November 12th, 2018
Posted by Joe

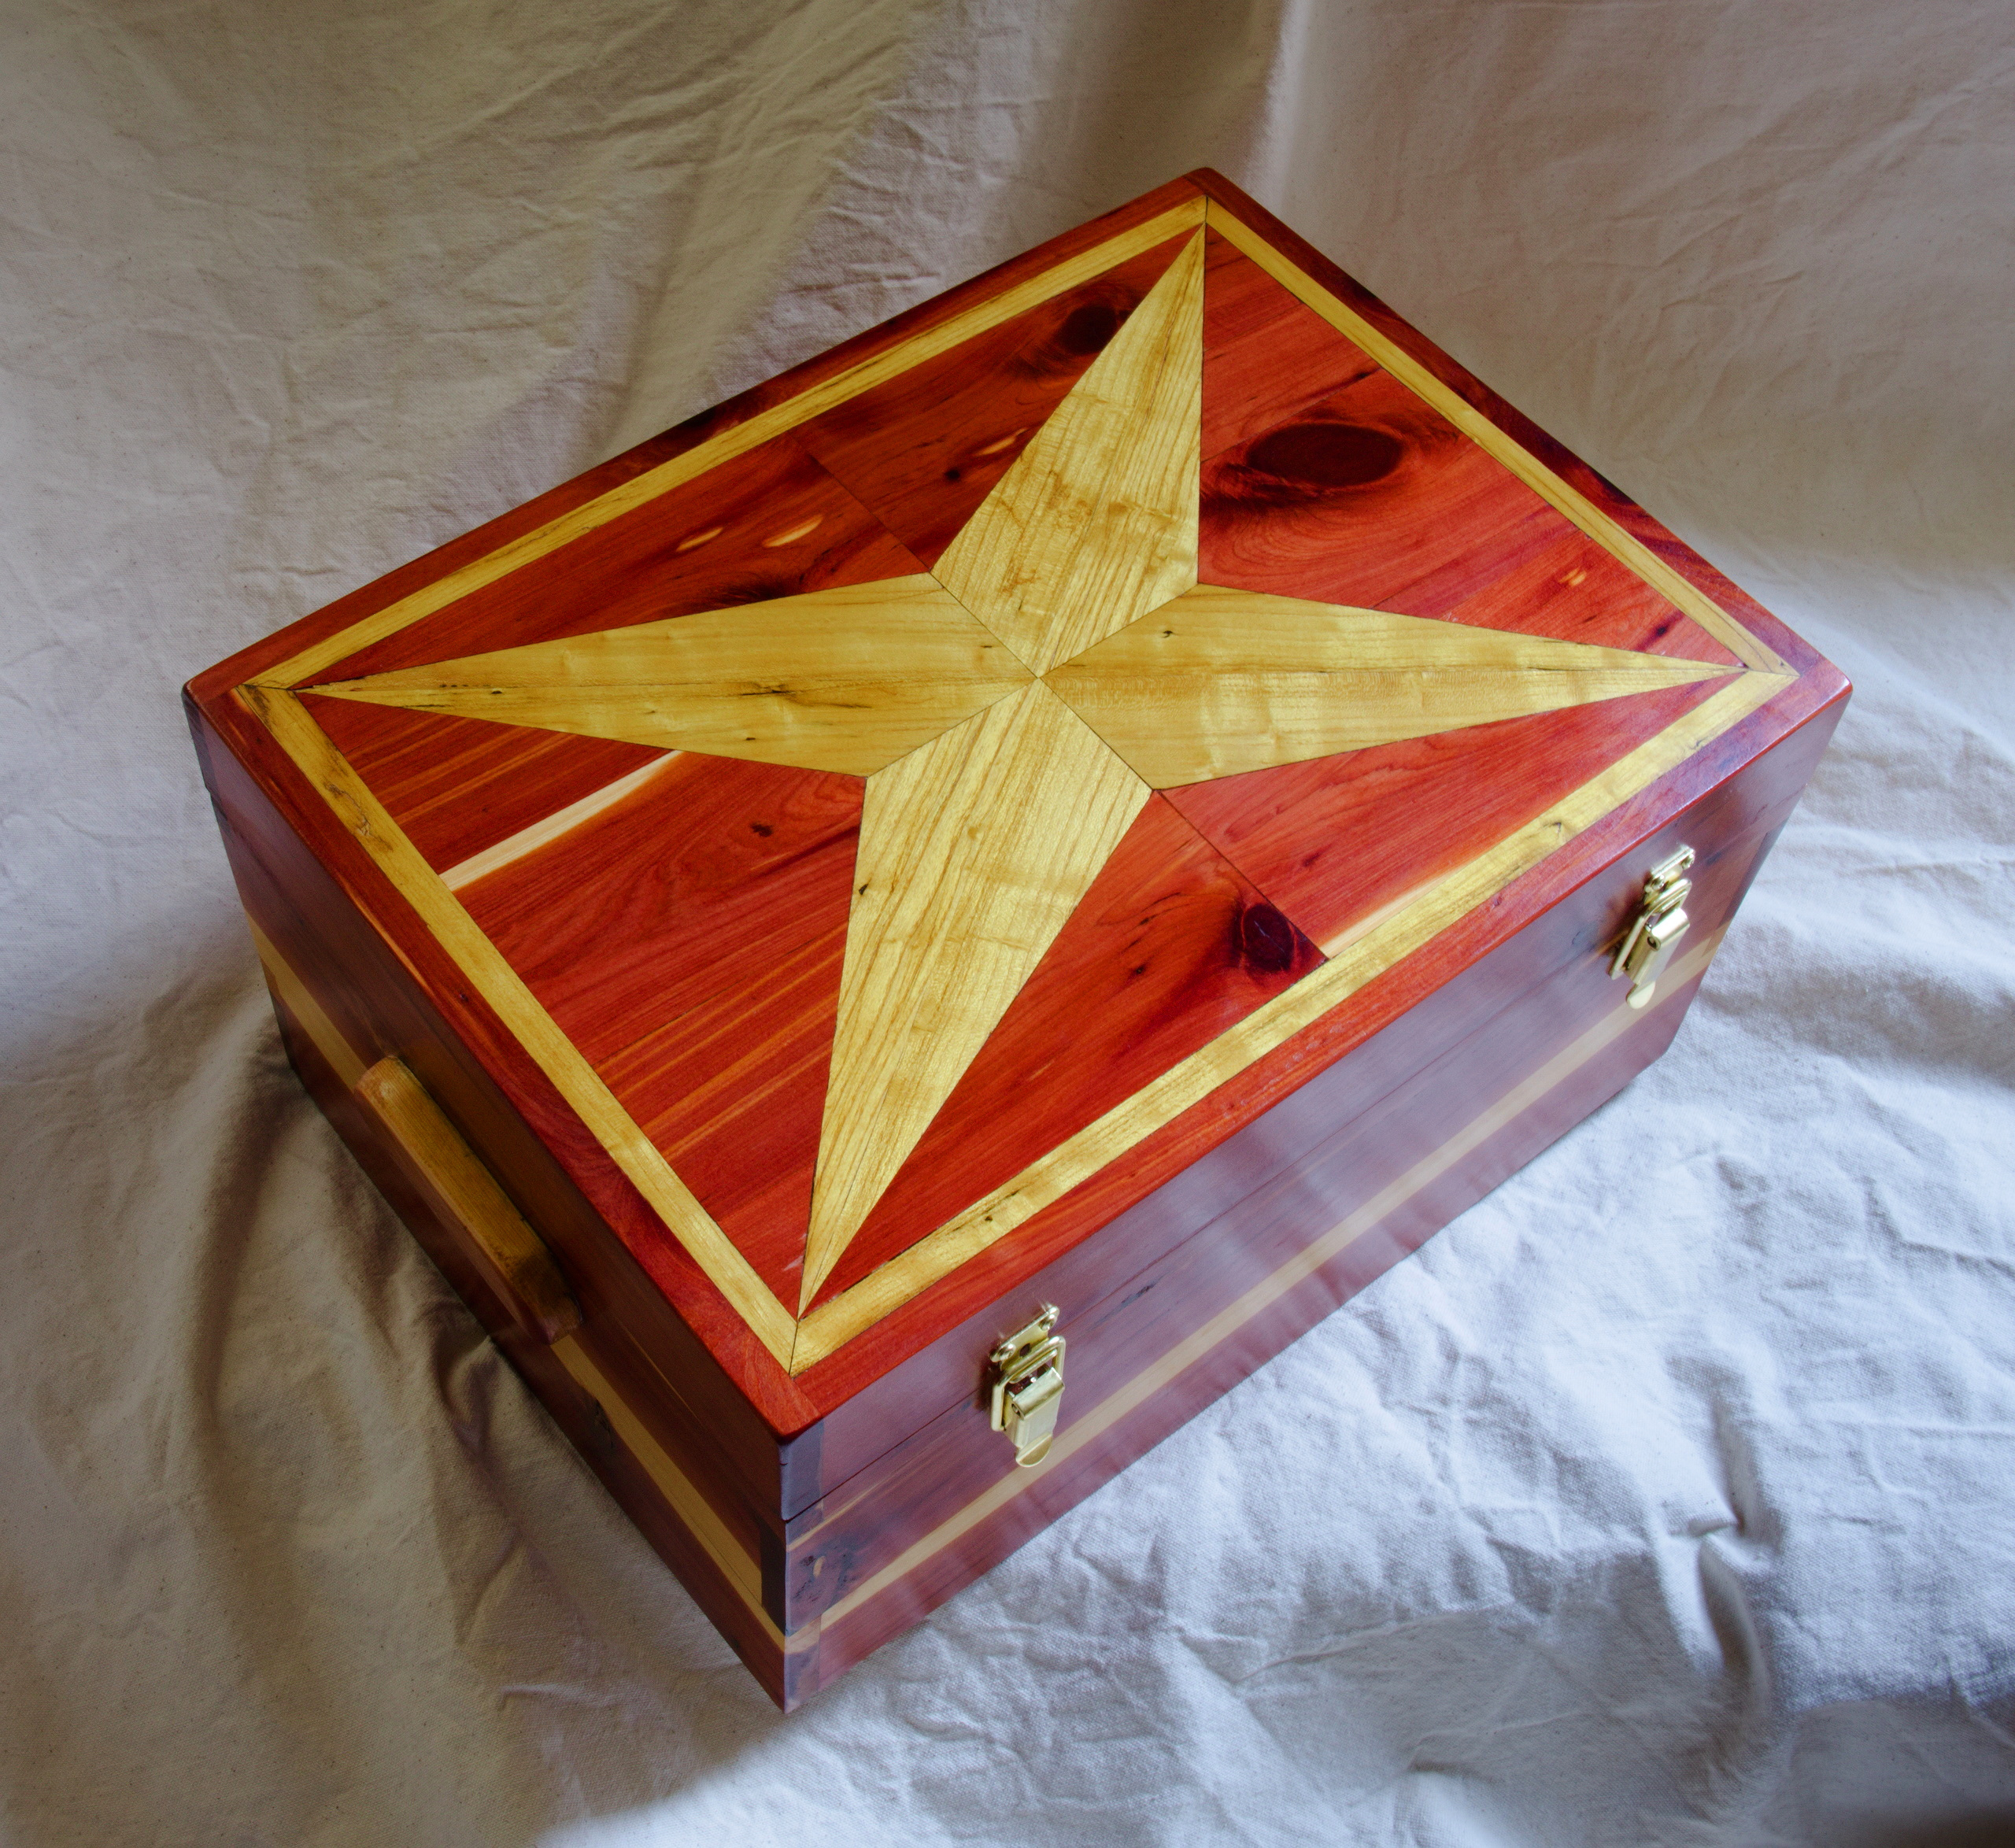
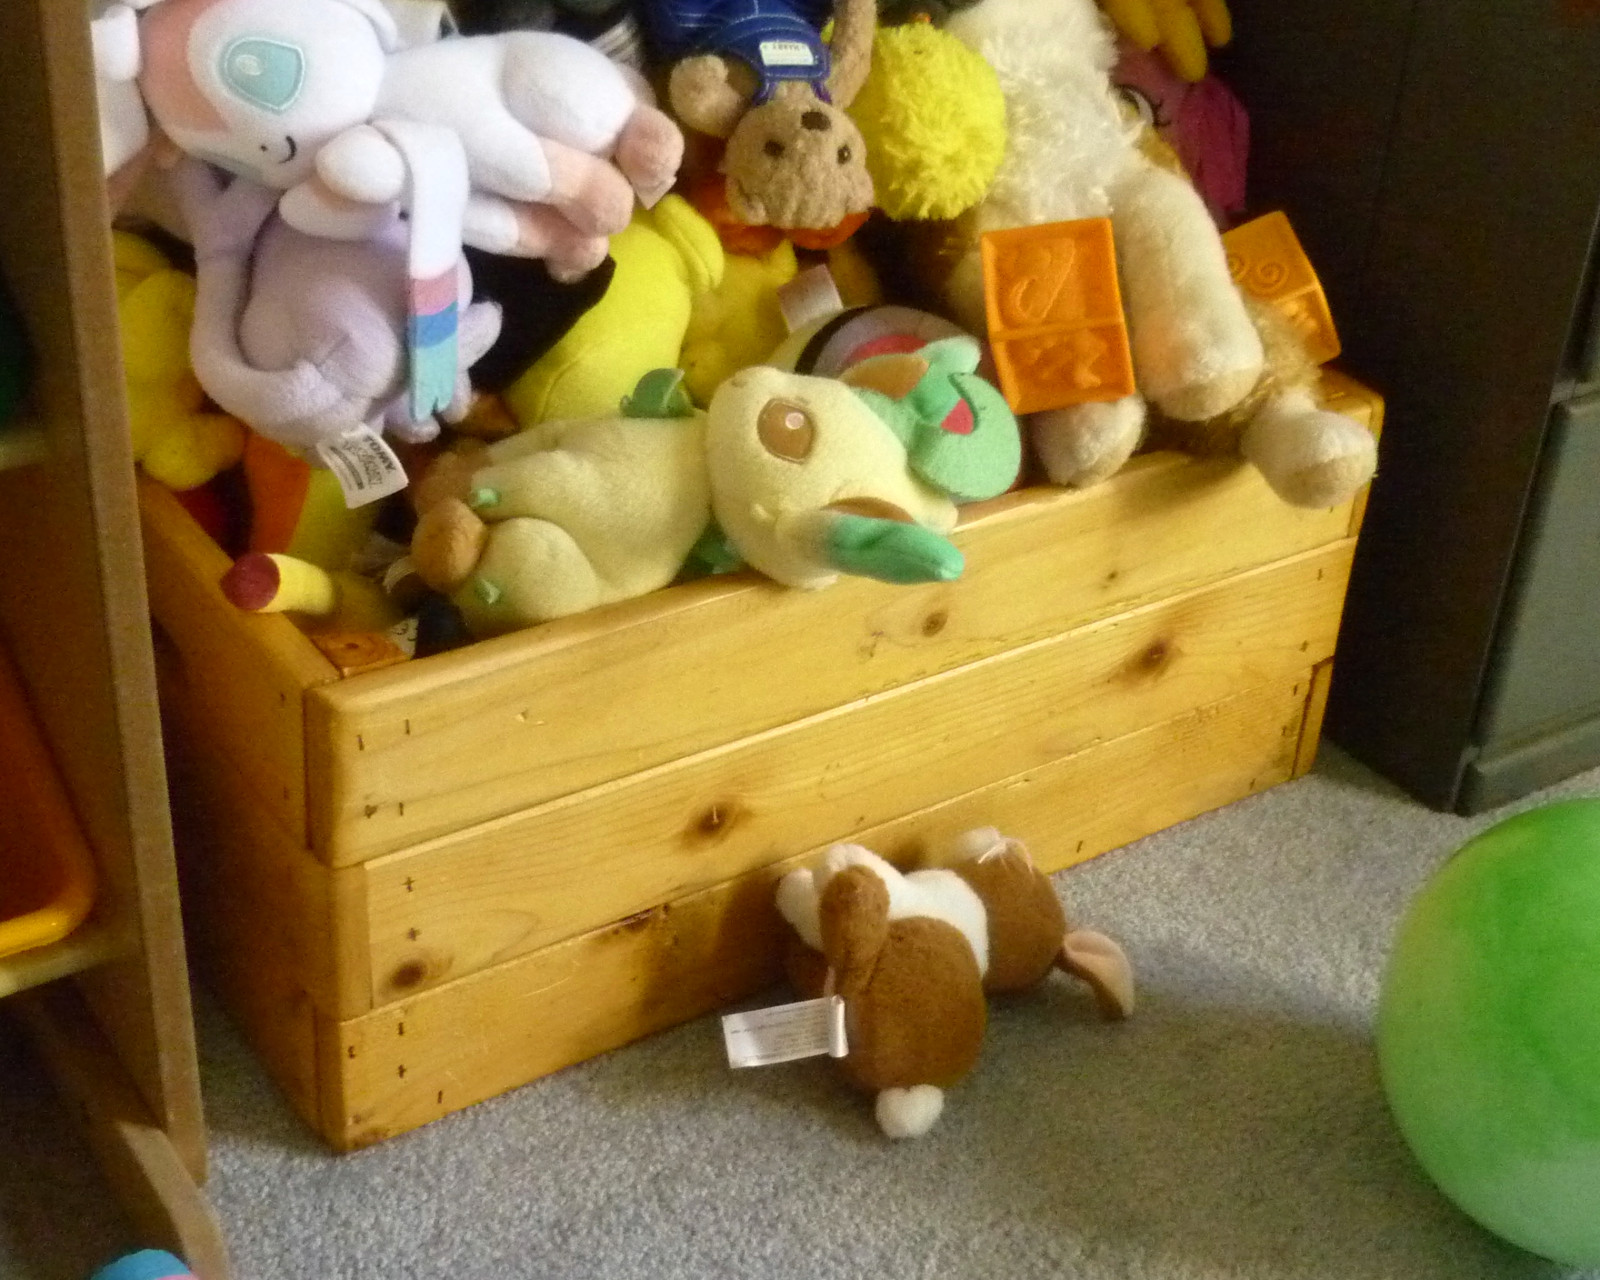
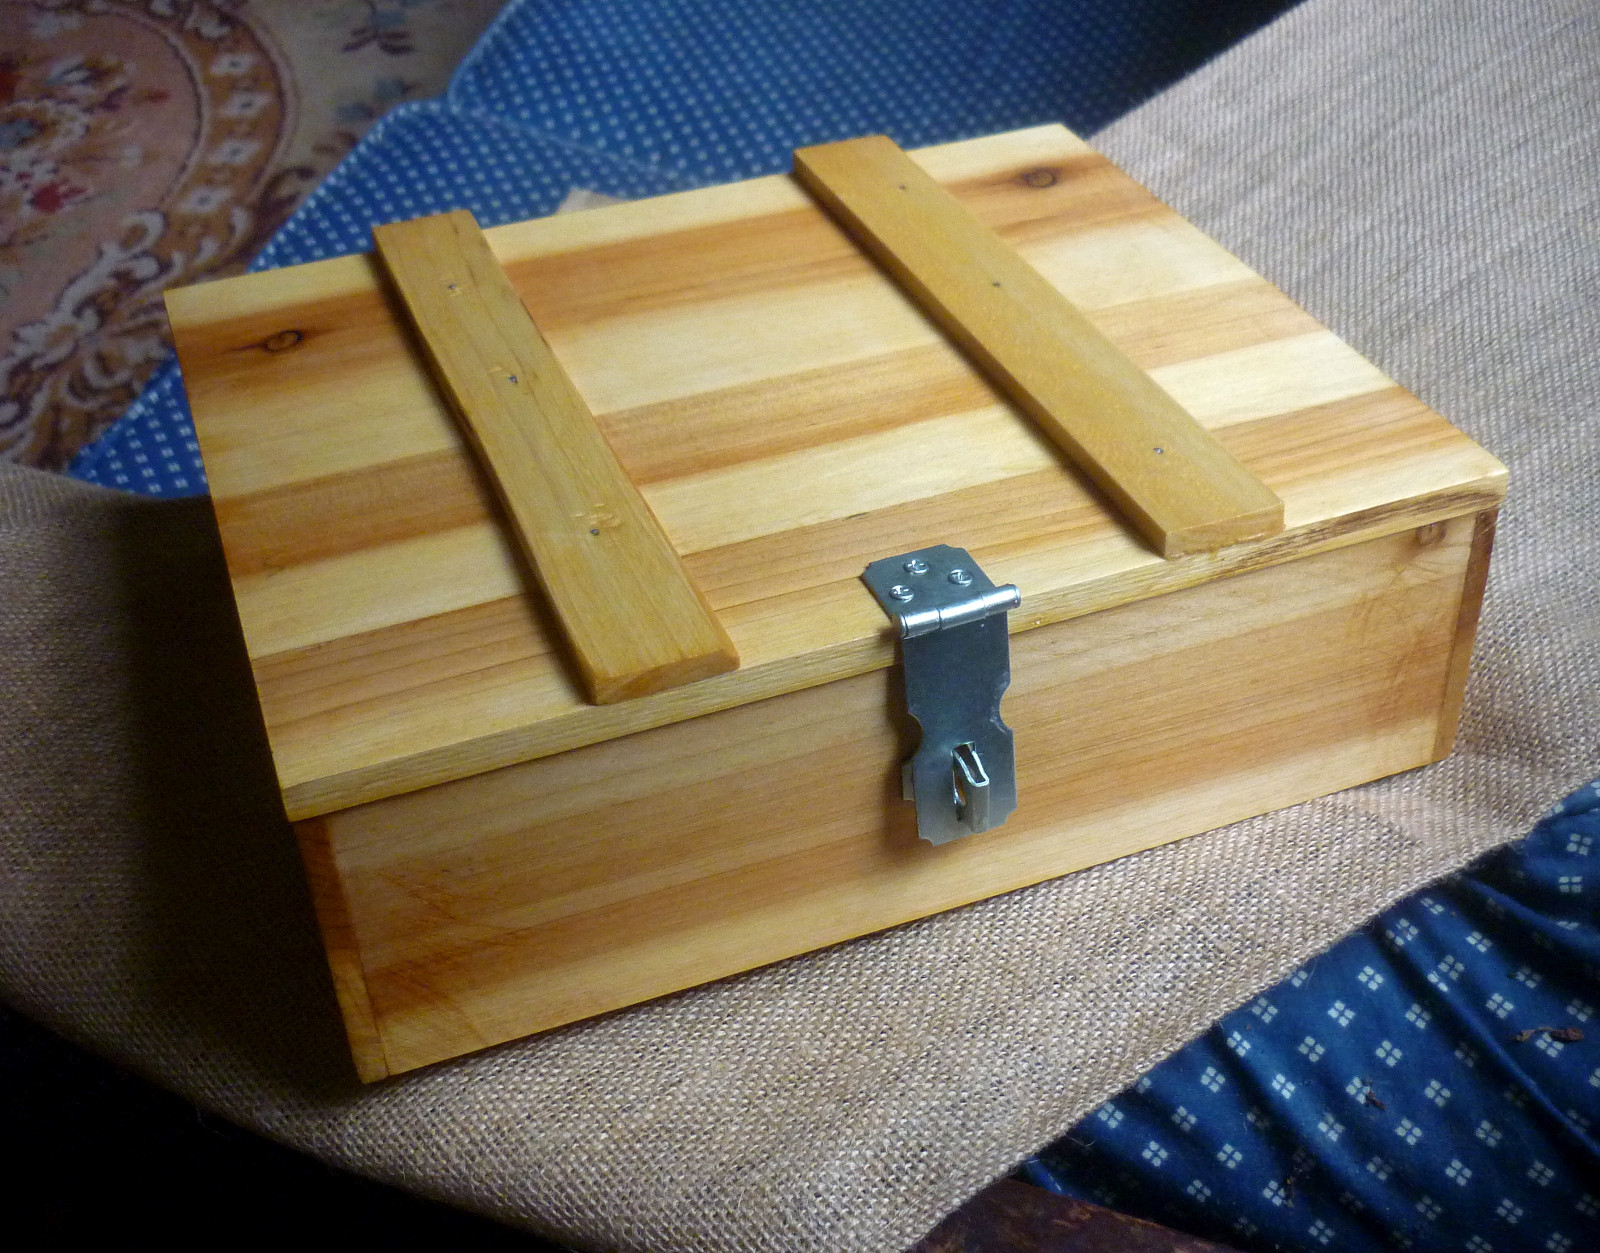
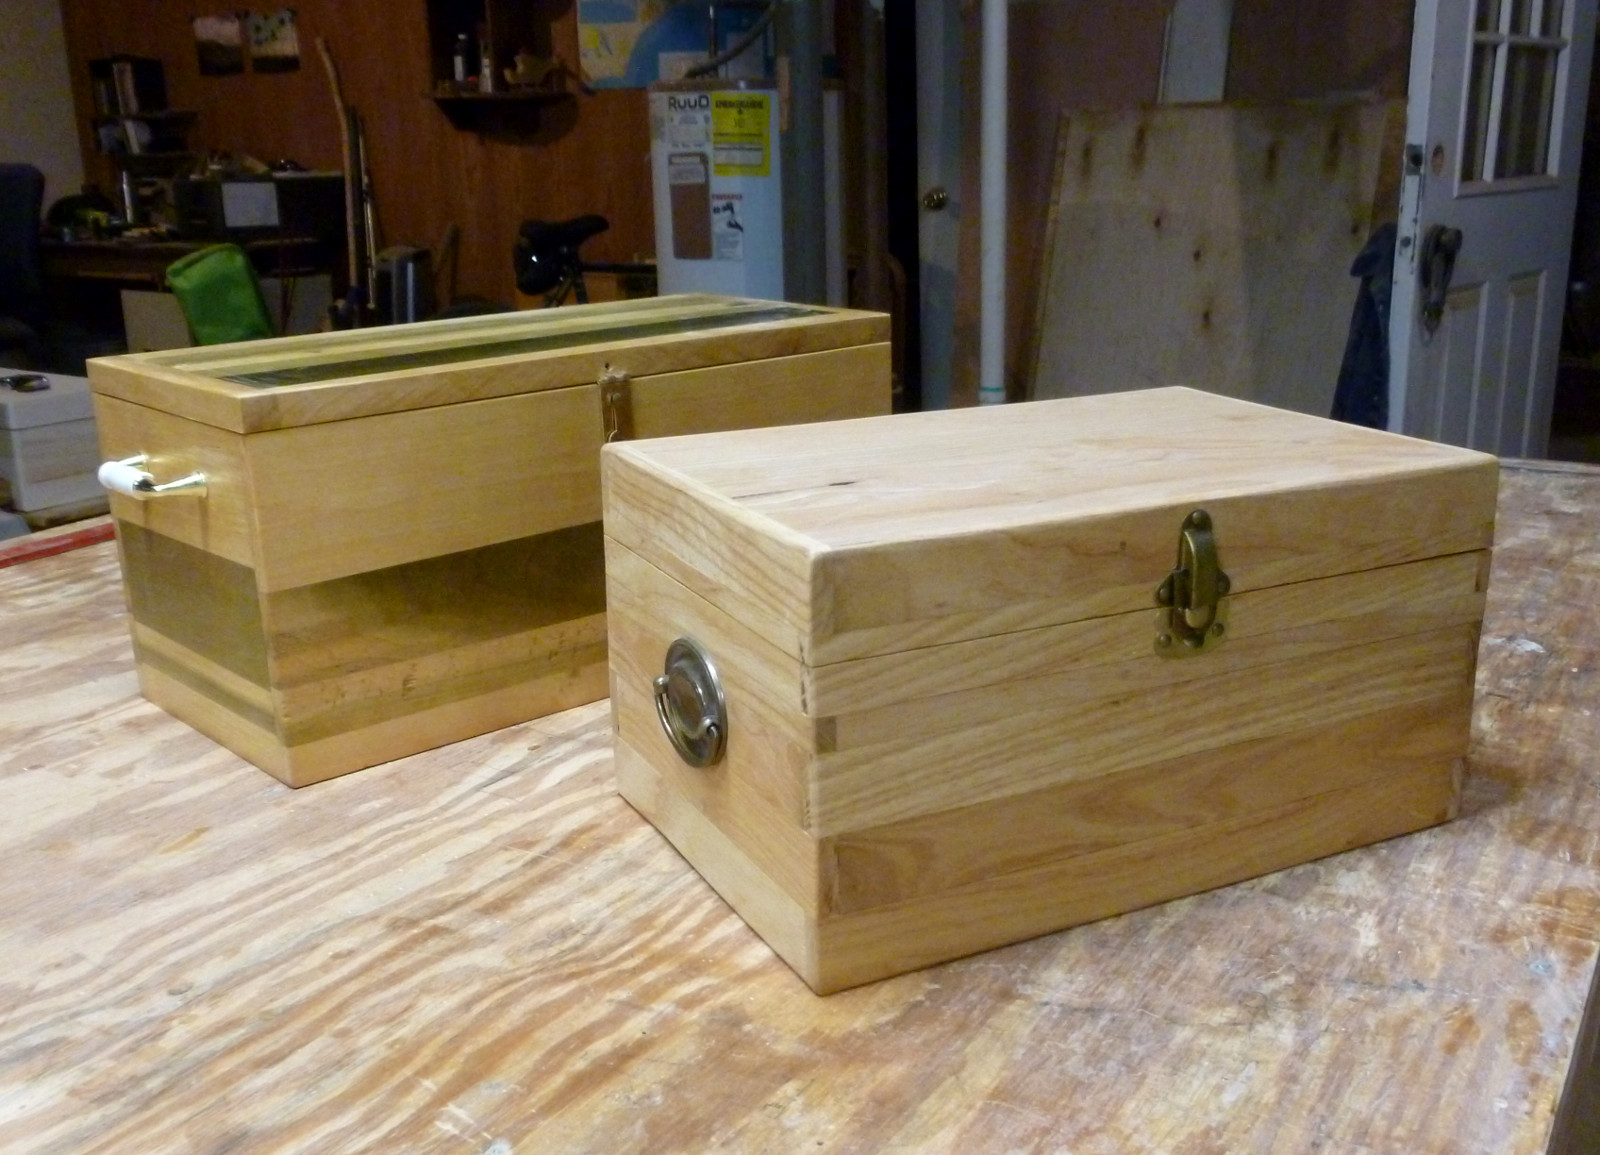
These five items were offered at auction this past weekend at the Celebration of Life Reunion to benefit the Jaycee Burn Center's aftercare programs. They all sold. I was very pleased at the outcome, even though Marcia bought the tea organizer tray. There was much interest in the douglas fir box and a kind of bidding war took place, that box went for nearly $100. I may have a commission to build another. We'll see.
November 9th, 2018
Posted by Paul

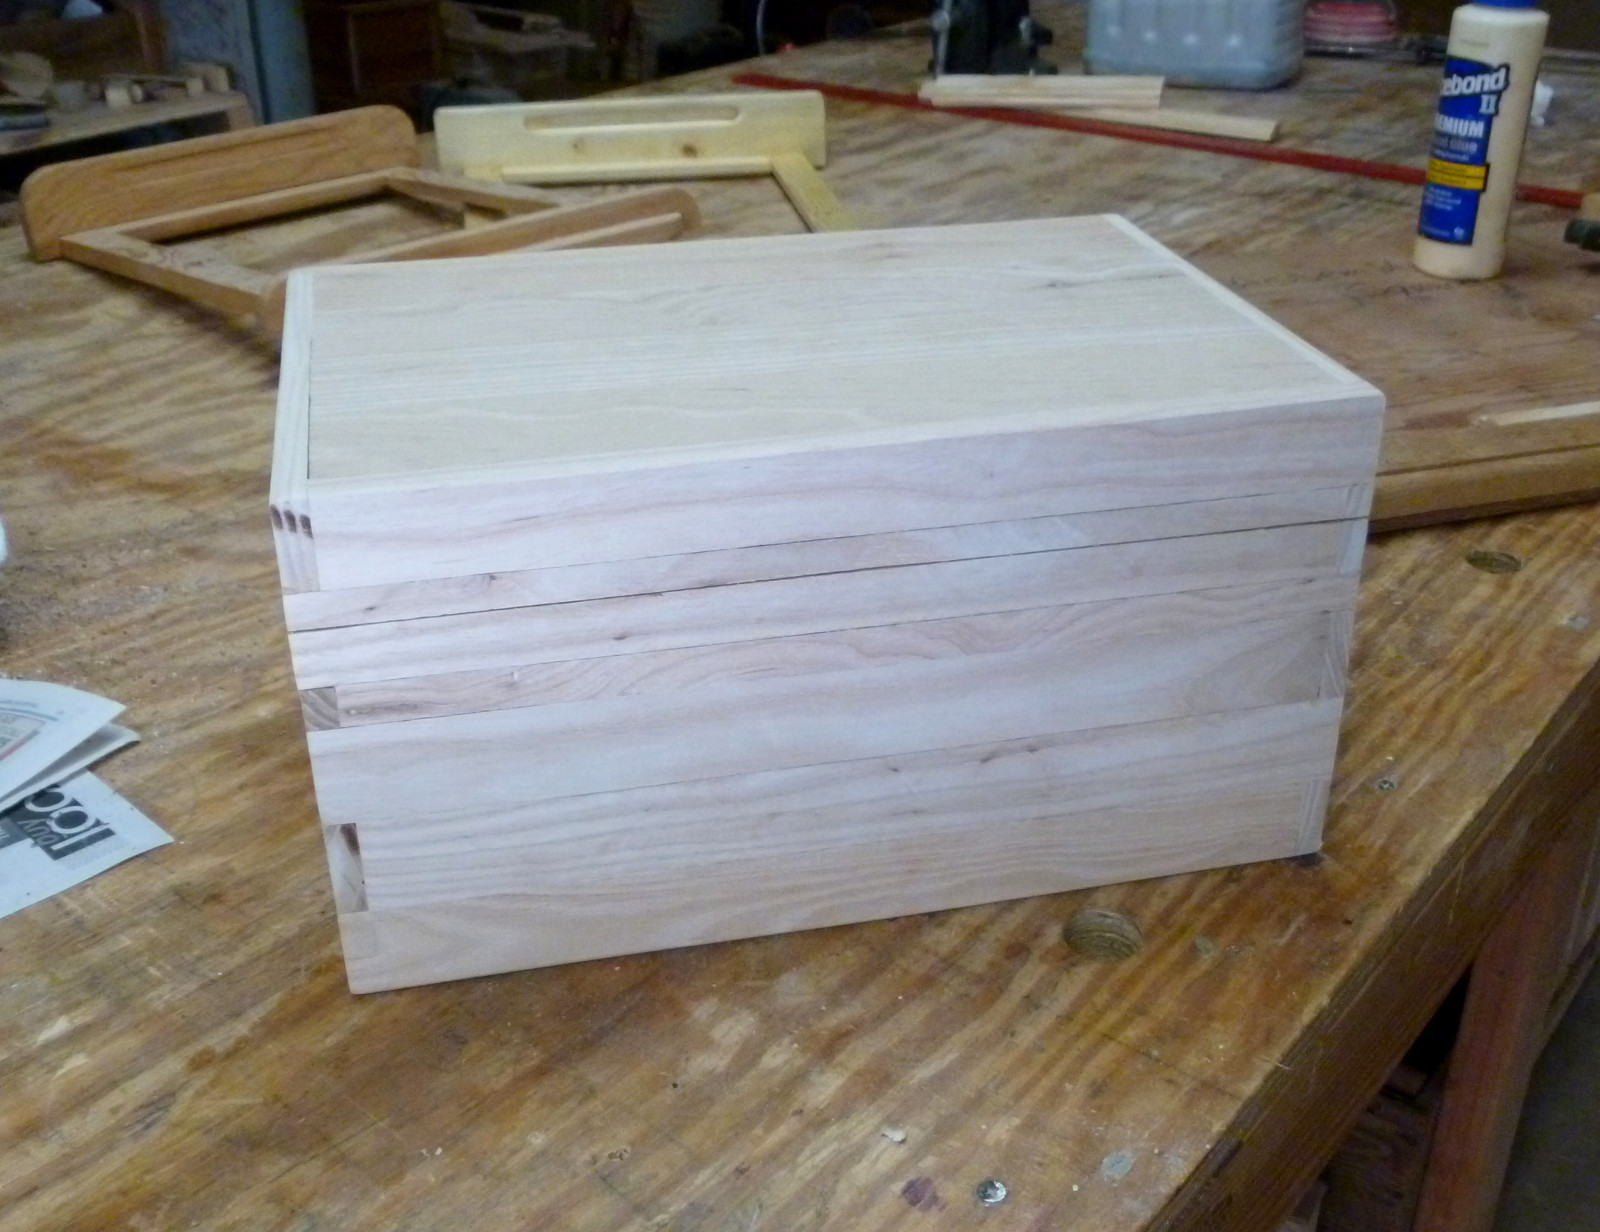
We completed another inlay-top box, this one of walnut with ash inlay. I really like the subtle colors. Just for fun, we sealed it with Minwax Sanding Sealer, and the picture shows how it raised the grain. Once it dries, we can sand it with 220 paper and coat with polyurethane for a really smooth, slick finish. That's the theory and we'll see how it works. There are all kinds of sealers and we have used several. Waterlox is good, and so is thinned polyurethane. If I remember correctly, we sealed my teak first-aid box with epoxy. I have used a thinned epoxy primer on exterior woodwork on my boat. So anything that will get down into the pores of the wood will work. Joe thinks the Sanding Sealer is just watered-down glue.
November 7th, 2018
Posted by Paul
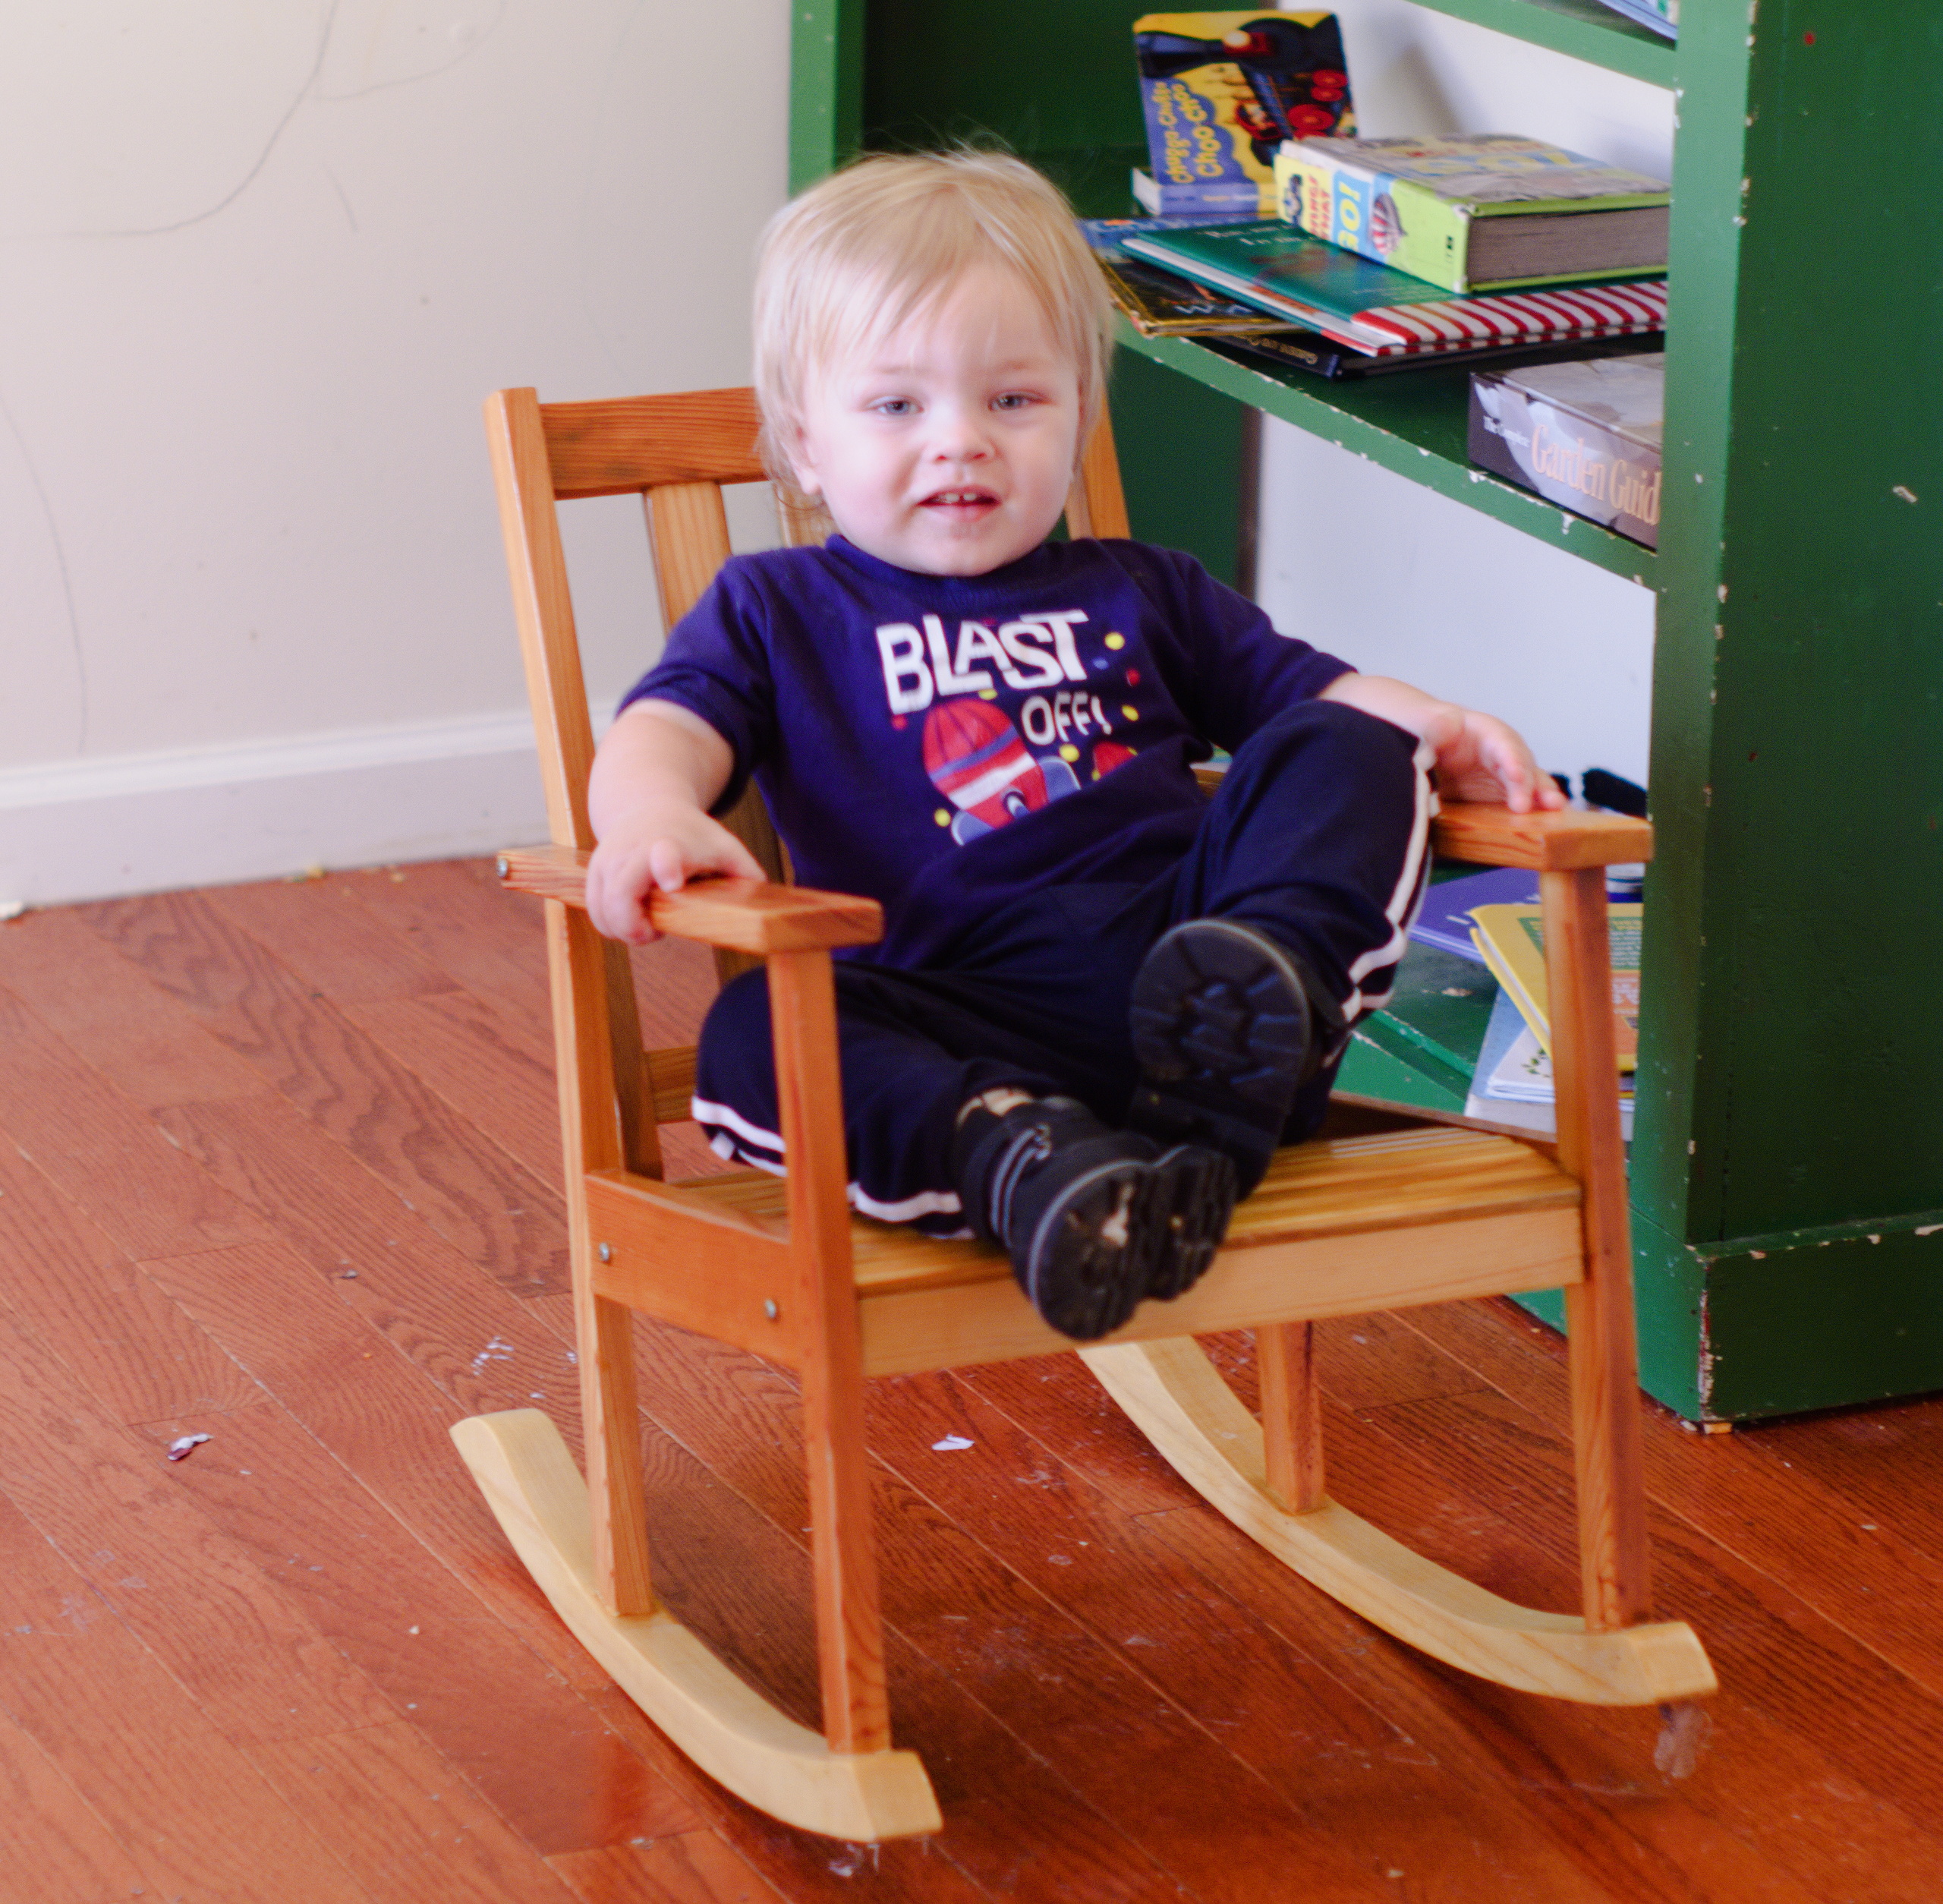
We built the rocker for Lars back in February of 2016, but he has practically outgrown it. Lex likes to sit in it, and surprisingly, Lars doesn't seem to mind. Lars is usually jealous about Lex using his stuff.
November 3rd, 2018
Posted by Paul

One of our first projects was this box built to the pattern of a Japanese toolbox, to carry larder supplies to my boat Valor, and store them onboard. My current boat, Terry Ann, has plenty of galley space to store groceries, but I still carry the box back and forth with things I need at home as well as on the boat. The box is built of cypress with simple joints and held together with cut nails that I bought from Tremont, the last manufacturer of them in America. The finish is starting to wear in places, but the box itself is just as solid as the day we finished it in November 2014.
October 31st, 2018
Posted by Paul

Recently, Marie asked us to build a couple of shelves for her bathroom. Here is one of them in use. One reason we like building for Marie is she always puts things to use. Nothing gets buried or pushed to the back of a closet.
October 7th, 2018
Posted by Paul

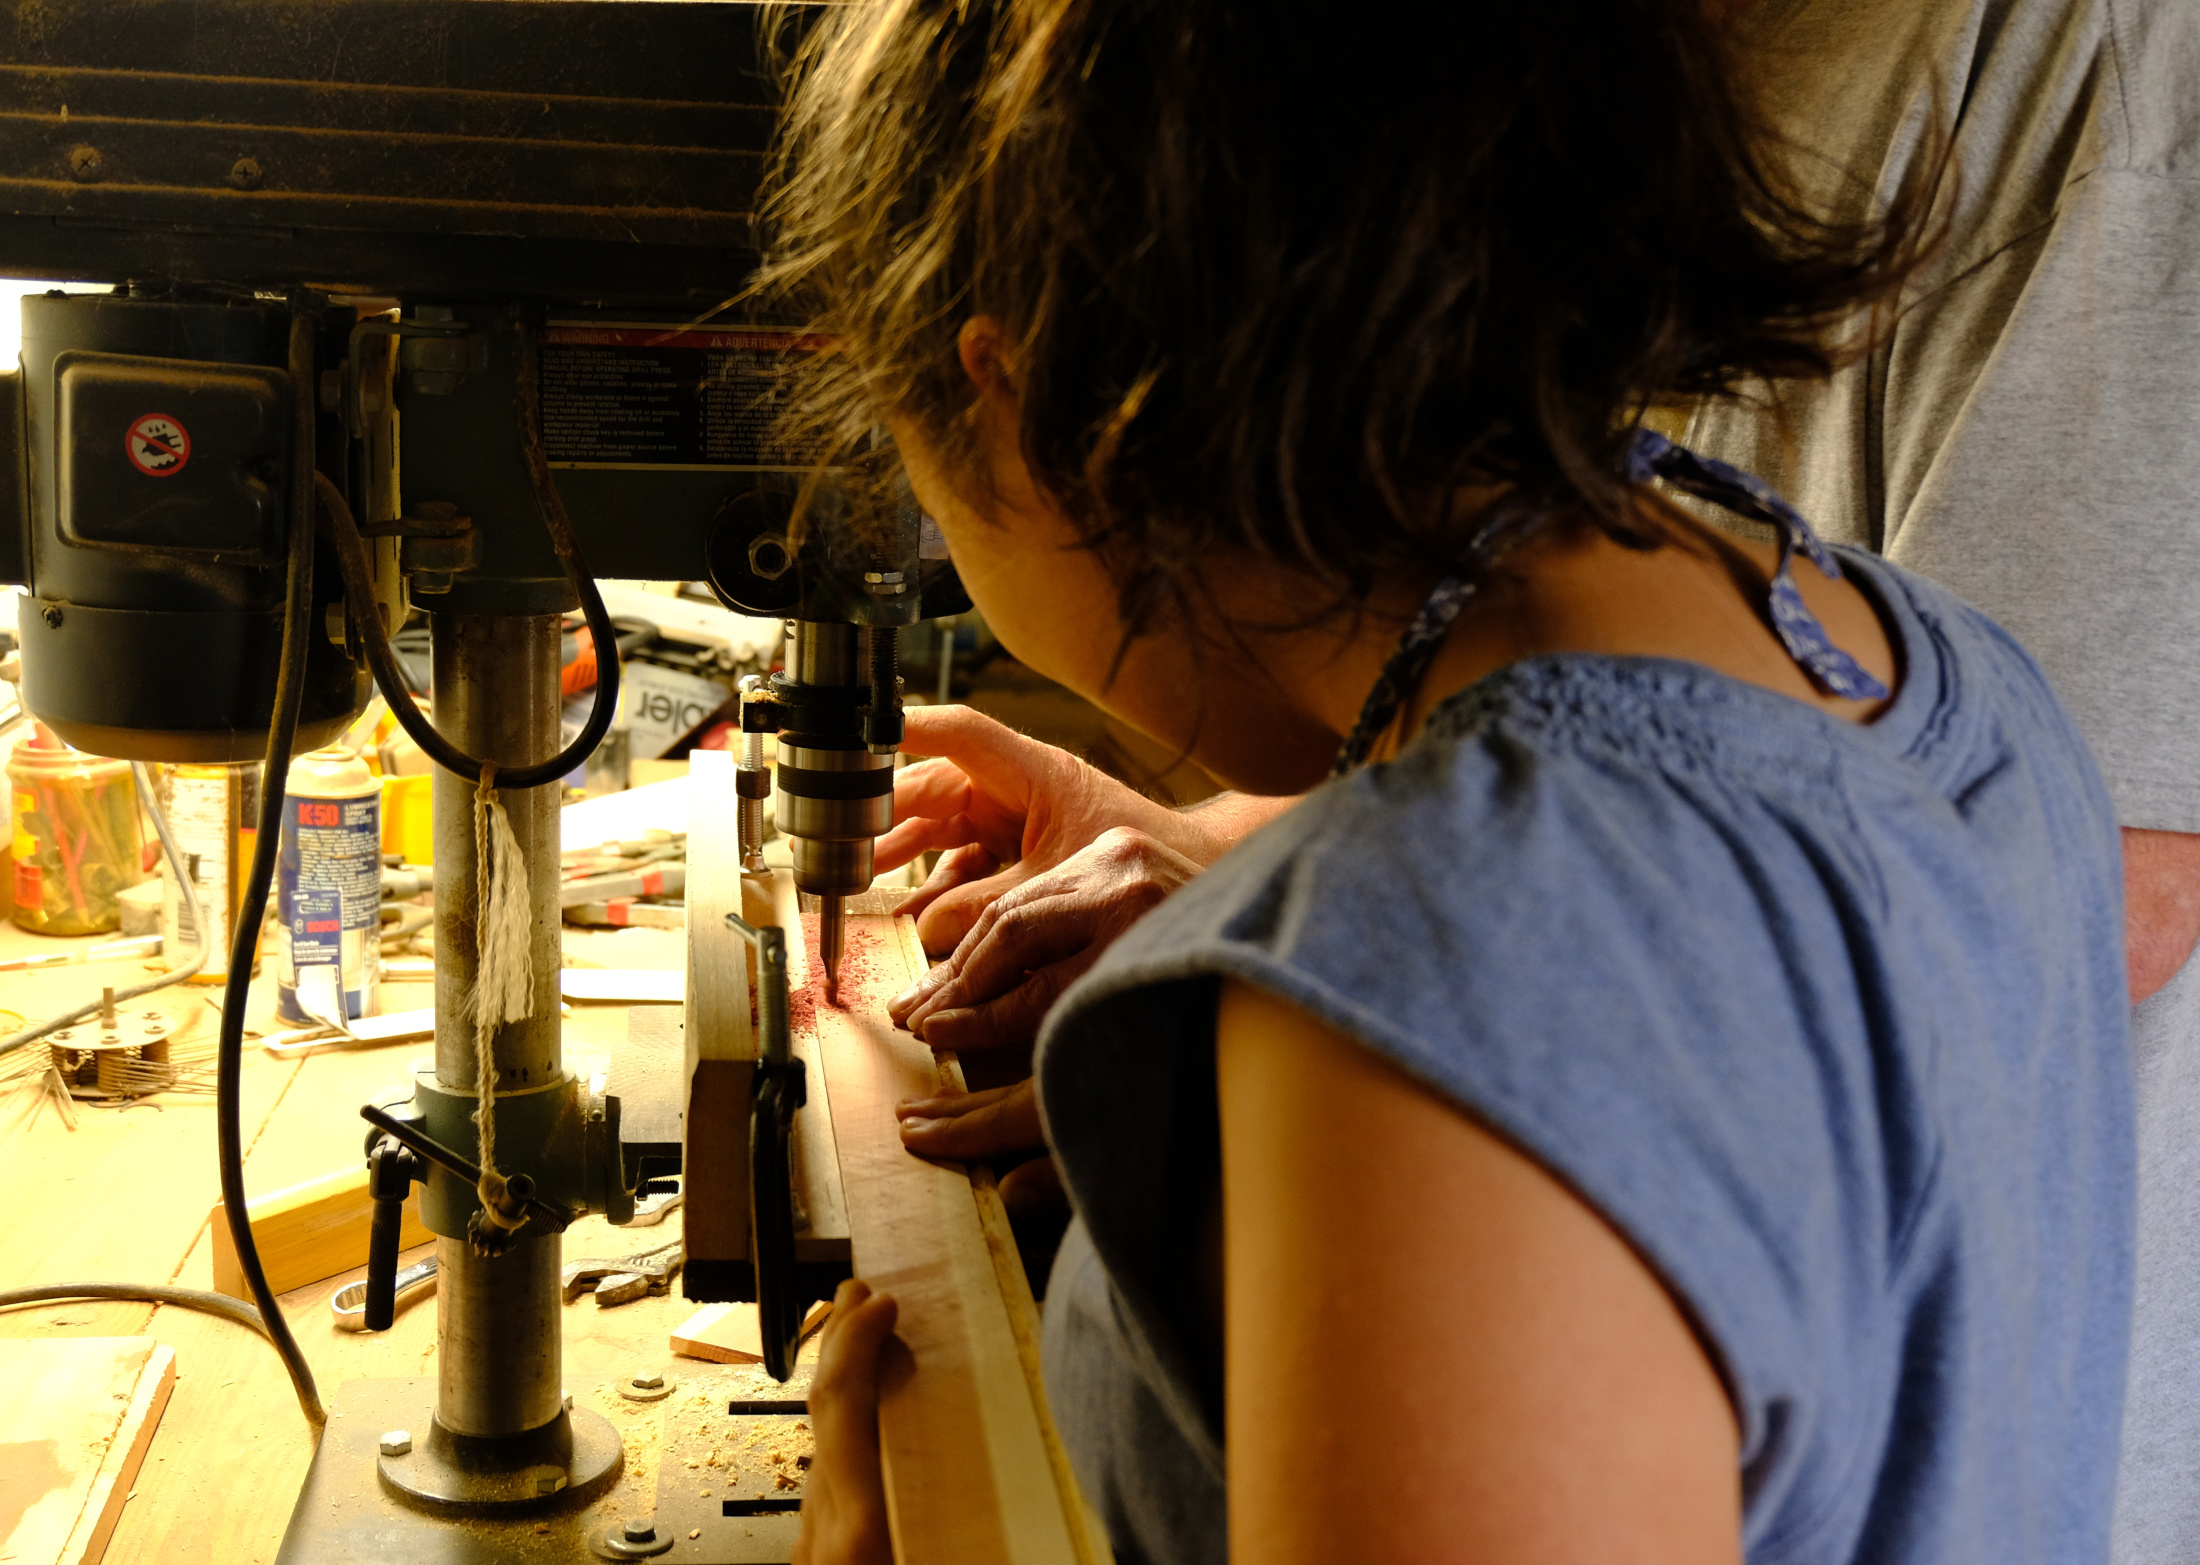
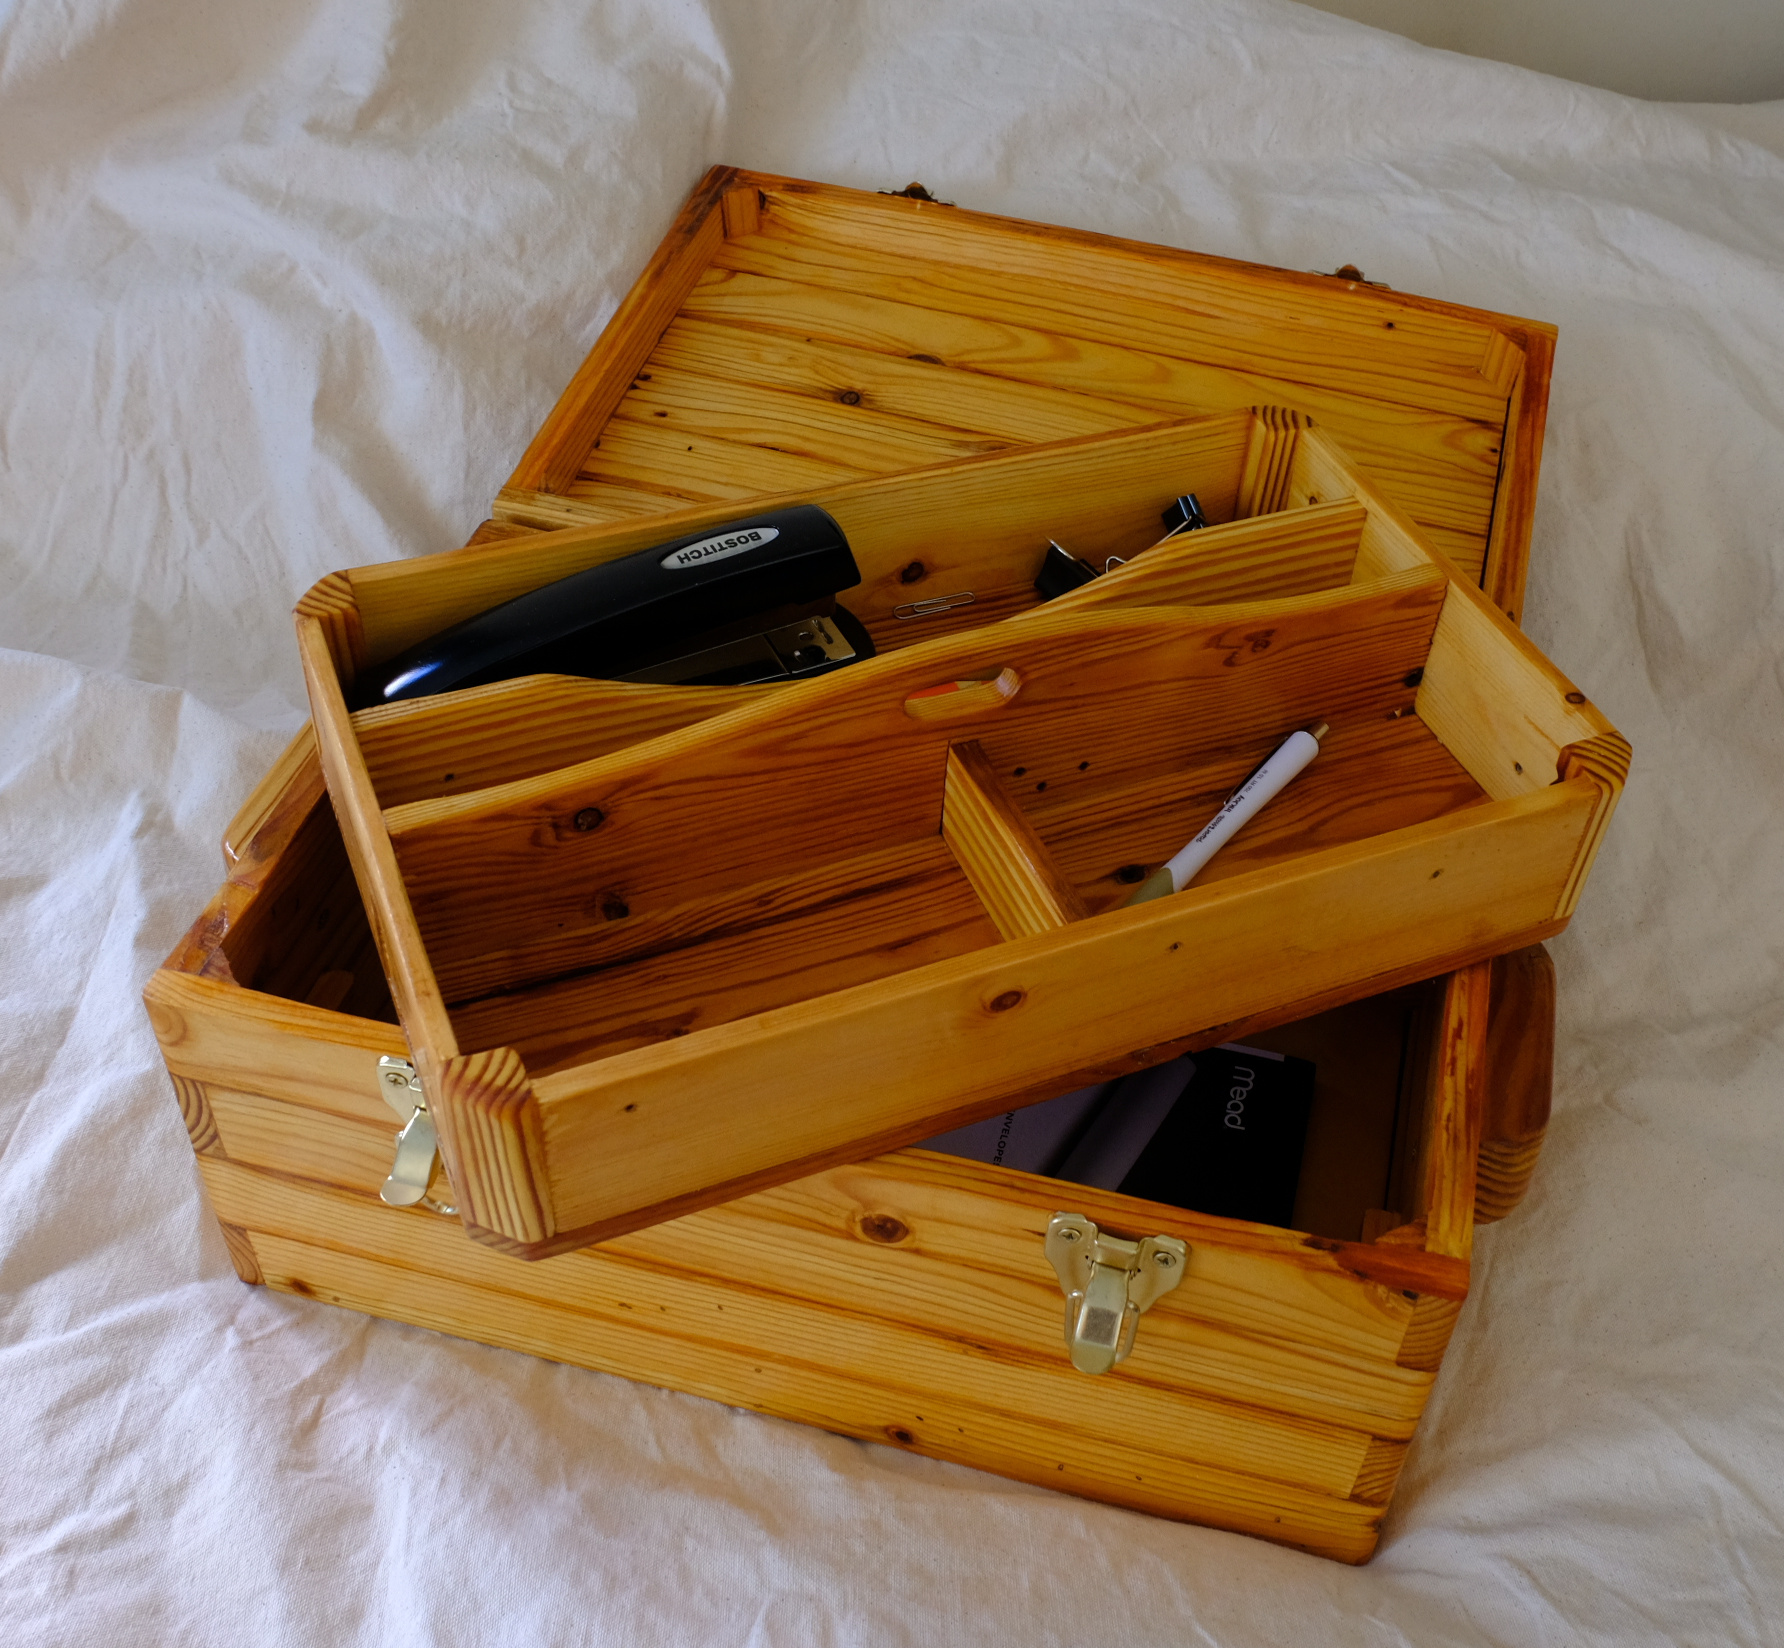
We got a small pack of quarter-inch curly maple at Wall Lumber and milled it out to build three small trays, patterned after the tea holder we made for Marie. I designed it to be easy and quick to build. One four inch wide board provided all the backs and fronts. The first step was to rabbet both sides of the board, then rip it down to the height of the backs. The remainder provided stock for the fronts. Then the lengths were chopped to make the three fronts and backs. A couple of passes on the ends of each part made the side rabbets. Then we cut the sides and dividers. I designed the sides to ride over the bottom rather than rabbet them so that all twelve pieces - two sides and two dividers per box - could be the same. Joe cut the slopes on the chop saw. This was the only difficult part, but Joe set up a simple jig and got it done. The bottoms had to be glued up as the stock wasn't quite wide enough. Assembly of the first two was fairly easy using the assembly square and some shims under the sides and dividers to keep them flush with the top. The third one is still in parts.
I took the first tray home and finished it with four coats of rub-on poly and a coat of wax. When I left the shop, the second one had come out of the clamps and was ready for filling and sanding, and the third one was ready to be glued up. The one I took is earmarked for a friend, and the other two I am hoping Joe can dispose of. All else fails, they can go to the next Firefighters sale.
October 4th, 2018
Posted by Paul
We have started a big project, a kitchen hutch for Marie. It will be frame and panel construction, with lots of mortises and tenons. Wall Lumber had a special on cherry, 100 board feet for $200, plus $25 to finish it 2s, and this project will probably use about half of it. Last week we fabricated the corner posts for the cabinet. Today we made stiles and glued up one of the panels. I expect this project to take some time, and we are working on some smaller ones simultaneously. We are completing three small trays, similar to the tea holder we made for Marie some time back, and in the first stages of making another box, walnut with ash inlay in the top. I have a boat project too, a companionway drop board with a lexan window. We did a test to see if we could adhere lexan to wood with epoxy, and it worked well.
September 27th, 2018
Posted by Paul
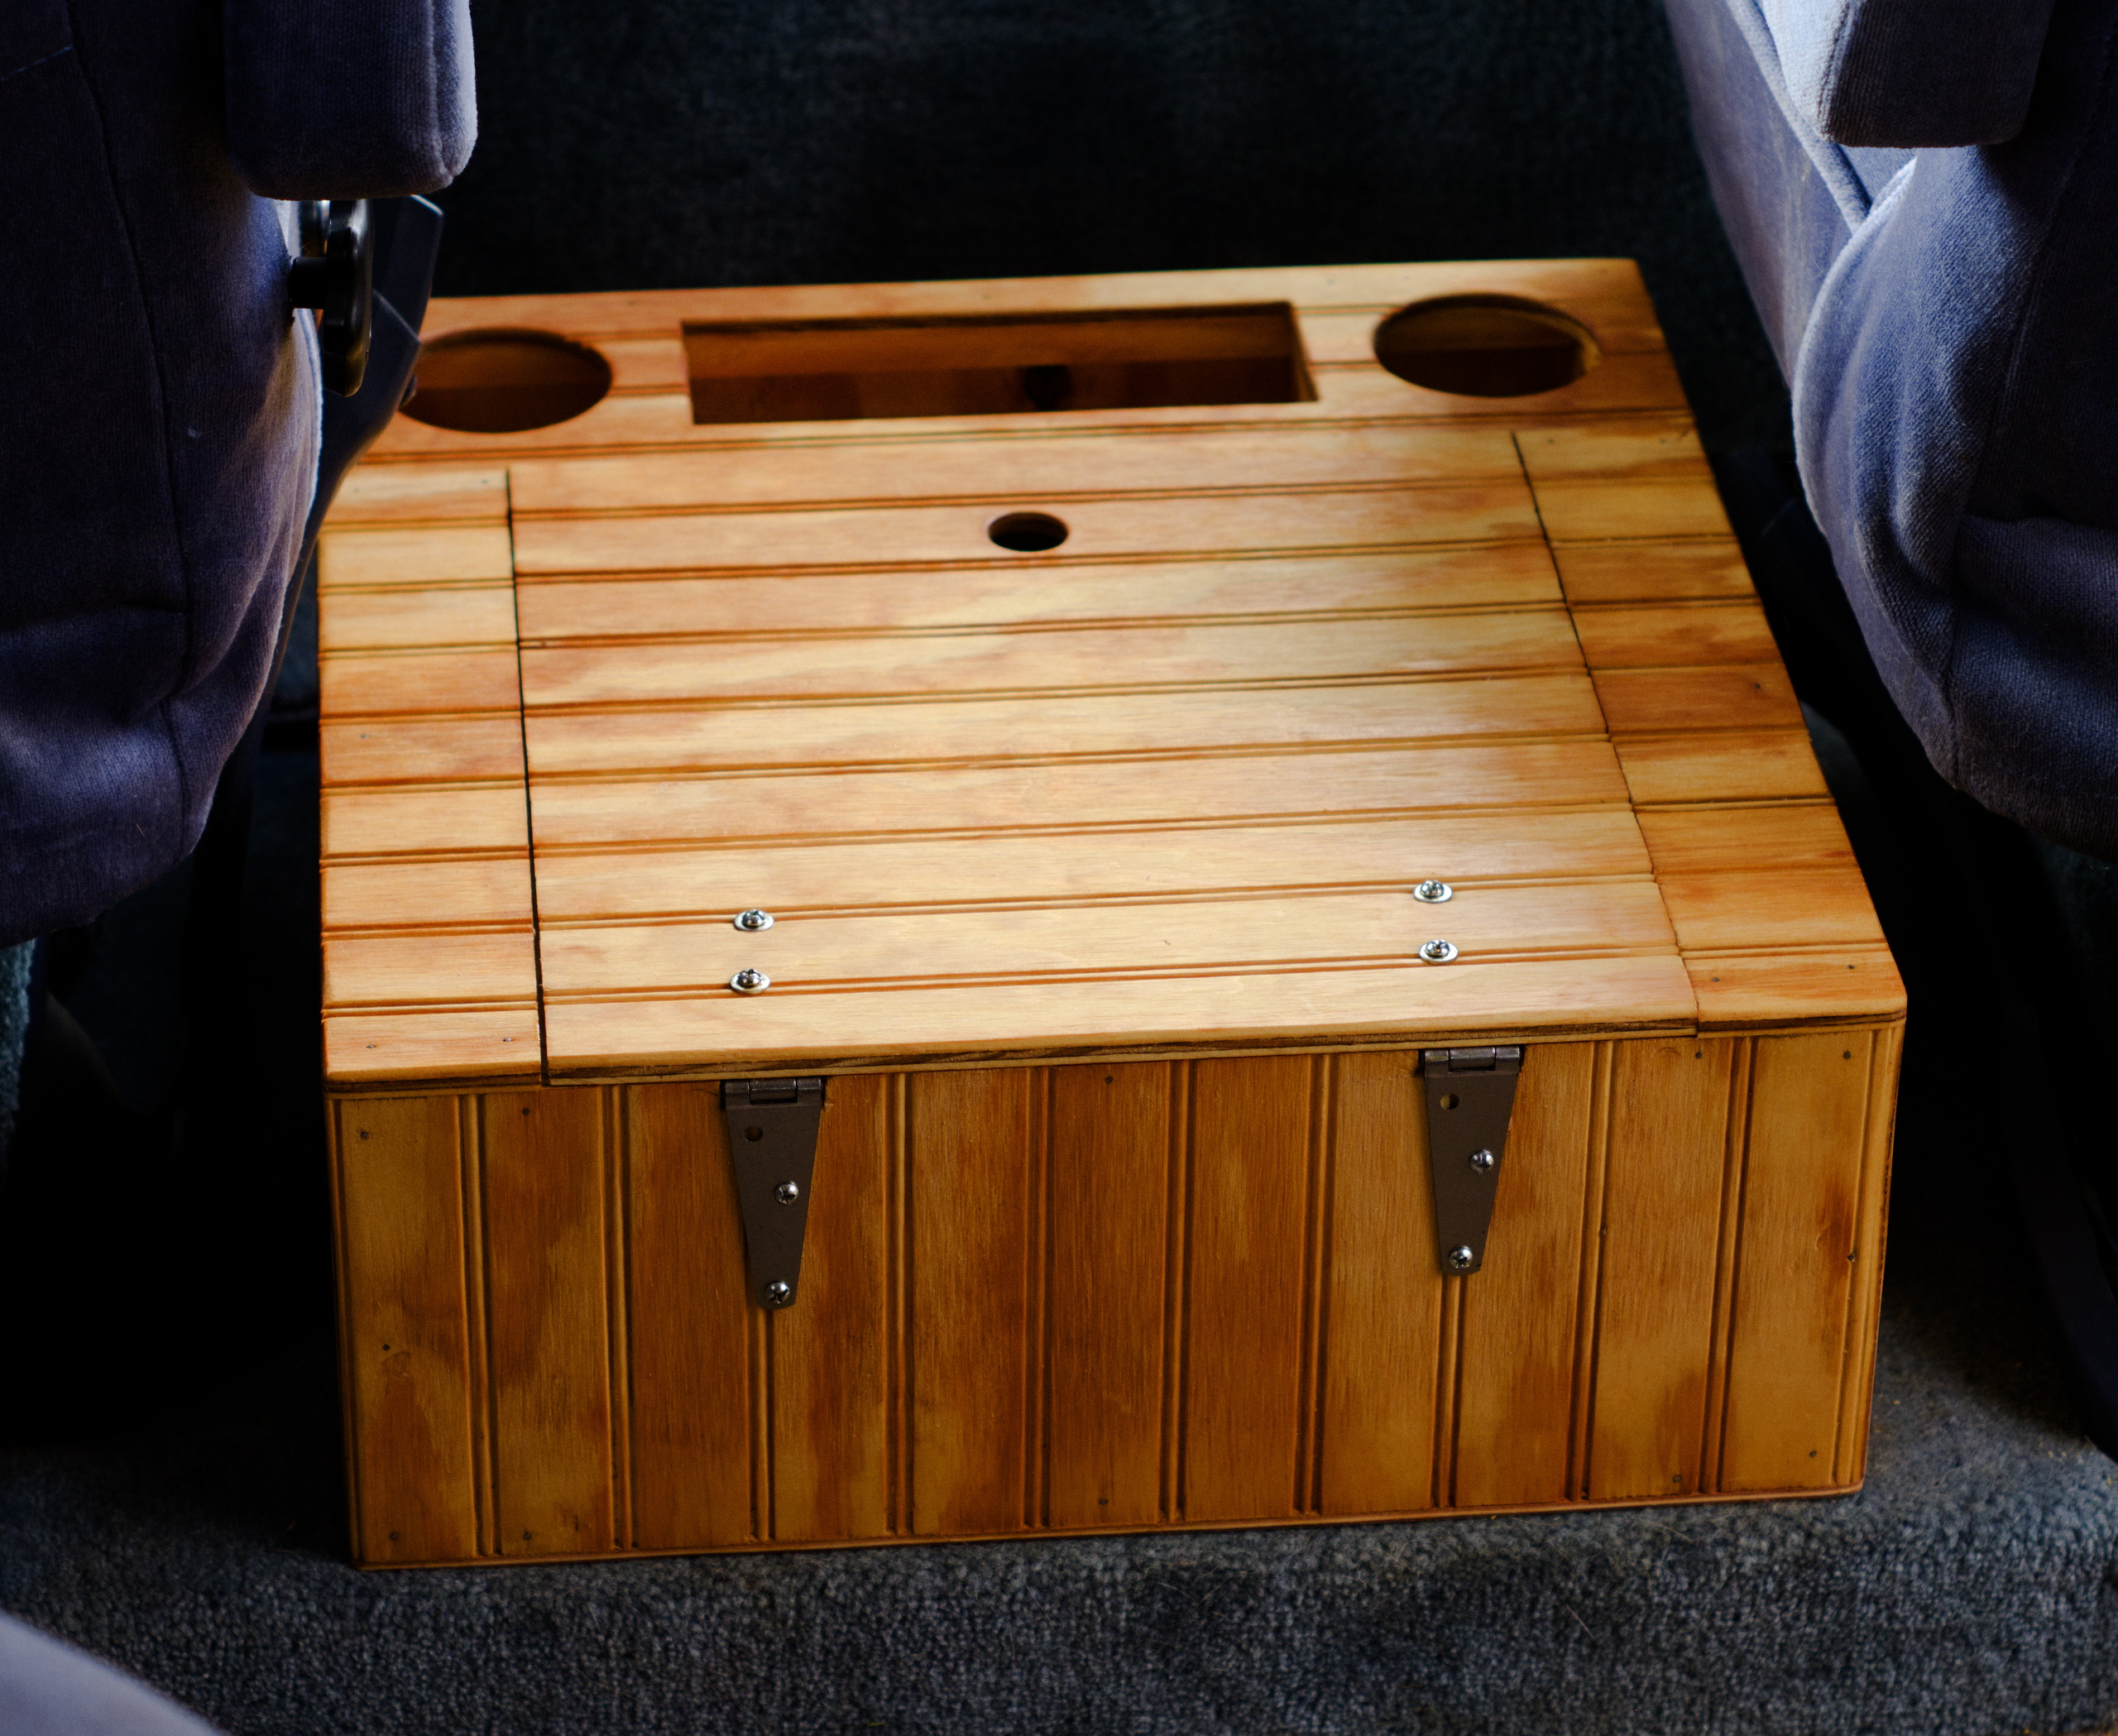
Joe and Marcia have a nice Dodge camper conversion van that they take on the road a couple of times a year. Joe built this box to go between the front seats and provide convenient storage. It has cup-holders and a space to store wallets or cell-phones, and under the lid, a drawer for paperwork and a bin for larger items. It's another good example of the kind of utility work that makes life easier.
September 23rd, 2018
Posted by Paul

Utility work. It's good to be able to make simple things like this tray. All it took was an hour of time and some dimensioned lumber left over from another project. We built this to make storage on my boat more efficient. I have a deep drawer in the forepeak. I keep mechanic's tools in it. They all end up in a jumble in the bottom of the drawer. I will glue four posts in the corners of the drawer, and the tray will ride on the posts. Hammers and big wrenches will go in the bottom of the drawer, and tool rolls, screwdrivers and sockets will go in the tray. It will make it easier for me to put my hand on the tool I need.
September 9th, 2018
Posted by Joe

We like to see how pieces look after time passes because everything ages differently. Here is a look at the treasure chest that we made for Katie a few years ago.
September 4th, 2018
Posted by Paul
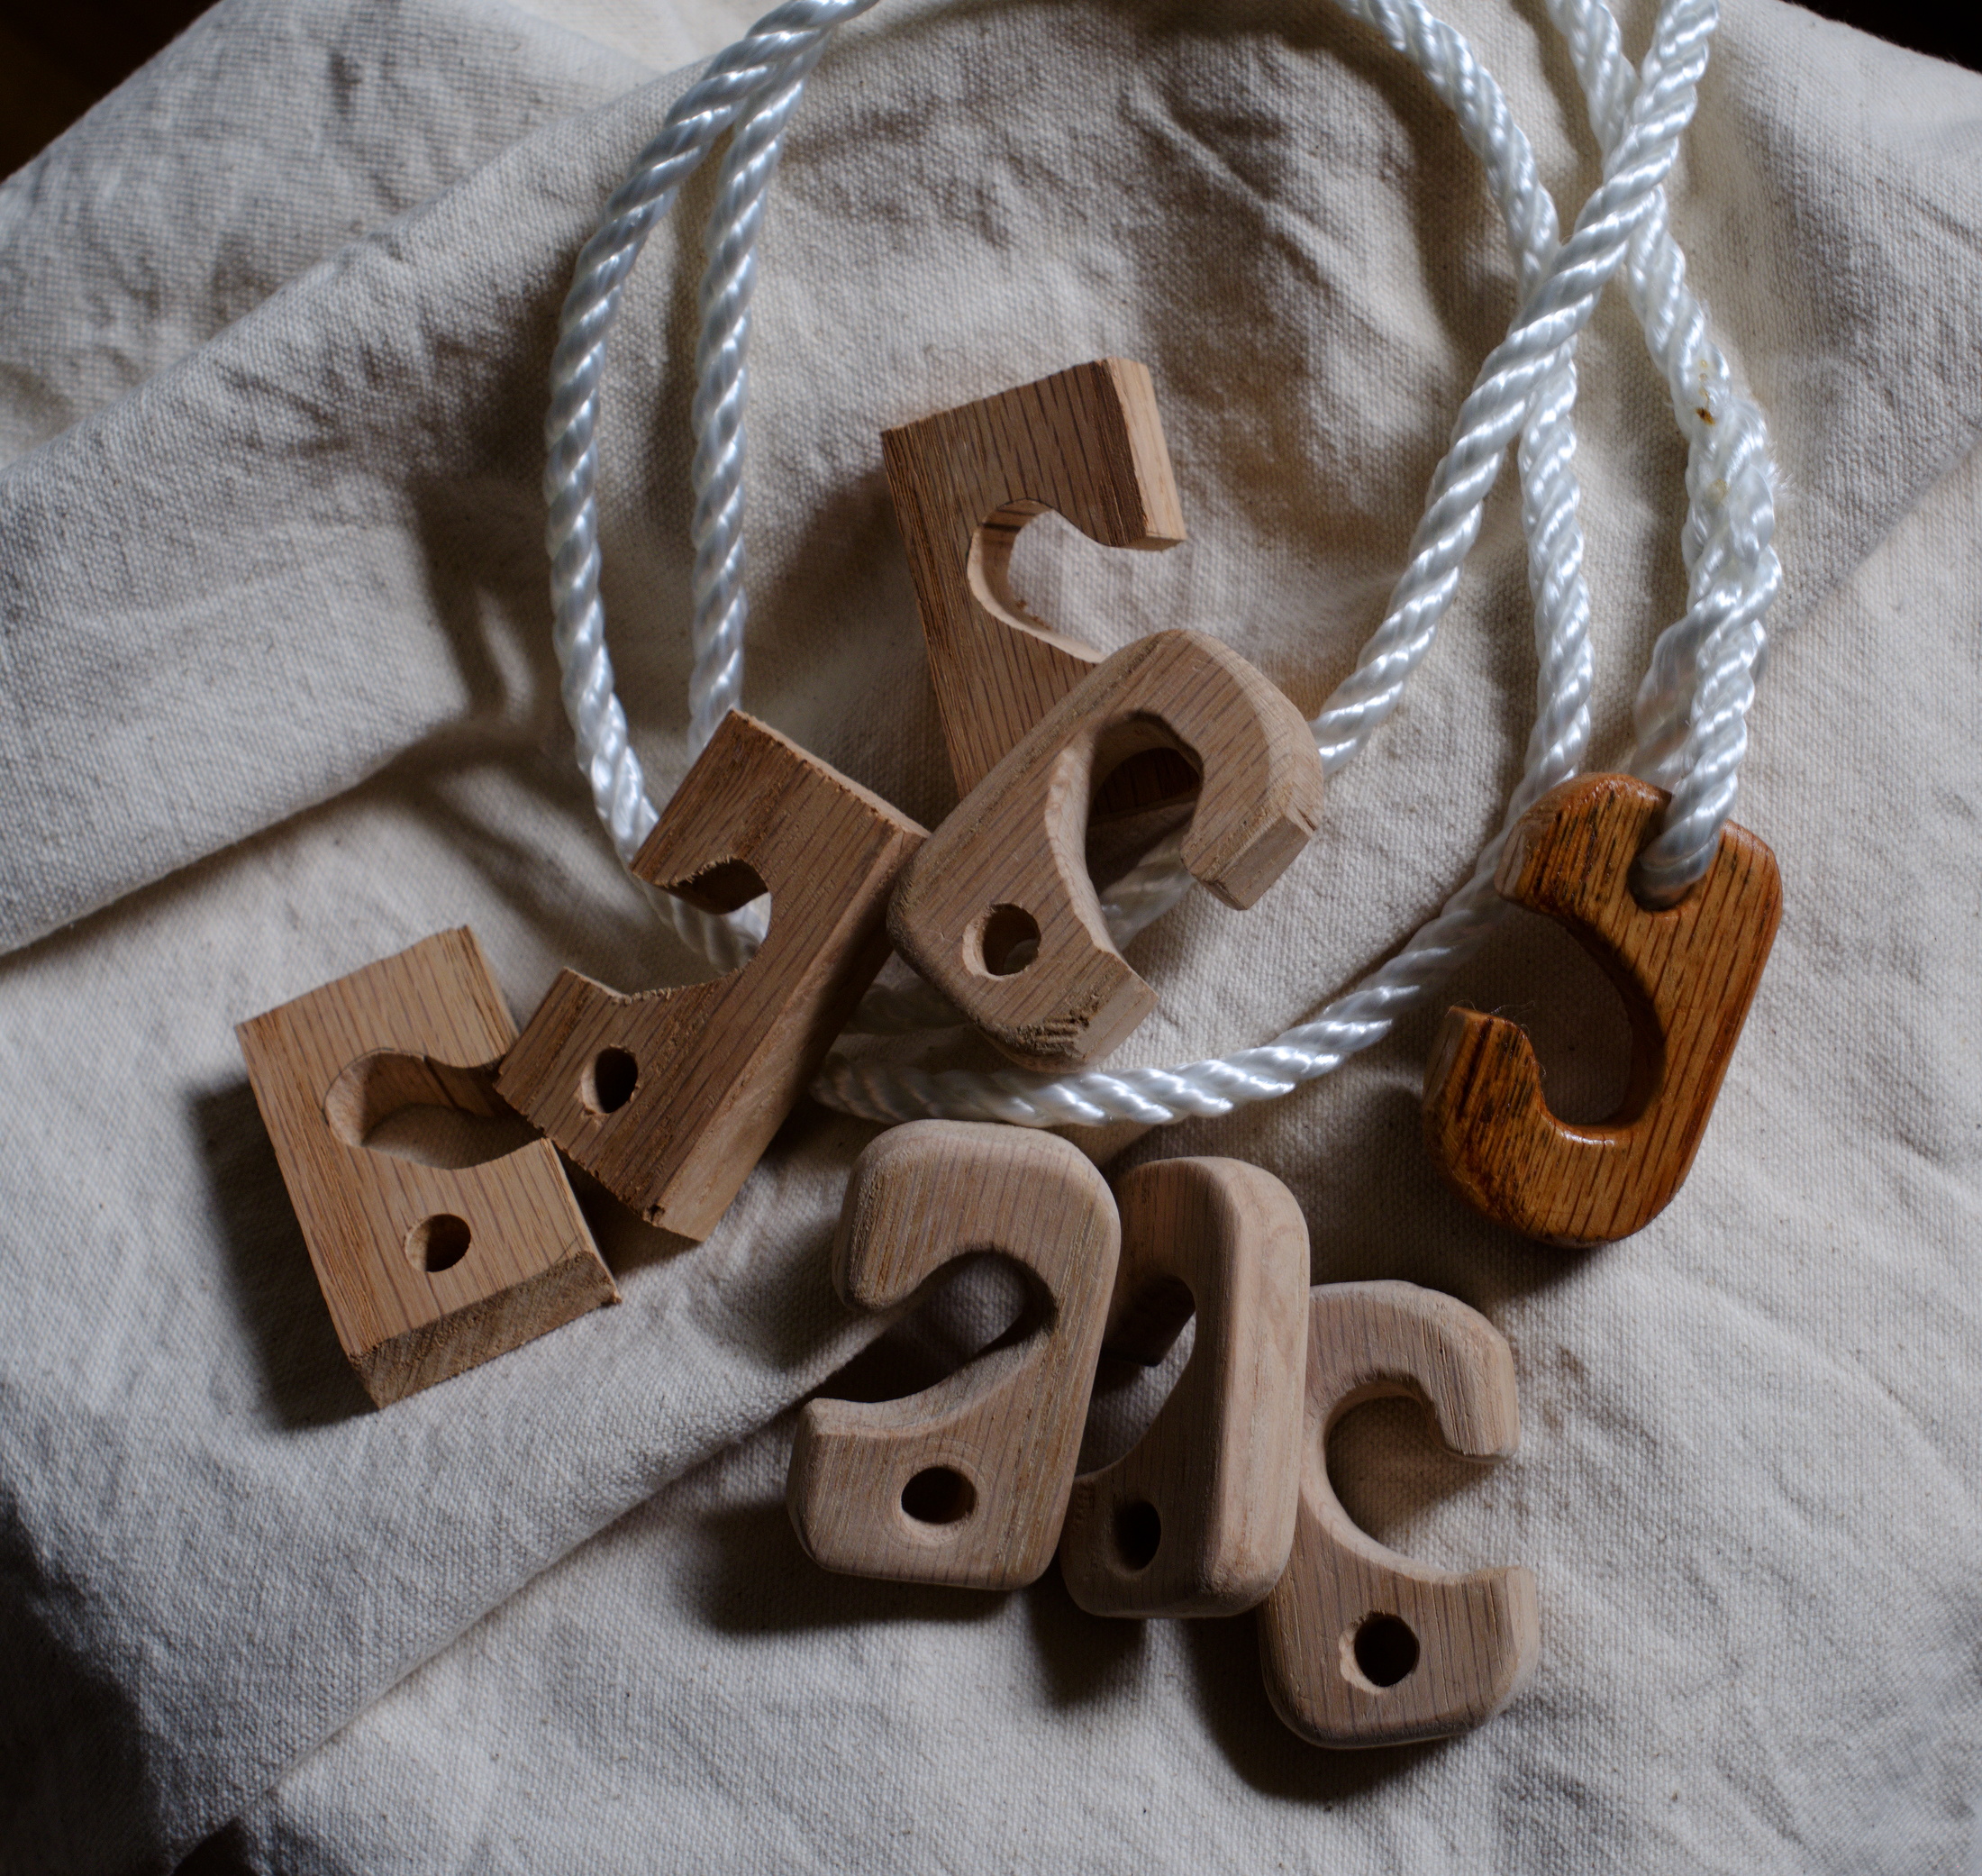
Hervey Garrett Smith, in his book The Arts of the Sailor, defines a swig block as "a snatch block without a sheave." Joe rough-cut eight of them on the scroll saw in an hour's time, then we started working them into shape with rasp, file and sandpaper. I took them home to continue the work, and here is a picture of the set in several stages of completion. This is boat work, for anyone wondering why we are building swig blocks. They will end up aboard my Alberg 35 Terry Ann.
August 28th, 2018
Posted by Joe

Katie asked me if I could build her a desk to do homework on. She wanted a rolltop desk and I said that wouldn't happen so she said she could make do with a small table. I had two small old pallets laying around, made out of heart pine. I took them apart and had just enough wood to craft this small table. We sent her some pictures and she is thrilled. I'm pleased how it turned out too.
Photograph by Joe Levsen.August 13th, 2018
Posted by Paul
We finished this cedar box with mulberry inlay yesterday. It is for Levi to store his D&D supplies.
These are getting easier as we build experience. The next one is planned for walnut with ash inlay.
August 9th, 2018
Posted by Paul

We drove up to Wall Lumber in Mayodan today and bought 100 board feet of 4/4 cherry. We had them face it S2S to save us having to plane it and ended up with 75 board feet of 3/4 to use for an upcoming project.
August 5th, 2018
Posted by Joe

When working with salvage wood, sometimes there is only a single piece of unusual shaped wood. This is the case with a piece of red oak crown moulding 7 feet long. There aren't many projects that take this amount of wood. I was able to mill out a board 3/8 inch thick, 2 3/8 inch wide, 84 inches long, and had a sculpted length 1 1/4 inches wide. The only thing I could think of to use this pretty wood for was a tray 20 inches long, 9 1/2 inches wide with sides 1 1/4 inches high. It is a simple design so I finished in little time. While the glue was drying for the base, I miter cut the sides. The whole thing went together rather easily. Two coats of Waterlox brought out the beauty of this red oak tray. Now, I just have to figure out what to do with it, Any suggestions?
July 29th, 2018
Posted by Paul

Glueing up the tray to go in Levi's D&D box. I enjoy building these trays, with the stopped dadoes, curved handles and finger holes. Lots of parts. Everything has to be assembled in the right order or it won't go together. I don't know whether Joe likes them as much as I do, but he has gotten to use his scroll saw three times on this tray. Joe cuts out the curves while I take care of chiseling the dadoes - I really enjoy making them, and this tray has eight.
July 22nd, 2018
Posted by Paul
Glueing the corner posts for a tray to go into the D&D box we are building for Levi.
Steve Schuler at The Literary Workshop has a post about installing hardwood flooring without power tools. Joe, a one-time professional floor installer, is probably rolling his eyes at the abject daftness of such an undertaking.
July 15th, 2018
Posted by Paul

Essentially a packing case that serves as a bookshelf between moves, this is Joe's creation from salvaged cypress lap siding. The simple construction lets the natural beauty of the wood take center stage. It's a great use for salvage wood that otherwise would have been burned, and wouldn't have released many calories at that.
July 9th, 2018
Posted by Paul
Emphatically not a technique we found in Fine Woodworking Magazine, Joe came up with the idea to take salvaged lap siding and face glueing lengths together with the tapers running opposite to make boards. Then the boards could be edge-glued to make wide boards, to make - what else? - boxes. Back to our roots of making simple, cheap but sturdy furniture that would be suitable for a young person's apartment, we are using one of Joe's designs, an open-faced crate with dividers that can be used for moving or set up as a bookshelf or end-table between moves. We already made a couple of these for Katie and they have served her well.
July 9th, 2018
Posted by Paul

It's not a bad idea to keep an off-site backup as cheap insurance against a disaster. My aunt and uncle in New Orleans lost their home to Katrina, and my friends Marcia and Joe lost theirs to fire. It does happen, as unlikely as it seems. Most of the contents of my condominium could easily be replaced, but not the photographs. I keep them backed up at home, and backed up again on a hard drive that I keep somewhere else. The same goes for financial data, books, and anything else that I can copy, scan or make digital.
We built two small boxes to hold hard drives. That keeps dust and light off them and should help them last longer. The one in the picture is made of ash, the other is ash with a cherry top.
July 5th, 2018
Posted by Paul

While I worked on a side project of my own - a small ash slide-top box to hold a hard drive for off-site backup - Joe finished the laminations of another mulberry and cedar box top. This work could be called inlay or parquet, although in truth I haven't found any mention of our technique despite having searched. We build a sub-top and then laminate mulberry and cedar cutouts onto it. With the laminations complete, our next step will be to trim the top to dimensions, getting the corners as perfectly square as possible. Then we will build the box from the top down - or rather, we will flip the top over and build up to the bottom. The reason for this is that, as courses are added, the box gets slightly out of square, no matter the care we put into it. By building from the top to the bottom, the out of square is concentrated at the bottom. That way, when we go to cut the top loose, the cut will be in the part of the box closest to perfectly square in all three dimensions. That makes the joint cleaner and easier to hinge. These are things that we have picked up in building boxes out as far as the eye can see - at this point, probably 50 of them.
At this stage the top looks rough and full of gaps, but in fact what look like gaps are shadow lines from laminated pieces of slightly differing thicknesses. Once the top is sanded flat, what few true gaps are there can be filled, then a final sanding can be done, a finish applied, and the top will have the bright, luminous appearance of the one we posted back on June 16th.
June 27th, 2018
Posted by Paul
Another 8x10 slide-top box, this one out of ash. I find these very useful.
June 24th, 2018
Posted by Paul

Joe built this good-looking coat tree. I helped him with stock preparation and we had a dickens of a time with a cedar plank. Ripping it to get material to build the tapered upright, the cedar twisted and bound on the table saw to the point where it would not feed. The internal stresses in that tree must have been terrific. We put a wedge in the cut end and managed to get it through the saw, but the wood twisted and warped to the point that it was unglueable. We set the cedar aside and Joe built the coat tree out of short lengths of what we believe is redwood, laminated with staggered joints, to create an interesting pattern. The completed tree is extremely light, but stable due to the wide spreading base.
June 19th, 2018
Posted by Paul
Faith and Joe cutting dadoes in cedar for a pencil box. They are using an inlay cutter that my friend Mark gave us. Joe is holding the bit down against the stop and guiding the outfeed while Faith holds the stock against the fence and pushes it through.
This work can be done on the table saw more quickly, but using the inlay cutter on the press is safer. Since the pencil box is Faith's project, we opted to use the inlay cutter so she could be more involved. One thing that the inlay cutter excels at is cutting stopped dadoes. I've cut a few with a chisel but the inlay cutter does it much faster and cleaner.
June 19th, 2018
Posted by Paul
Joe built this teak slide-top box out of some of the last scraps left of the broken lawn furniture Graham gave us a couple of years ago.
June 16th, 2018
Posted by Paul
Here is a last look at the first mulberry-topped box before we give it away.
June 14th, 2018
Posted by Paul

Work is coming along on another mulberry parquet-topped box. I haven't seen much about this technique of laminating geometric forms onto a base but it seems to be a very strong construction method. If the forms are cut carefully they are easy to fit together without gaps.
Joe is almost done with a slide-top box out of some last scraps of teak, and I started one today of ash that I picked up at Wall Lumber recently.
June 11th, 2018
Posted by Paul
Joe finished his treasure box. It came out too good to bury in the back yard, and Joe says he doesn't really have enough gold and jewels to fill it up anyway. I think Marcia has claimed it.
This is the last of the teak, other than a few scraps, that we recovered from the old scrap lawn furniture Graham gave Joe two years ago.
May 30th, 2018
Posted by Paul

Joe has been working on this one for about six months. Now the hardware and finish is on it, he says it's done. Maybe one more coat of wax...
May 27th, 2018
Posted by Paul

Even though we don't sell anything, we still call it payday when several projects get a coat of finish on the same day. These boxes all still need hardware, but there's nothing wrong with rubbing on a coat of poly first. Everything was built with wood we had around the shop - teak, cherry, maple, cedar and mulberry. It has been a long time since we bought any wood, and we still have stacks of it from our salvaging operations.
May 20th, 2018
Posted by Paul
A table saw has to have some kind of slot in it to allow the blade to come up through the table. The slot is usually in an insert so it can be replaced. The standard insert that comes with most saws has a fairly wide slot so the saw arbor can be slanted, allowing wood to be cut on an angle. The problem is that the wide slot allows for tear-out on the bottom of the stock being cut, and allows thin cuts to drop down into the inside of the saw, which could kick back out dangerously.
The saw manufacturers will sell you something called a zero-clearance insert, but it is quicker and cheaper to make your own. The slot for the blade is just wide enough to raise the blade, so nothing can drop down in the saw. We made one today for Joe's table saw. It was simple and it works well.
There are many articles on the internet about making a zero-clearance insert. I'm a little disconcerted that we have had the shop for 4 1/2 years now and we just got around to making ours.
May 14th, 2018
Posted by Paul

We're making good progress on this box, using some new construction techniques. First, we are building it from the top down which should make the top squarer and easier to cut off and hinge. Second, we attached the corner posts top and bottom so we could glue a full course at a time without bending the posts out of square. It's been a little tricky working out the method but I think we have it now and the rest of the box should go quickly.
May 14th, 2018
Posted by Paul

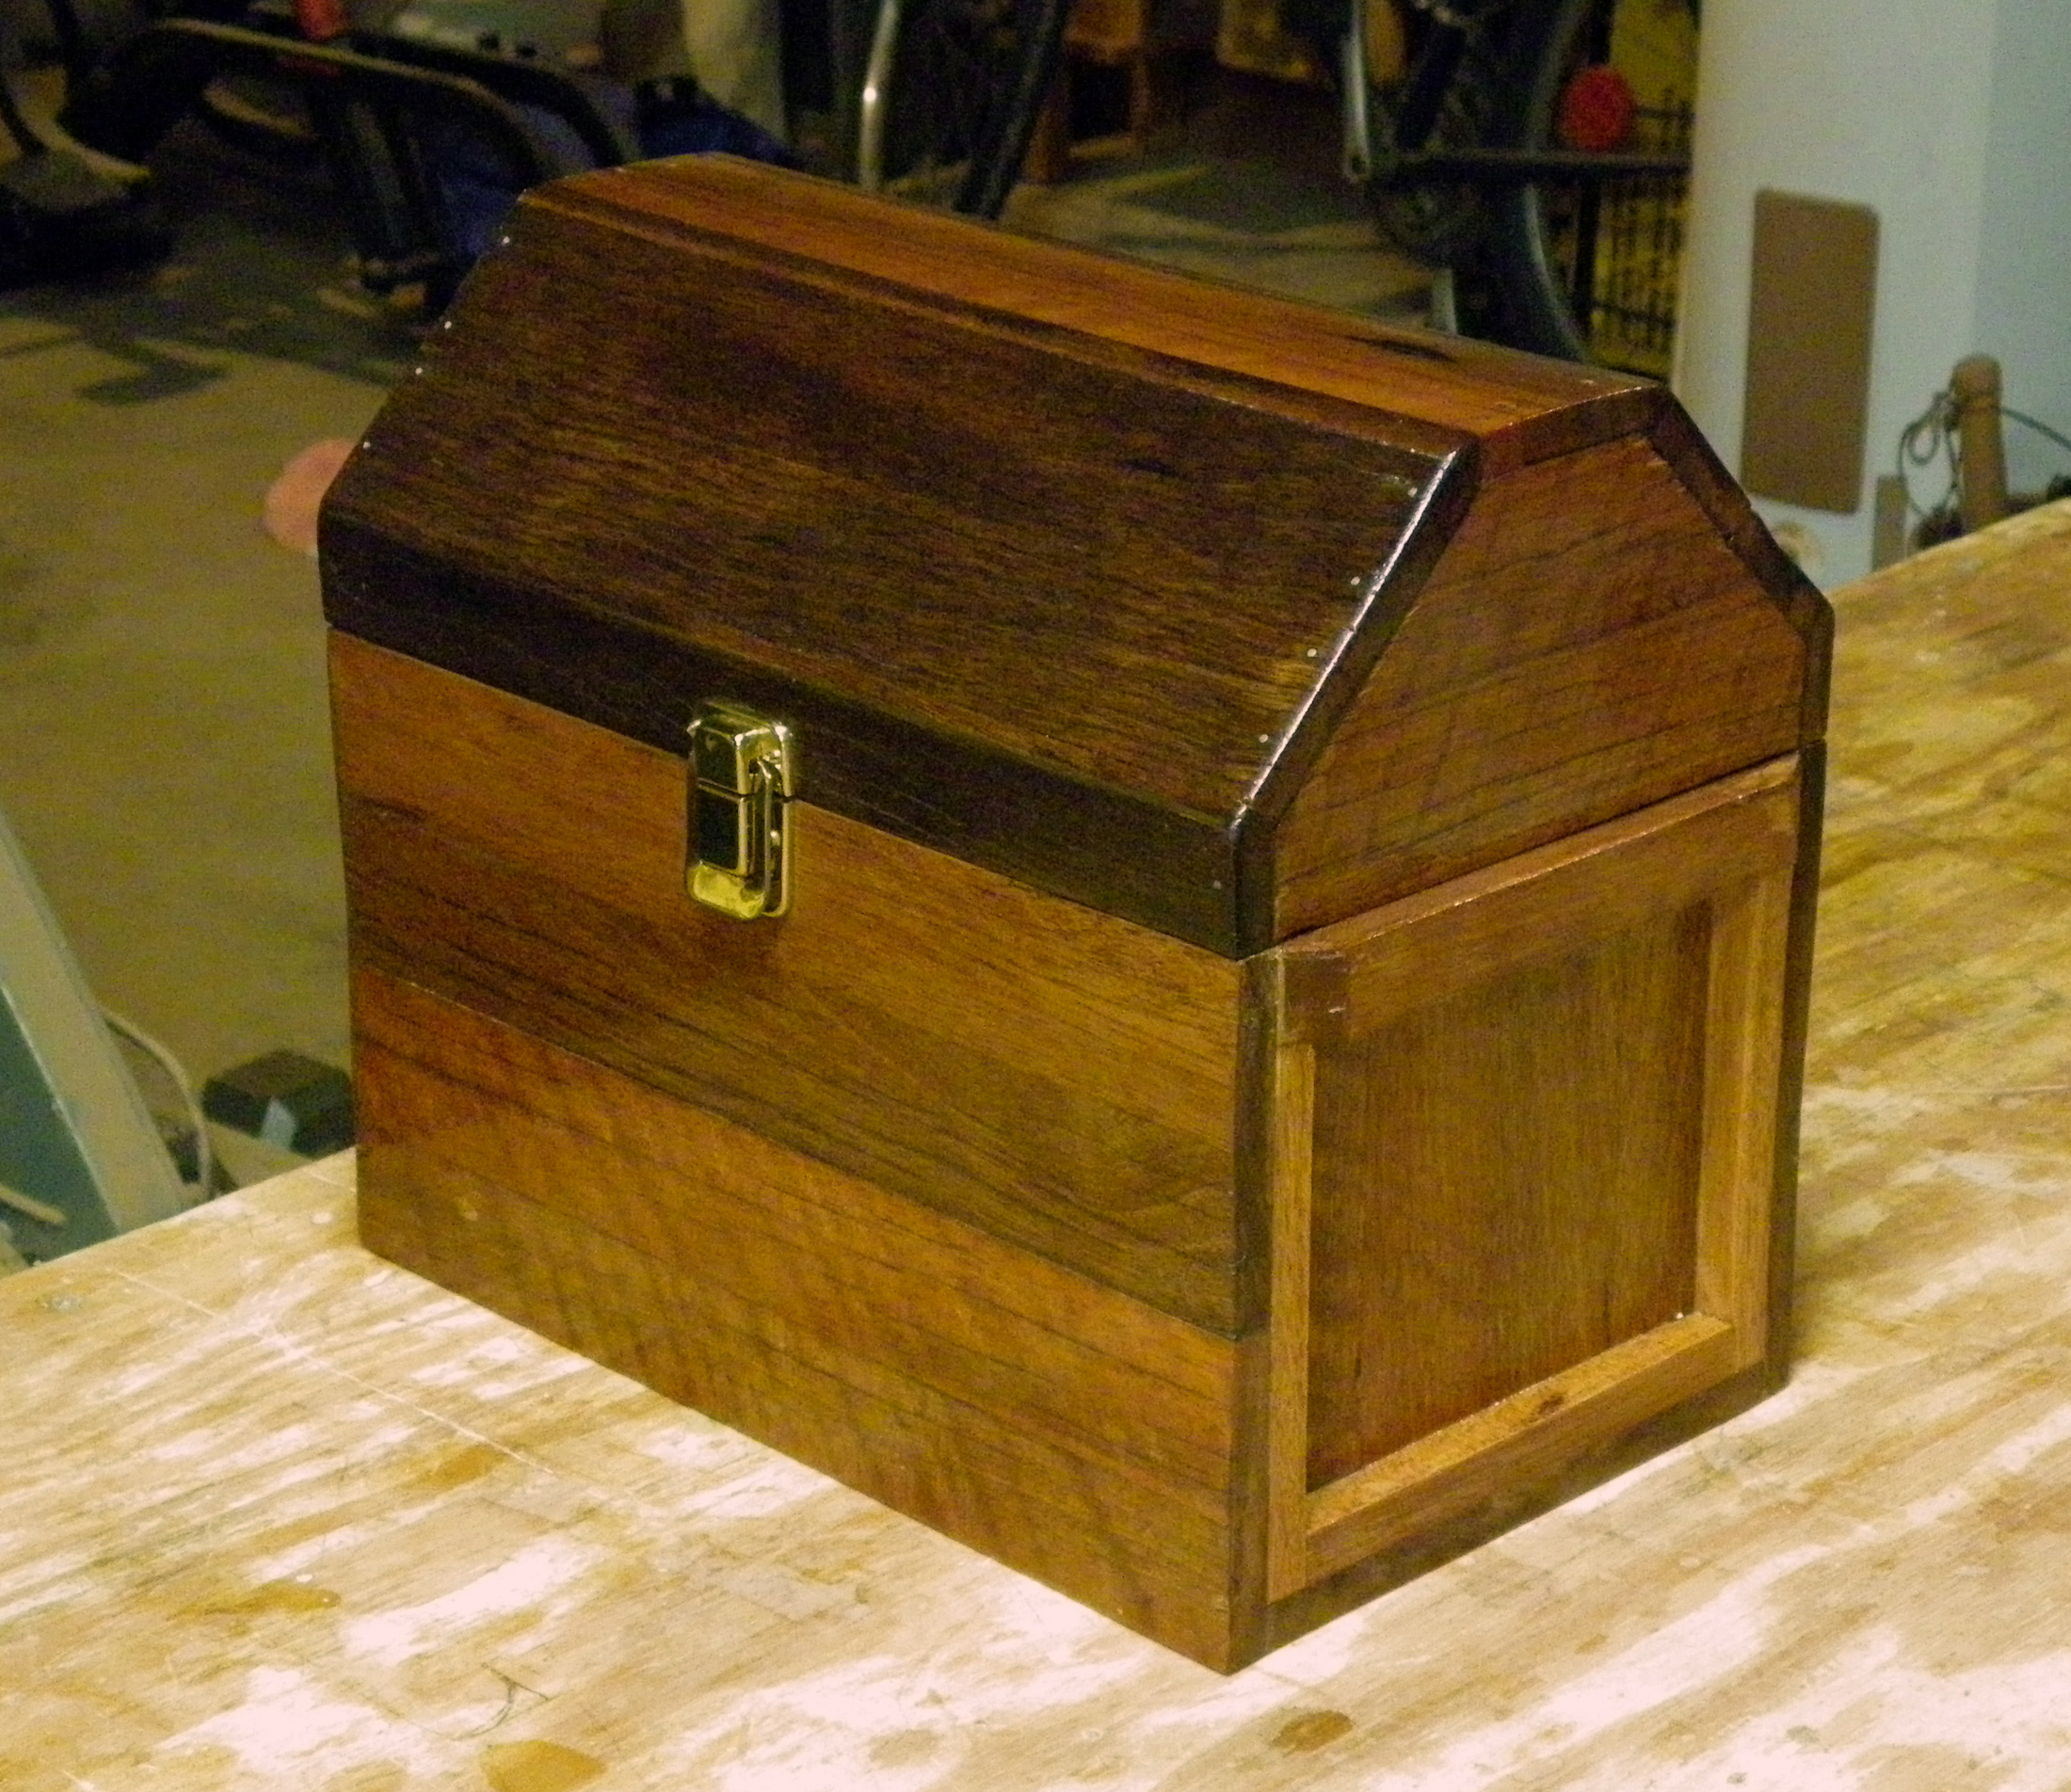
Joe has been working on this teak treasure box. After it is done, he is going to fill it with gold, silver and jewels and bury it in the back yard.
May 13th, 2018
Posted by Paul

After work at the woodshop.
May 7th, 2018
Posted by Paul

We laminated Marie's Nightmare Before Christmas poster to a sheet of Lauan and then built a frame around it.
May 6th, 2018
Posted by Paul
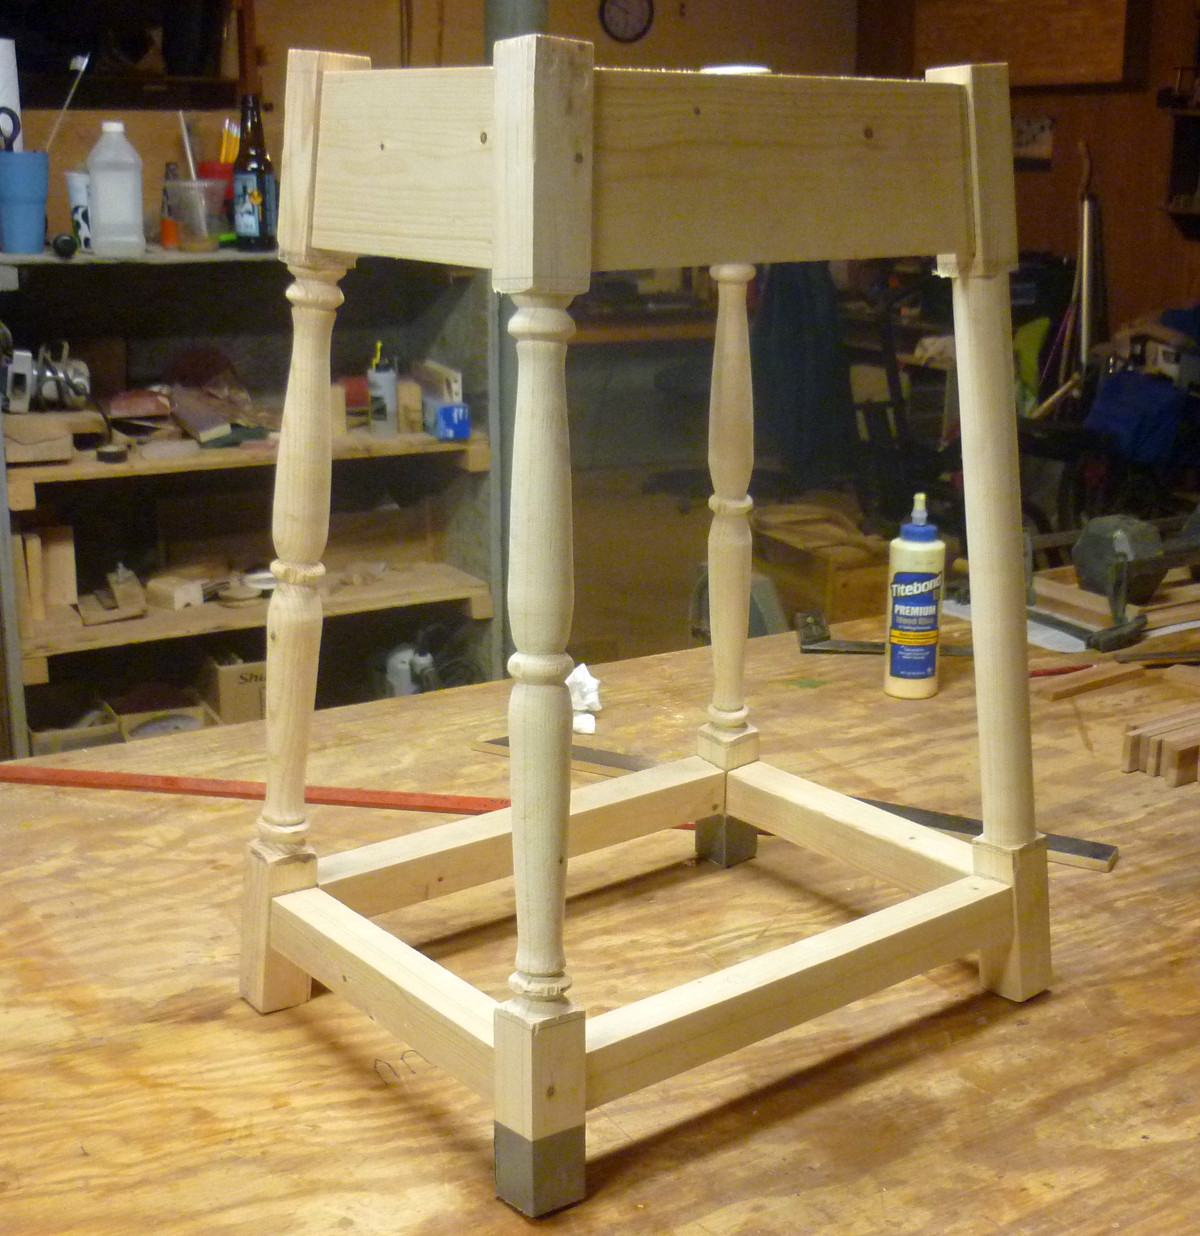
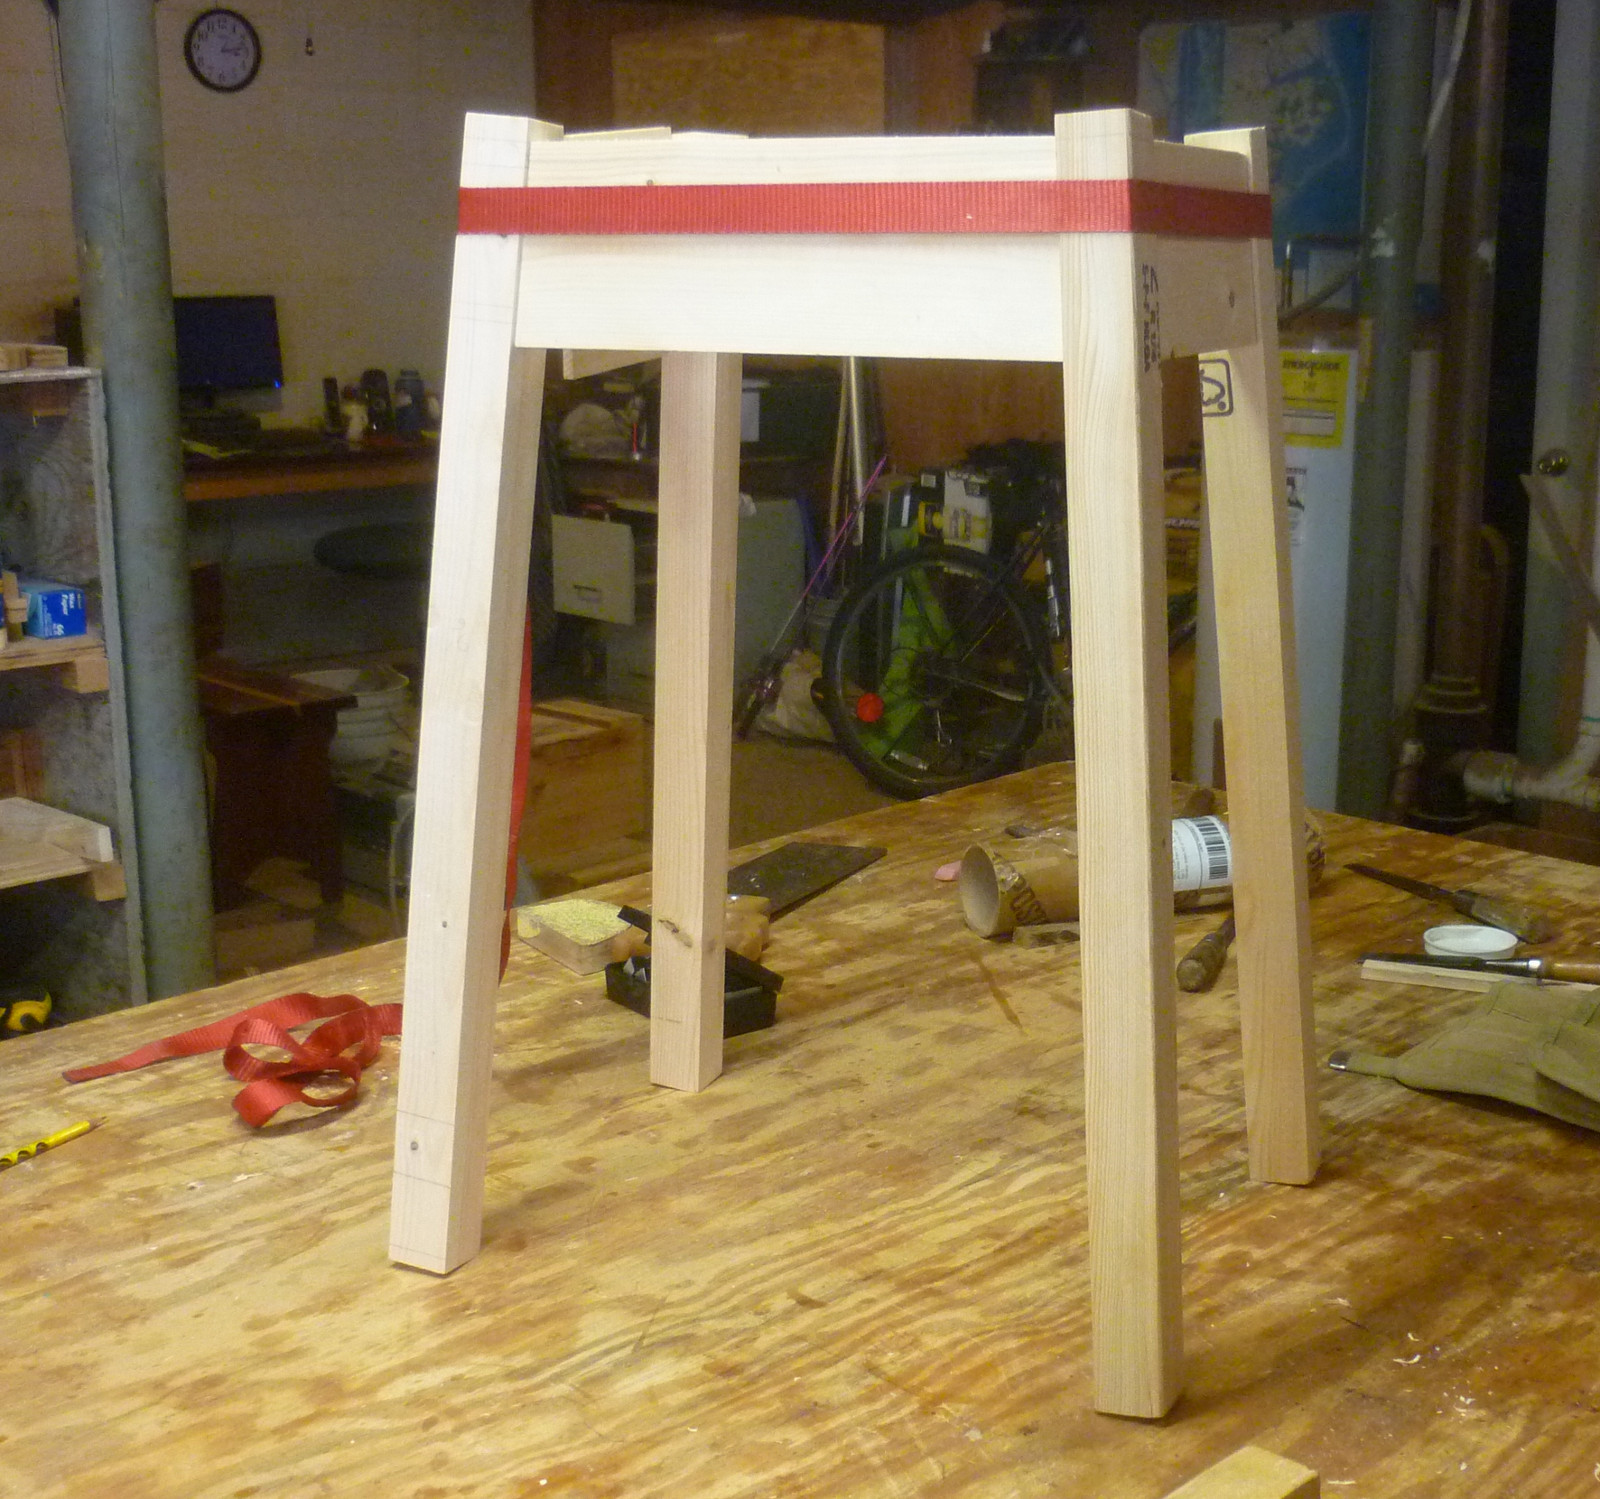
This form, known as a Moravian stool, has been popularized by the traditionalist woodworkers Chris Schwartz and Roy Underhill in recent years. We made ours from the untraditional wood Leyland Cypress, more known as a fast-growing landscaping tree than as a source of lumber, but that's all that is out of character. I picked up some rounds from a tree cut in my neighborhood and took them to the shop, where we hand-split the wood and stickered it for about a year to dry. Then we hand-sawed the wood to widths, hand-planed it to thickness, hand-formed the legs, hand-cut the sliding dovetails and bored the holes in the top with a hand brace. We pounded the legs in place and secured them with wedges that Joe cut by hand. In fact, we built this stool totally by hand, no machine tools involved. It gave us a lot of insight into the work that the first Moravian settlers in Bethabara and Bethania did to furnish their hovels. I'm sure many of these primitive stools survived for decades in the barns, sheds, kitchens and cellars of Forsyth County Moravians.
May 3rd, 2018
Posted by Paul

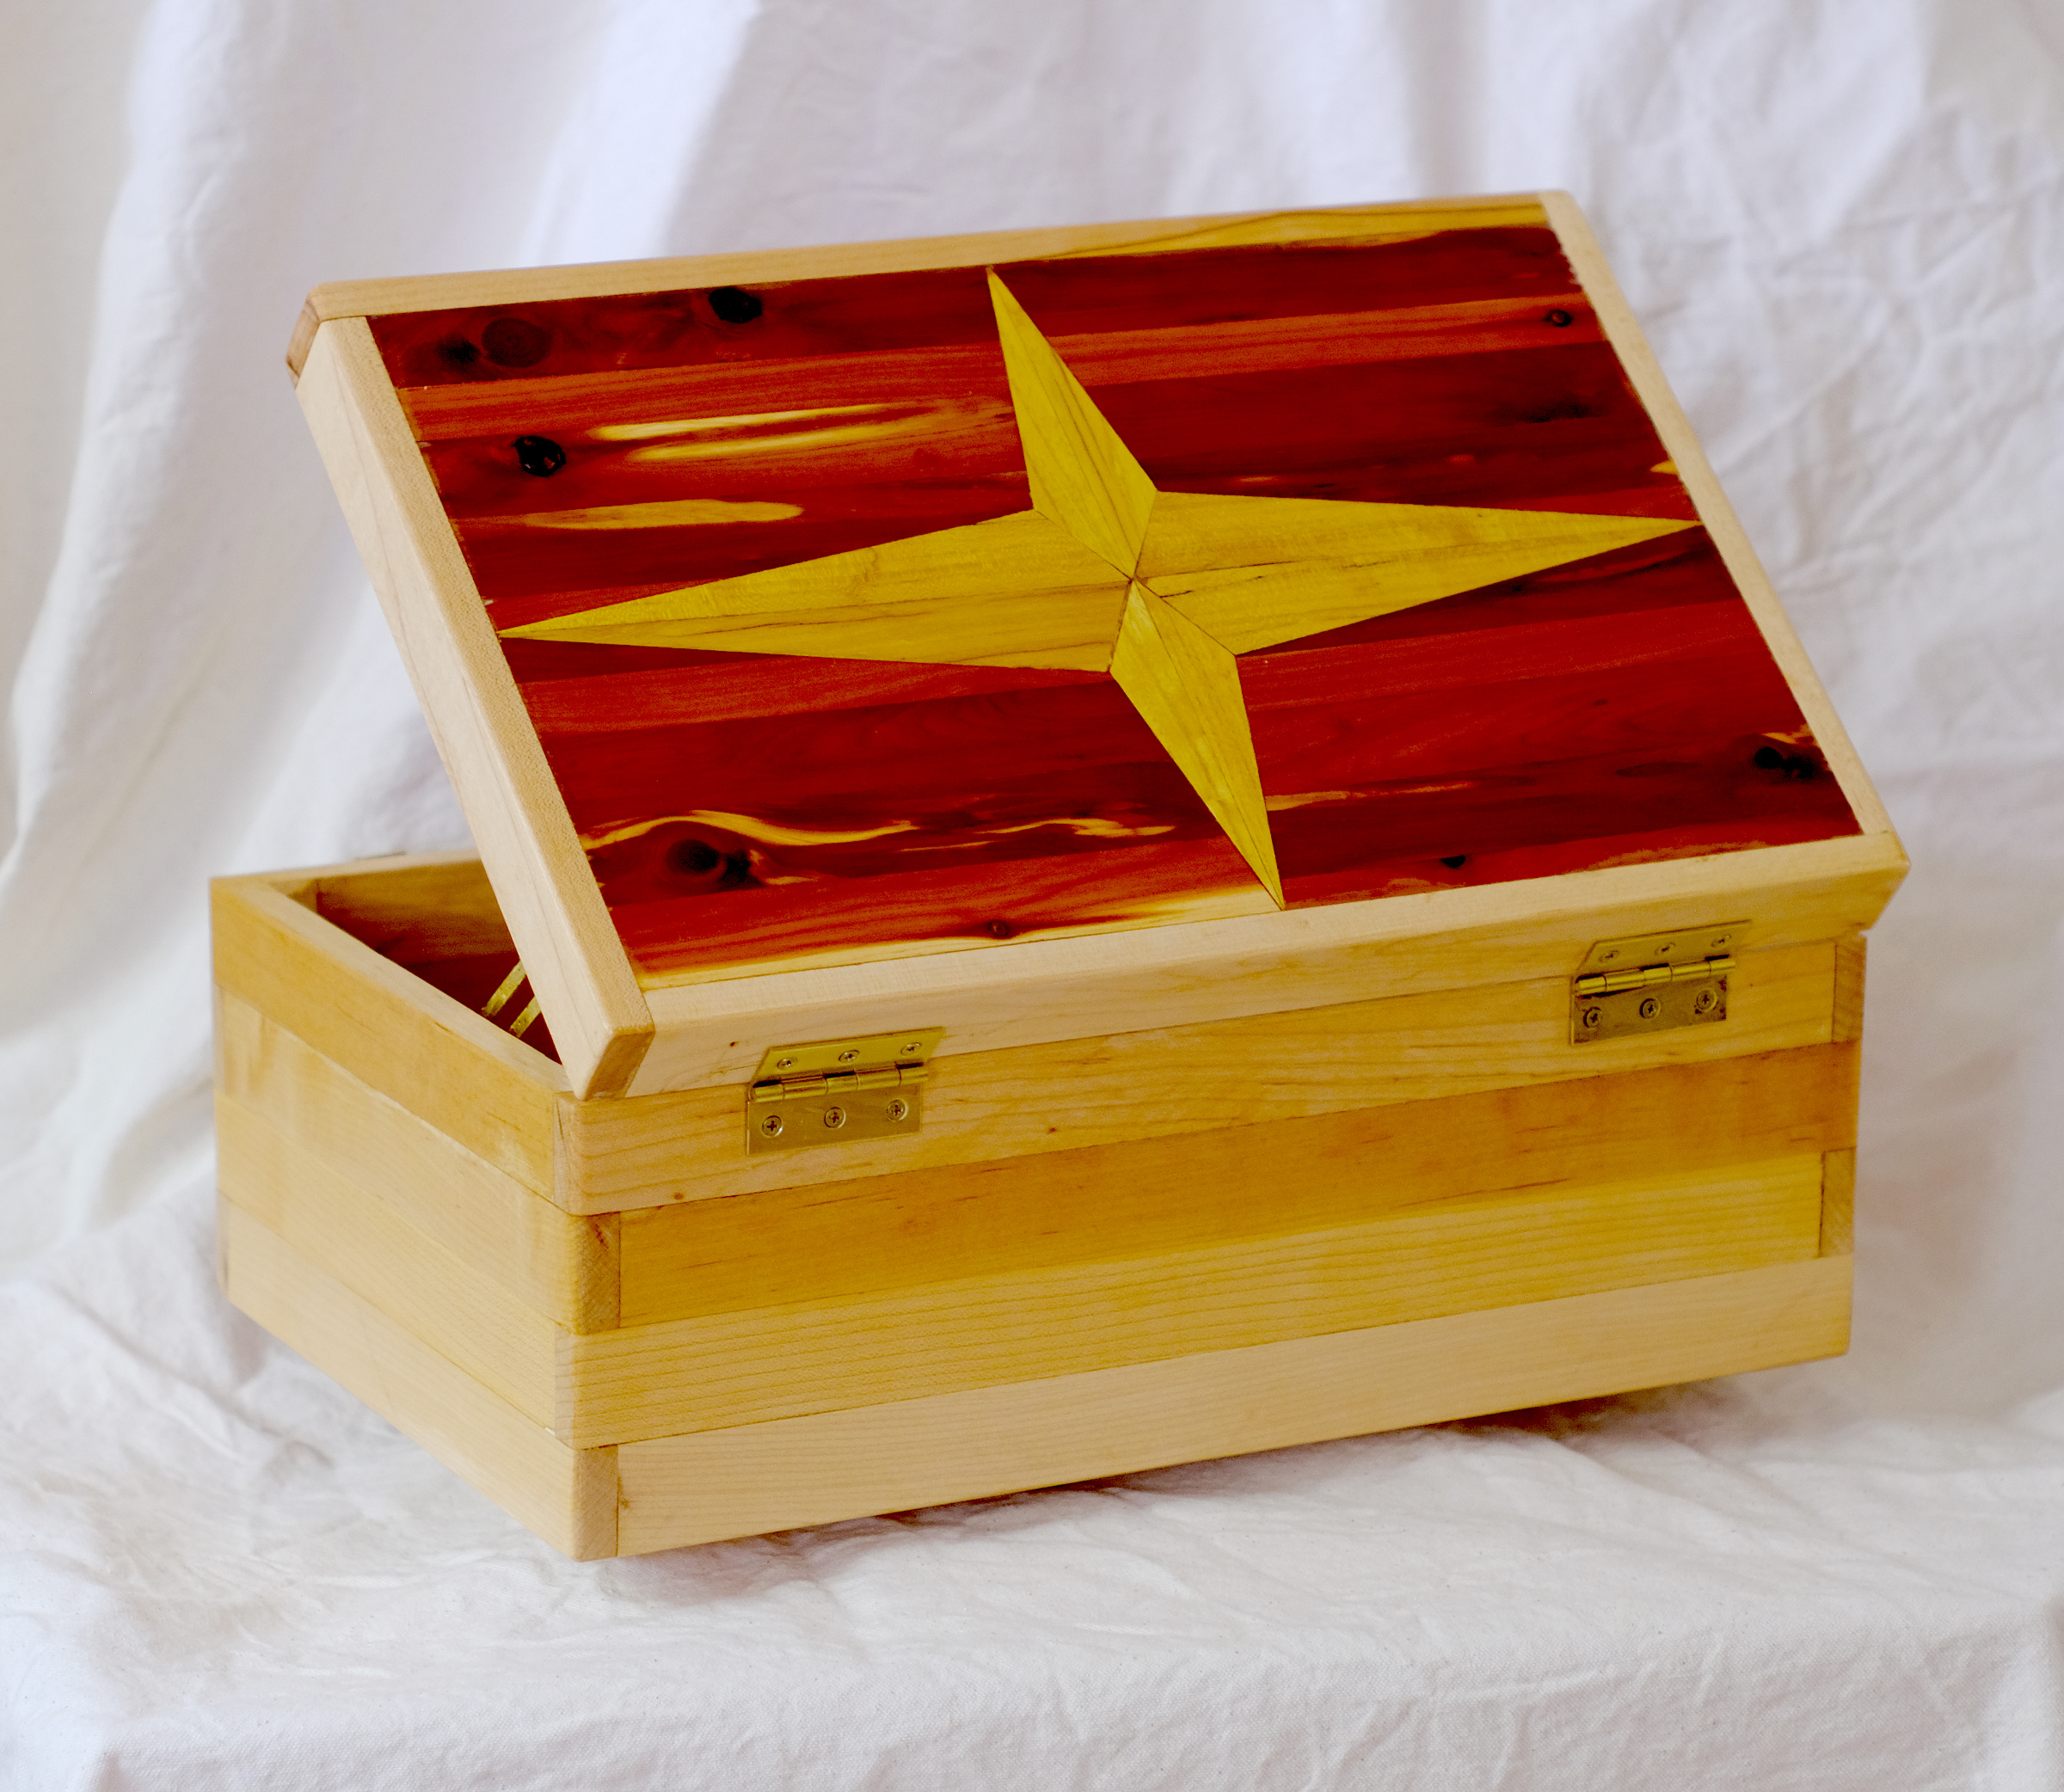
The four corner fillers are glued in around the star and the box top is close to being complete. All that is left is some light filling, sanding, and cutting to exact size - 9x15 inches. Once the 1/2 inch thick sides are built around it, the final dimensions will be 10x16.
April 29th, 2018
Posted by Paul
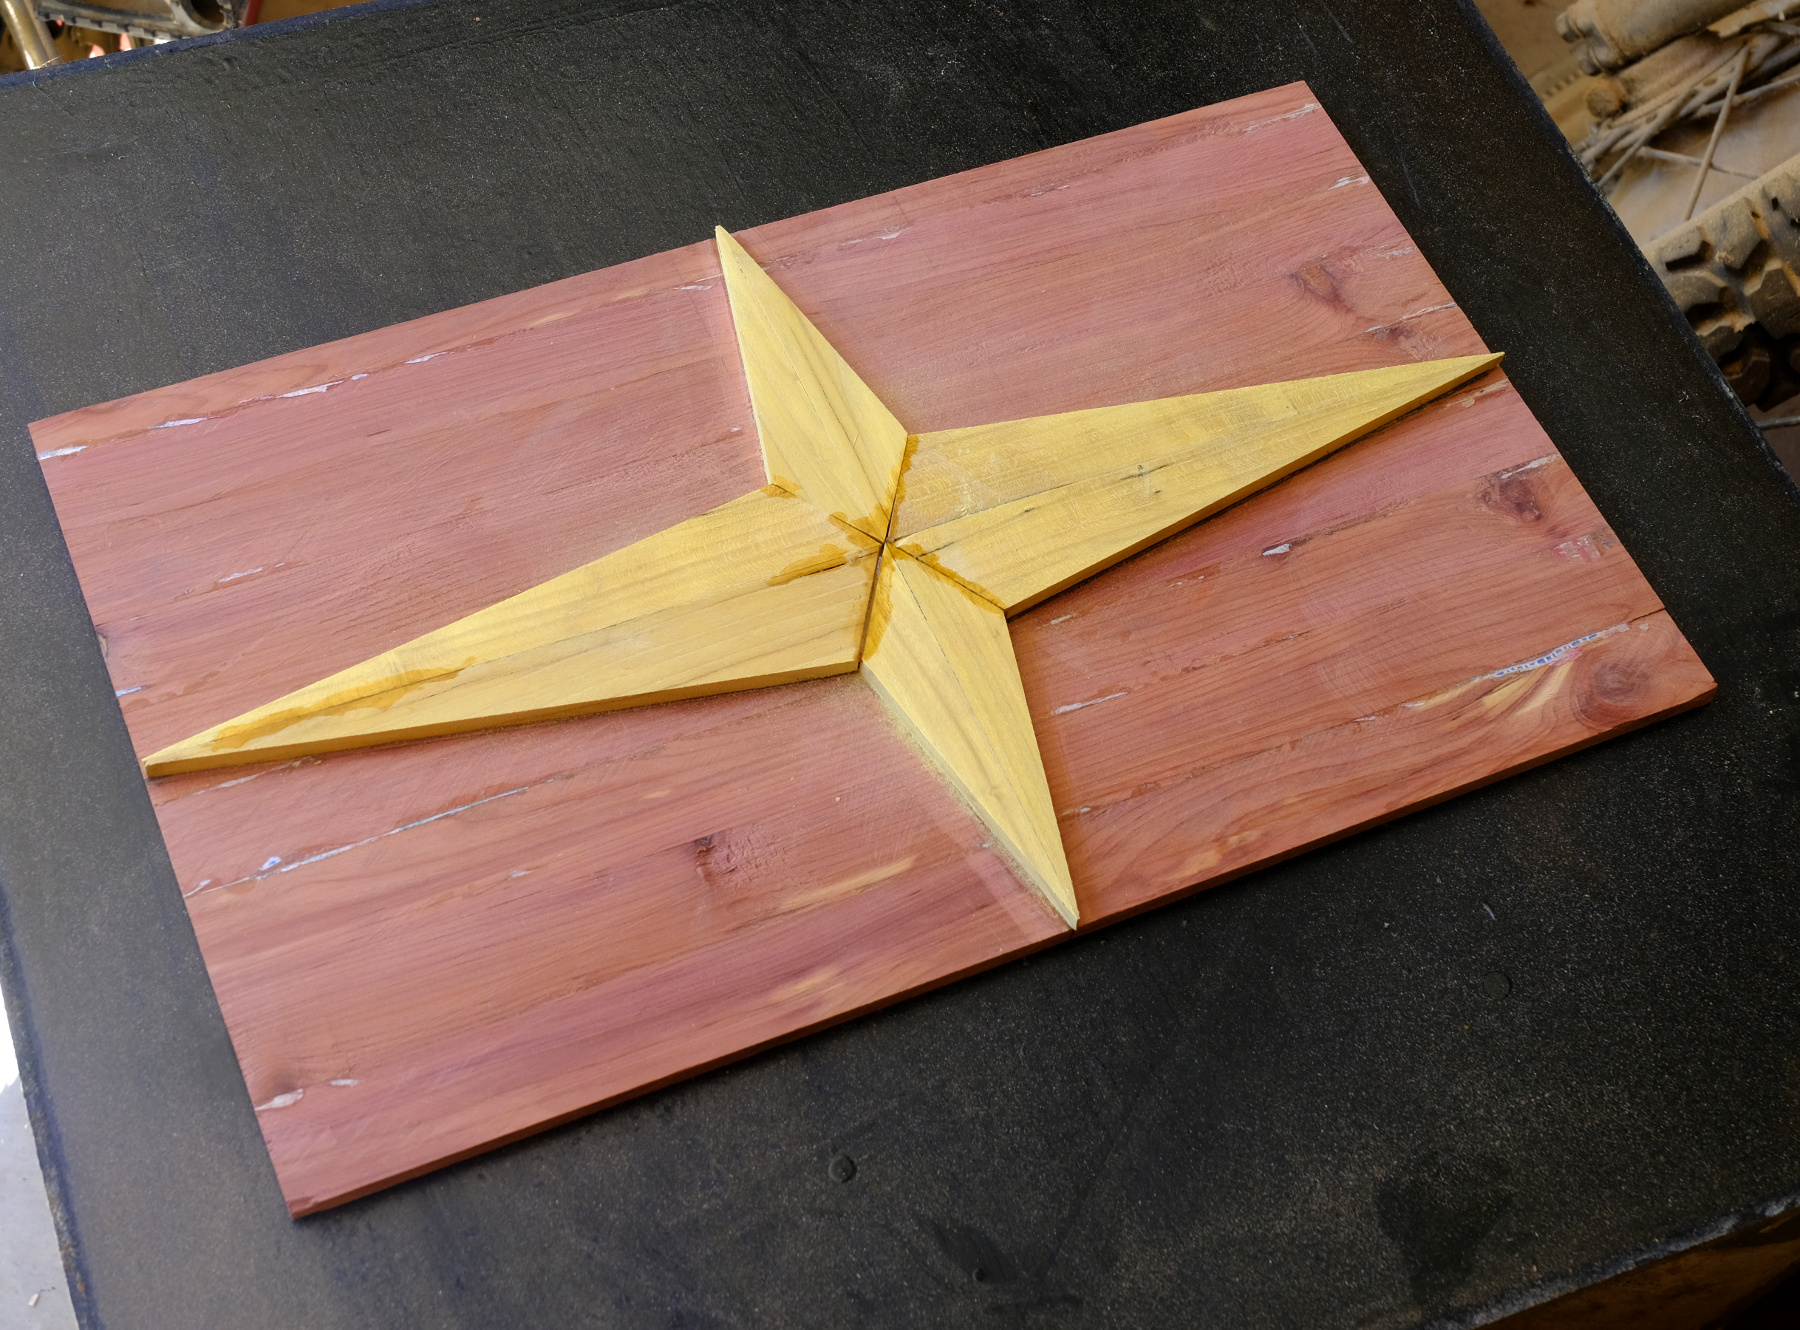
The four-pointed star has been laminated onto the sub-top and the fillers for the four corners are cut out and ready to glue. This is going to be the top of another 10x16 staggered joint box like the stationery box we made for Marie. This one we will build from the top down so if it gets slightly out of square it will be at the bottom and won't cause a problem cutting the top loose.
April 15th, 2018
Posted by Paul

Joe finished up the last of the three step-stools and we put on first coats of finish. Our other projects for the day was to build a base for the top to a new box and then start cutting out geometric bits of mulberry which will be laminated onto the base, along with cedar, to form a four-pointed star. Joe has built some boxes using this technique, which is similar to parquetry. I posted a picture of one Jauary 14th, 2018.
April 8th, 2018
Posted by Paul
I took the stationery box home the other day and rubbed on a final coat of gloss poly. That made three coats, although the first one was more like a sealer - the thirsty old yellow pine soaked it up like a sponge. After the last coat dried, I waxed the box and delivered it to Marie. I hope she finds it useful.
That's the end of the yellow pine, until we can find some more. A friend has promised us a couple of planks.
April 7th, 2018
Posted by Paul

I made a holder for my usb hub to keep it located on top of the computer rack. The holder is screwed down and the usb sits inside it, with rims around the edges so it doesn't slide when I plug or unplug a device. Nothing fancy, just a little project to make life more convenient.
April 6th, 2018
Posted by Paul

I got to the shop today after being out of town for two weeks and found that Joe had made up stock for three more step-stools. We got all the parts cut out and fitted by mid-afternoon and glued up the first one. After a break to drink beer and sit in the sun with Marcia while the twins played on the lawn, we glued up a second.
March 11th, 2018
Posted by Paul

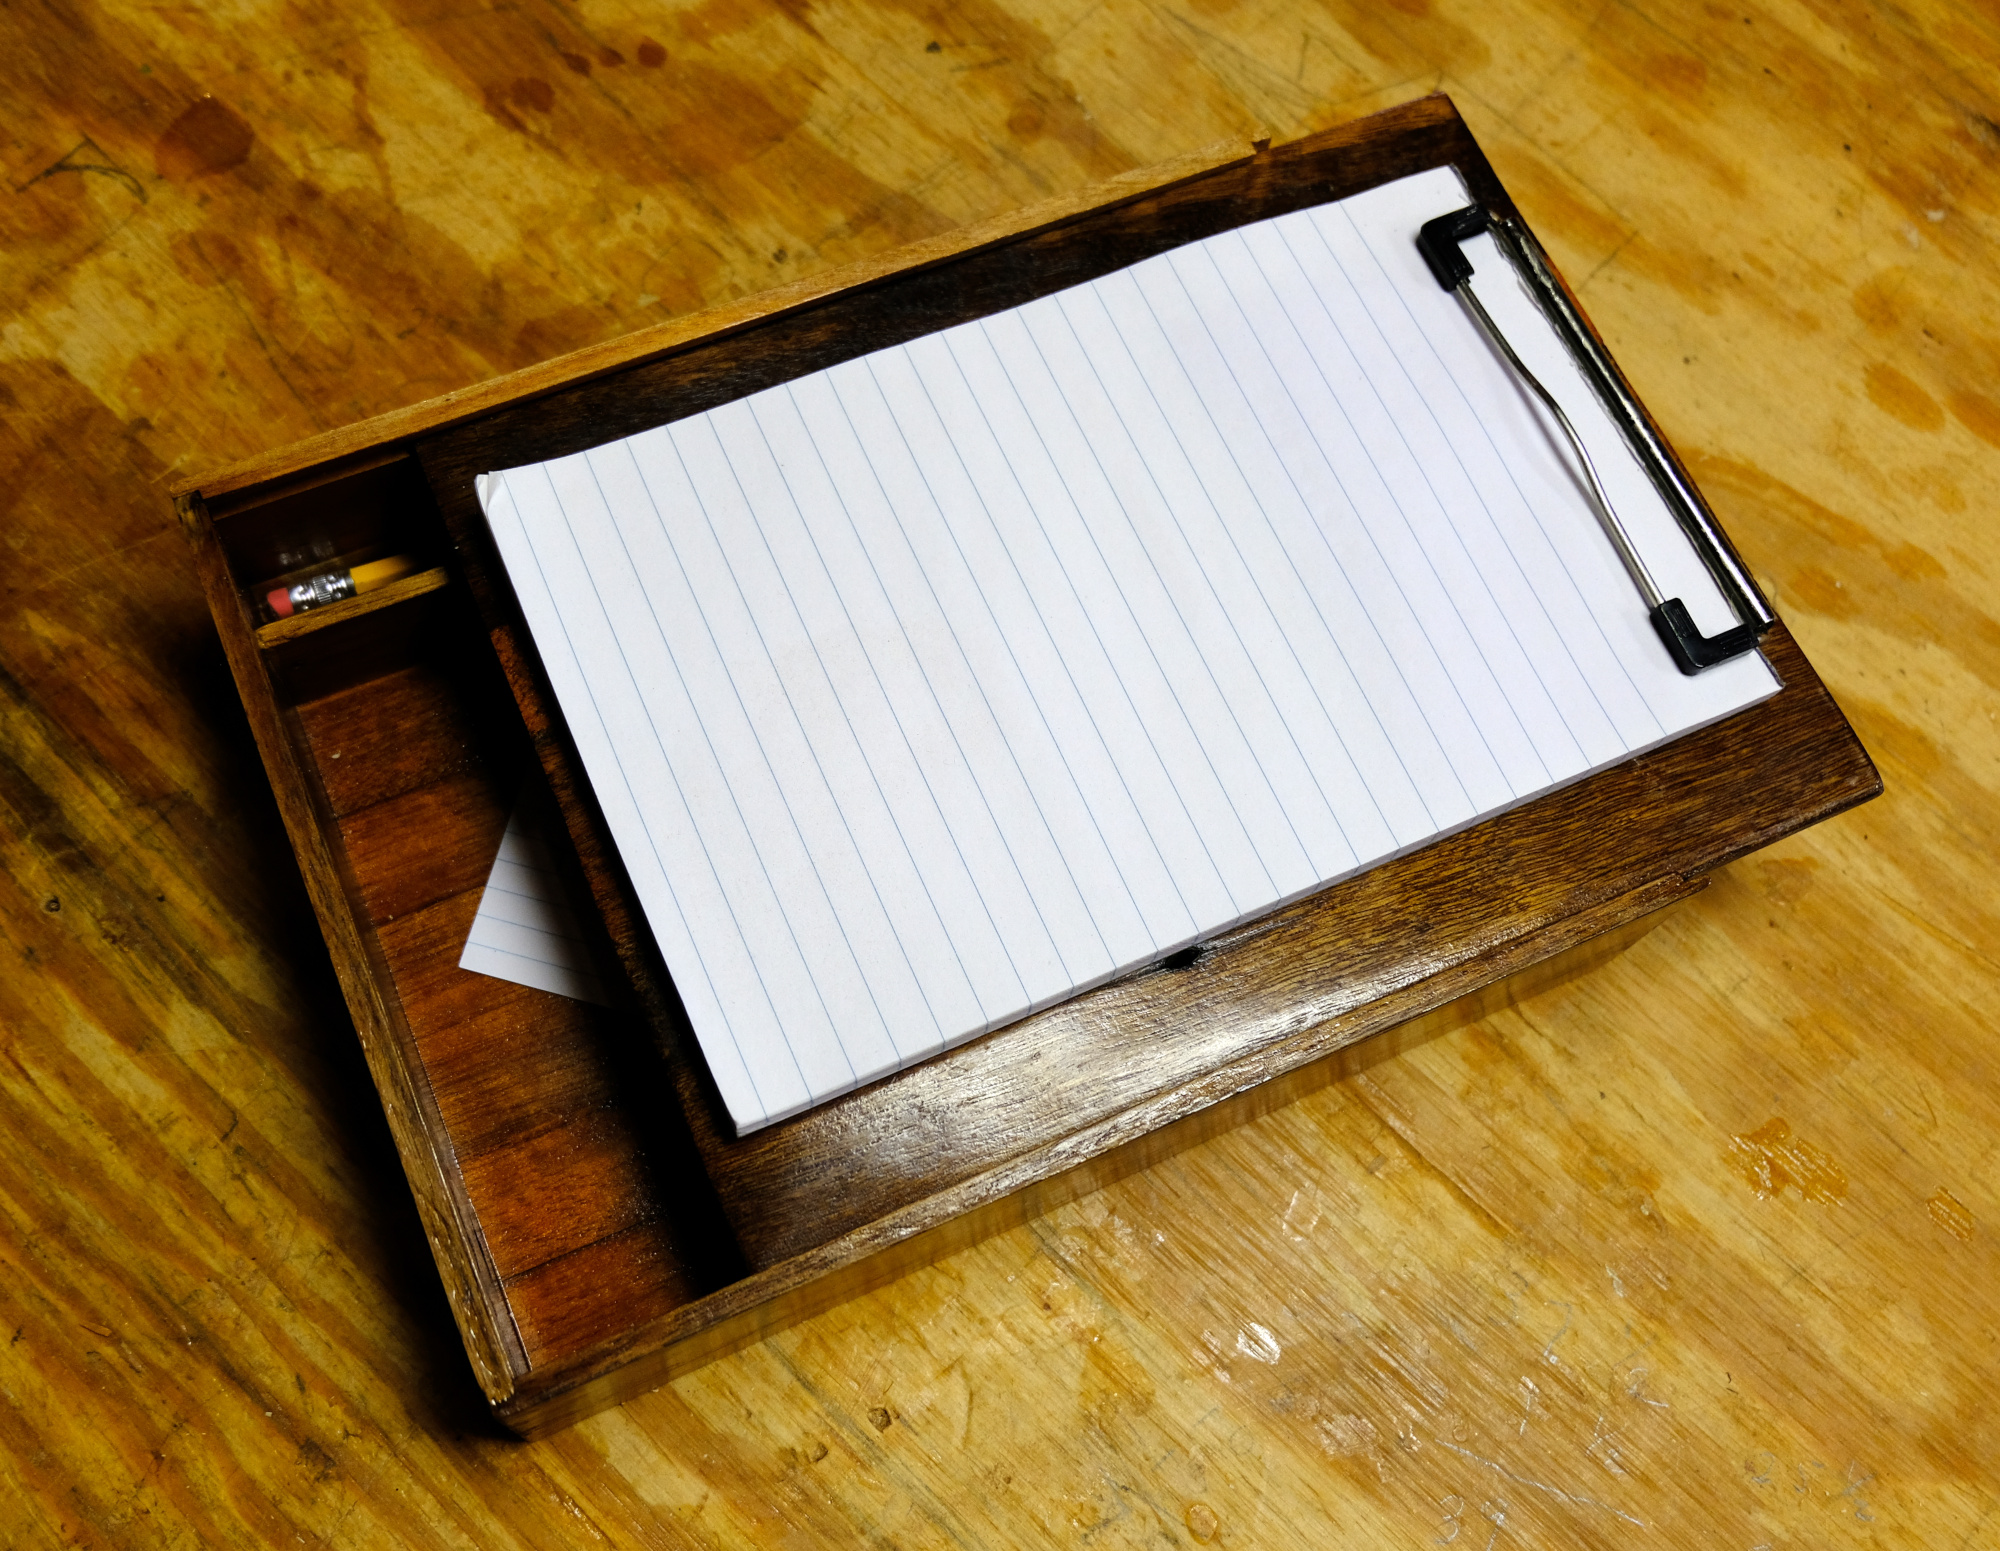
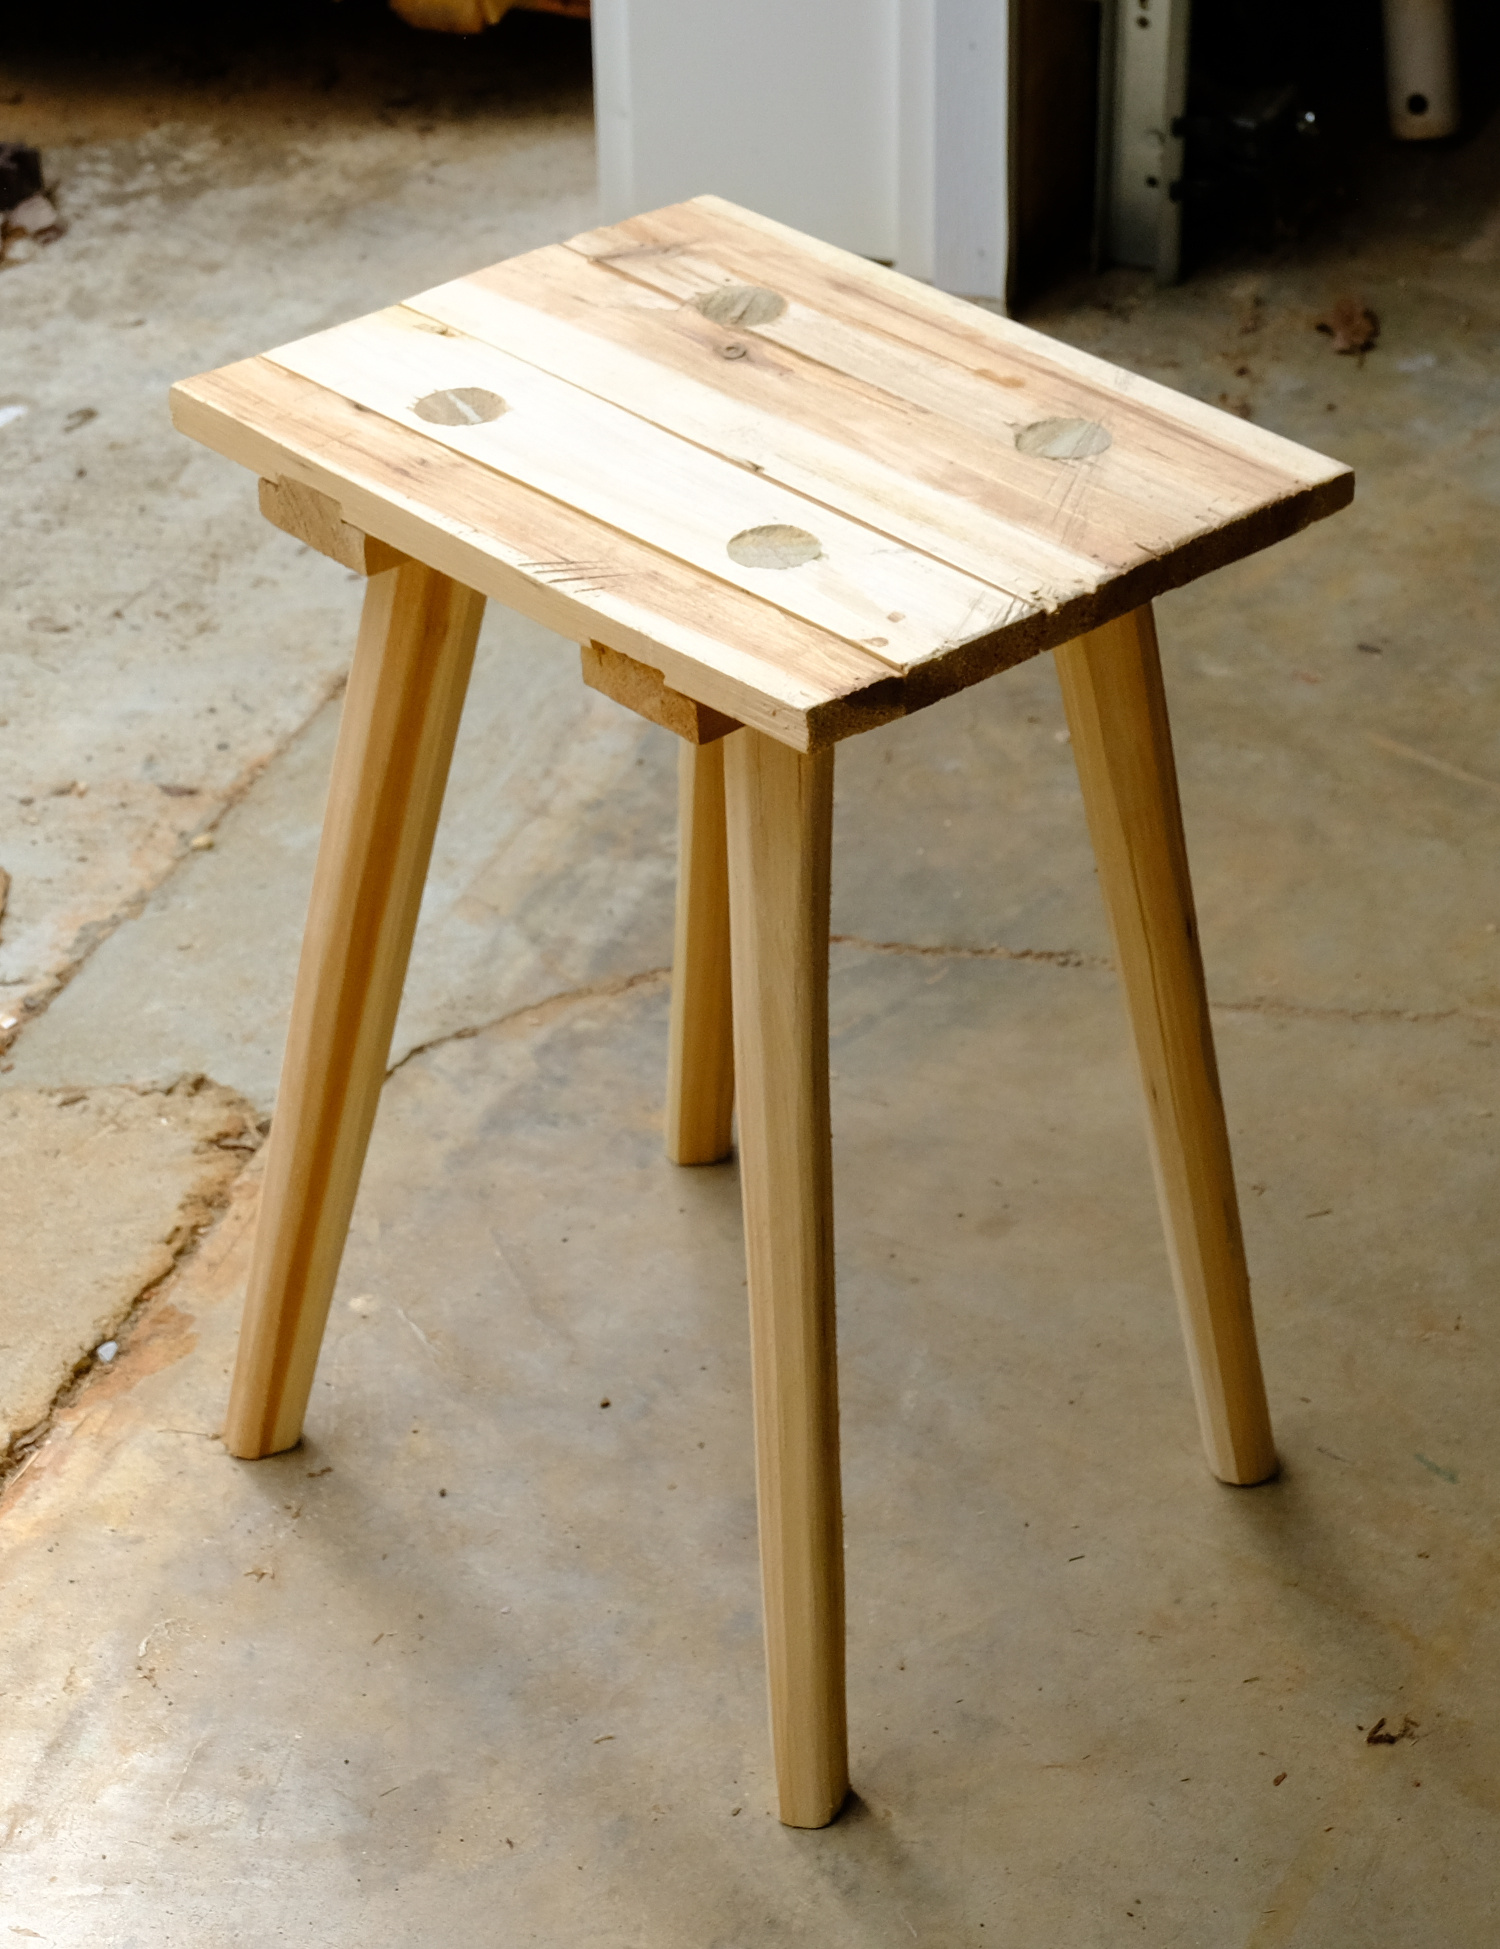
We buy satin Minwax by the gallon, but we got a quart of gloss just for this project. The amount of figure and color in the yellow pine suggested using a finish that would obscure it the least. Satin and matte finishes have more solids in them, which just like paint cover the natural figure. On the other hand, gloss finishes show up dust and finger prints, so for furniture that is going to get heavy use it may not be a good choice. I think this piece is going to spend most of its life tucked away on a shelf, to be taken down just occassionally (it is designed to store stationery and writing supplies).
Most furniture makers avoid showing end grain, but I find it adds a lot of interest in staggered-joint boxes and crates. This is functional, vernacular woodworking rather than fine cabinetmaking and we don't have to follow all the rules.
The box is 12x16 inches and about 8 inches tall. There is a tray with dividers that fills the top third of the box. The top will be hinged, with some sort of hasp or catch.March 5th, 2018
Posted by Paul

Hope spent an hour working in the shop and learned how to drill a hole with a traditional brace and bit.
February 19th, 2018
Posted by Paul

I found a few cutters, probably for a Stanley #50, that I bought on Ebay some time ago. One of them looked like it might be suitable for cutting a cock bead on a table edge or drawer front, so we decided to make a simple bead scratcher from a plan that Paul Sellers posted a while ago. It didn't take long to make, once we figured out exactly how it was supposed to look. I tried scratching beads on a length of pine, and then on oak, and I can see that it will take some practice to get the feel of using the tool, but hopefully it will prove useful.
February 15th, 2018
Posted by Paul
We almost never buy wood. The last thing we bought was the Douglas fir for the tavern table, last October. We find so much damaged furniture set out on the curb that we have little need to buy any stock. Furniture that can be fixed is put back in shape and passed on to someone who can use it, and furniture that is too far gone is broken down for stock. Joe has made some great finds of cherry and maple. This picture shows some very clear, straight-grained light wood that we think is redwood.
We live in the yellow pine belt and are always picking up boards from demolished old sheds, or laying around the back of people's garages. Yellow pine is as common as dirt around here.
Steve Schuler writes a website called "The Literary Workshop Blog" and he has a great recent post about how he gets stock, Trash –> Treasure, or New Spoons from Old Furniture. In Steve's town, there is a "neighborhood trash pile" and he found two old dressers there, too far gone to return to service, but a real gold mine of useful wood. Among other things, he got some intensely green heart poplar from them and made some beautiful spoons.
The more wood that gets saved from the landfill, the better. Joe reminds me that bulky item pickup is coming soon in our town, and the streets will be lined with damaged and worn-out furniture. We'll be out there looking for what can be salvaged.
February 15th, 2018
Posted by Paul
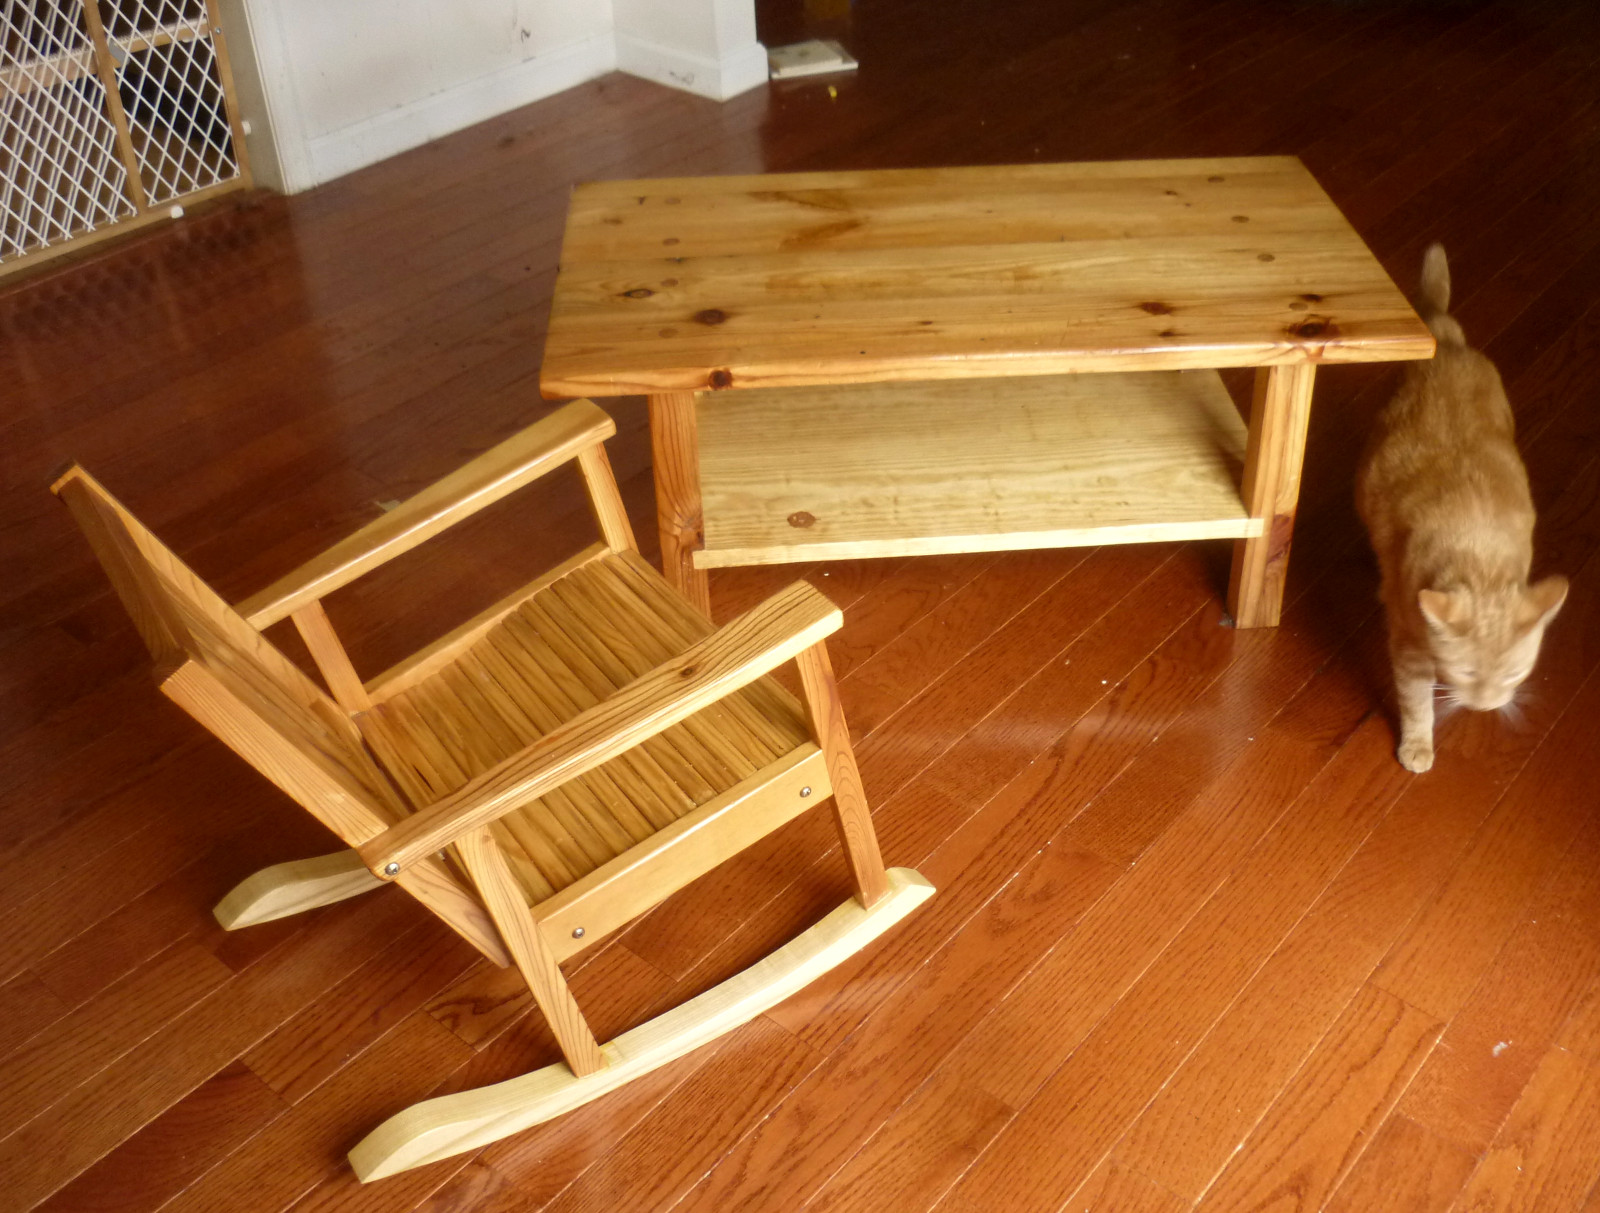
The rocker was built for Lars in February 2016. The table we built in May of the same year, to replace Marie's coffee table which was coming apart at the joints under Lars' battering. In short order Lars appropriated the new table as his own, so Marie and Levi are still without a coffee table. I must say, Lars has not been able to damage this one in the least. It has stood up to everything he has thrown at it (sometimes literally). The rocker is holding up as well. Skittles the cat, while colored like yellow pine, is not as tough. He has suffered enough at the hands of the rambunctious toddler to know to high-tail it at his approach.
February 11th, 2018
Posted by Paul

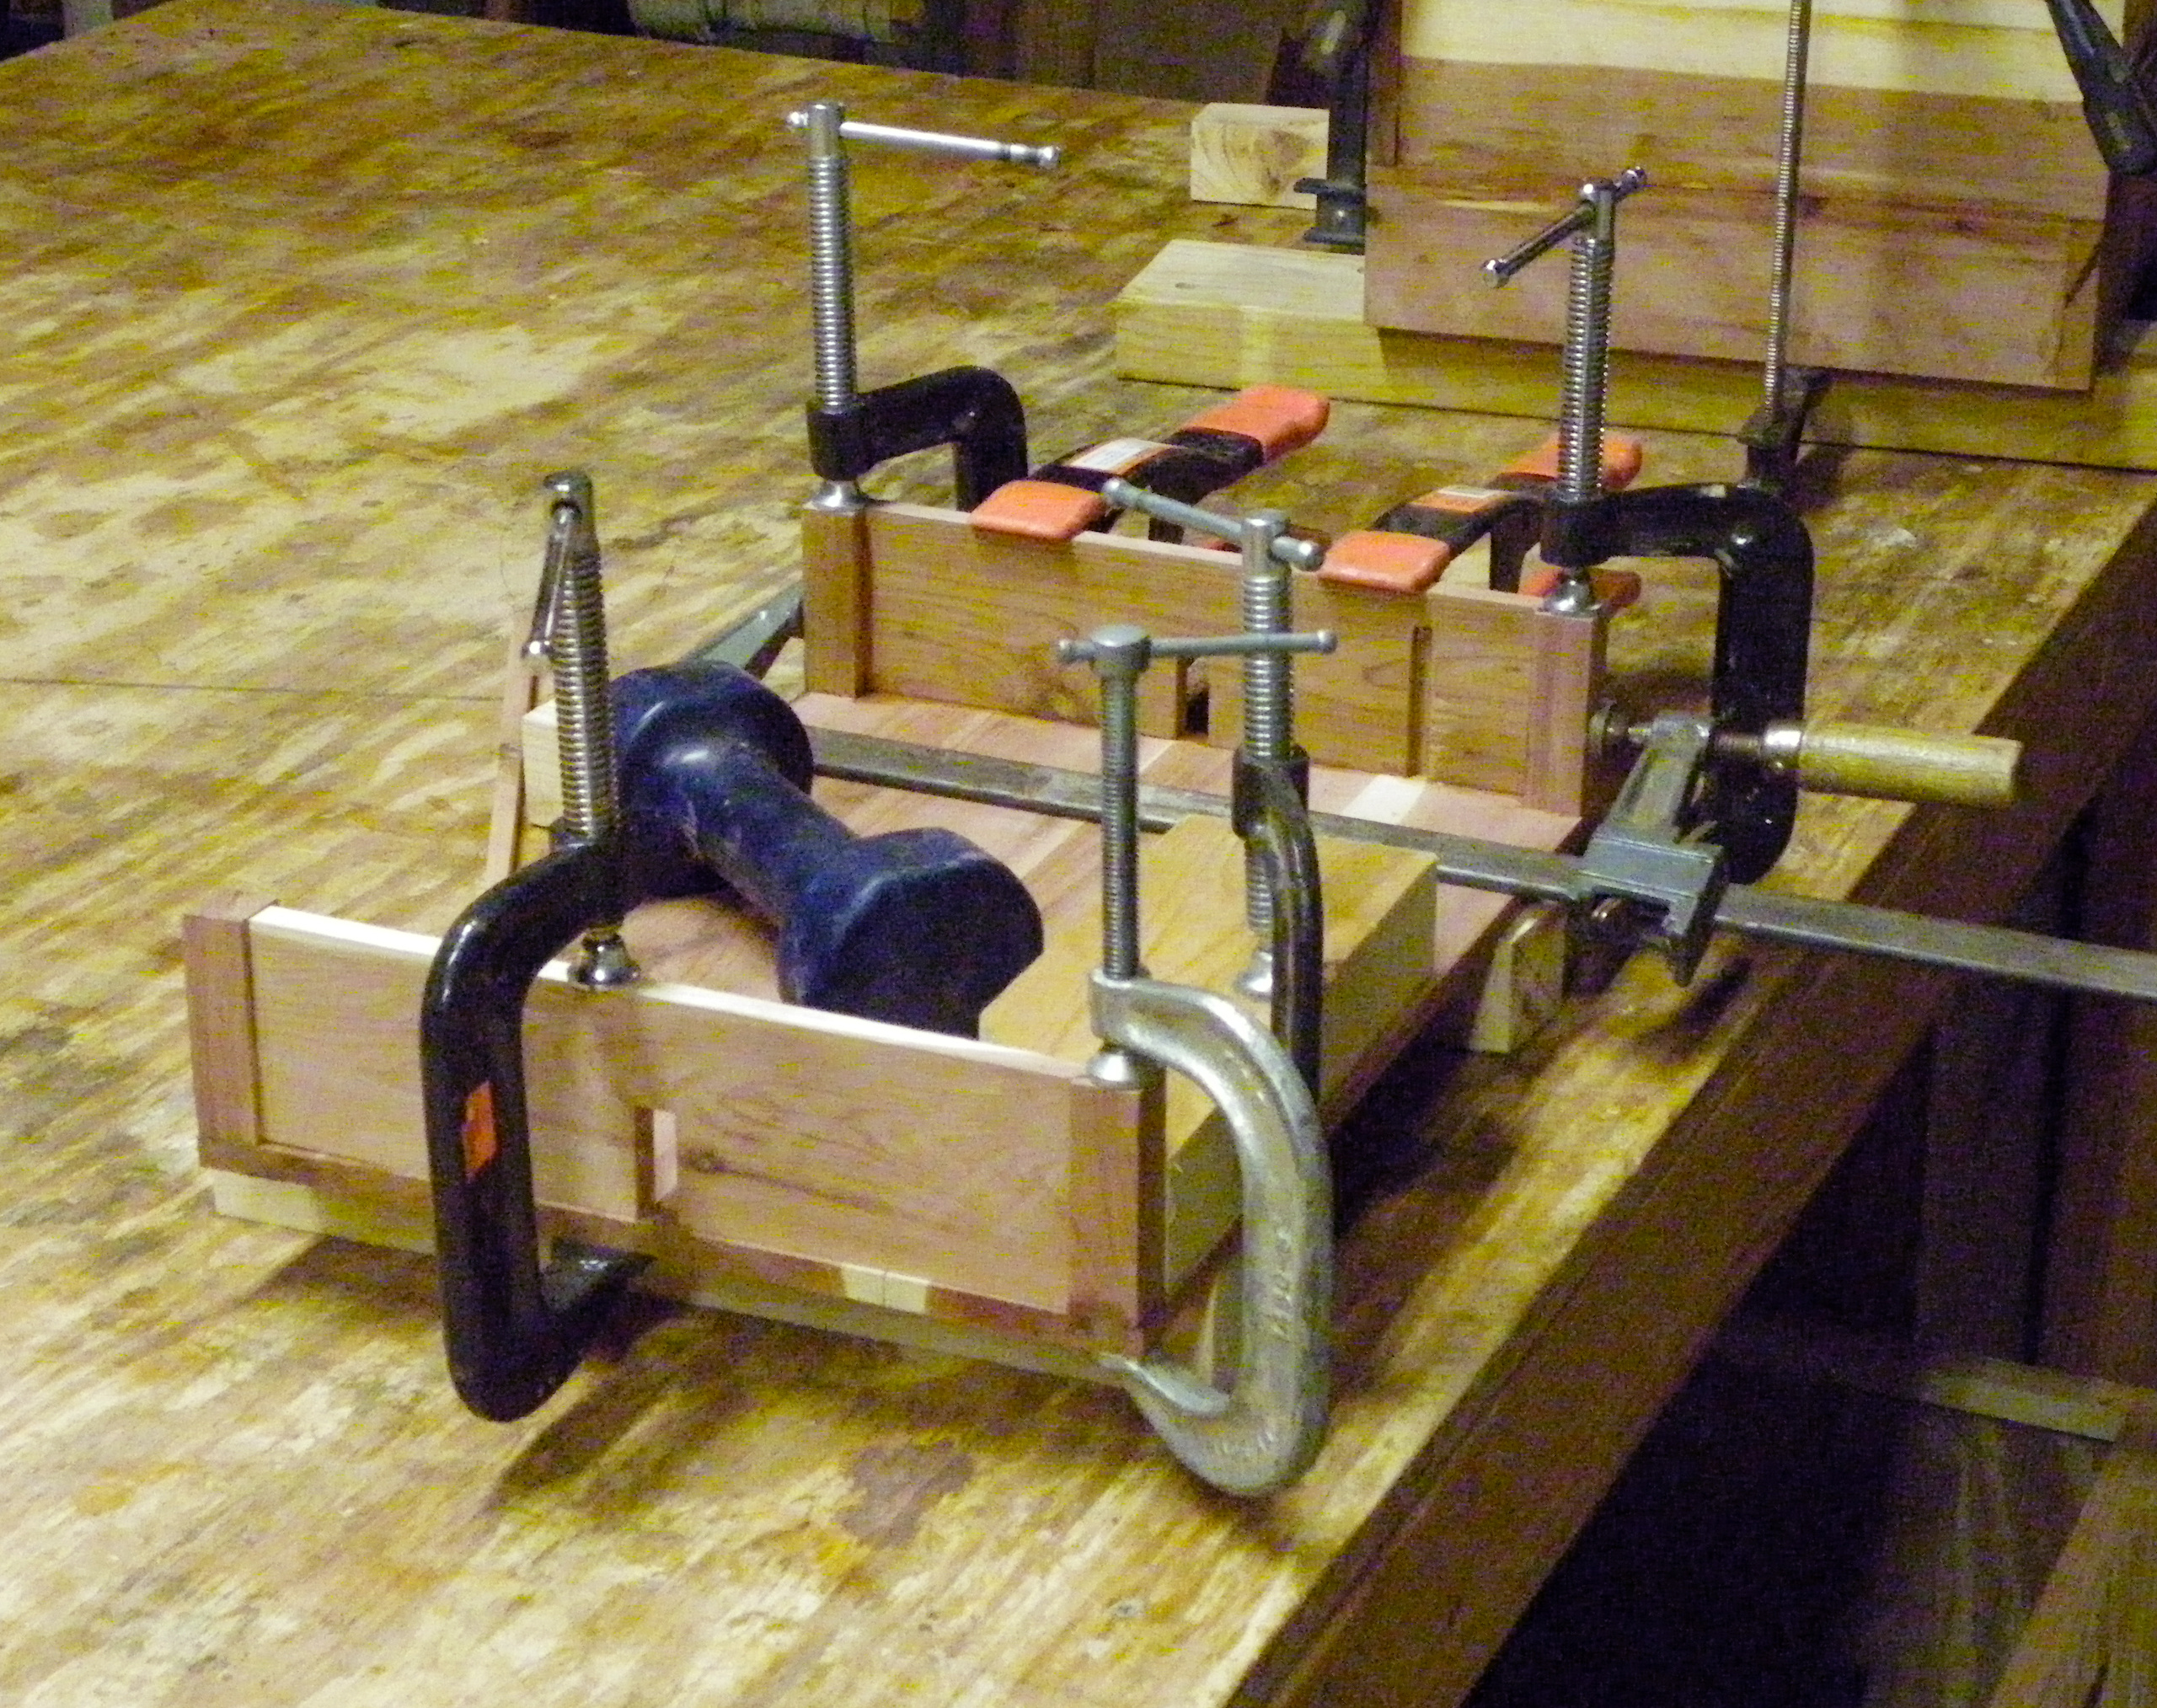
There's the beginning of a box in there somewhere, under all those clamps.
February 10th, 2018
Posted by Paul

Marie reports that Lars wanted to take his truck to bed with him last night.
A friend asked us to repair a dresser drawer. One screw had ripped out and all the others were loose. The bottom was out of its slots, warped and bent. The first thing we did was double up the bottom with a sheet of luan. Then we drilled a new hole to replace the torn-out one, and replaced some of the screws with longer ones. With the more rigid bottom and tight screws, the whole drawer came out better than new. When I installed it today, I coated the runners and rub surfaces with wax. I'm a believer in waxing or oiling any friction surfaces, whether it be sliders, hinges, latches or whatever, to make things work easier and reduce stress.
February 9th, 2018
Posted by Paul

I took Lars his truck today and he played with it most of the afternoon. He likes stickers and the first two of what will probably be many are now affixed.
February 7th, 2018
Posted by Paul

After working on her project for a while, Faith took a break to play with Lars' truck. It's done now, and I will deliver it in a day or two.
February 7th, 2018
Posted by Paul

Faith only gets an hour or so a week to work in the shop, but she has made steady progress on her project. Today she did some sawing and sanding to get the corners and roof squared up.
February 4th, 2018
Posted by Paul

My friend Mark sent me this picture of some mulberry he was working up for firewood, and when I told him it was considered good wood for furniture he saved a half-round for Joe and I. There wasn't enough to build anything so we sawed it out in quarter-inch slabs to use for parquet and inlay. We got about 20 pieces which we stacked and stickered in a corner of the basement to dry. In a few months we should have some interesting wood to enhance a box. I think it would look good inlaid into walnut.
February 2nd, 2018
Posted by Paul

A couple more coats of poly, and this rig will be ready for delivery.
January 31st, 2018
Posted by Paul
When I get a chance, I like to check up on things we have built and see how they are holding up. This crate, which Joe made for Lars in April 2015, is doing fine. The only difference from the day it was built is the wood is getting darker and more golden, the natural effect of light.
January 28th, 2018
Posted by Paul

With the economy booming, it's hard to schedule a truck these days, so Lars and Lex have decided to start Smith Bros Transport to cash in on the gold rush. Joe and I have been hard at work building the first rig. Here we see it getting a first coat of finish. Soon the wheels will be installed and it will begin rolling up revenue miles. Who knows what the future holds - a tanker, a flatbed or a gondola? Or maybe one of those tough Freightliner cab-overs that ruled the road in the 70s?
January 21st, 2018
Posted by Paul

We waxed the tavern table and put it to use in front of the fireplace, though for the first time in days there was no need for a fire. So this project that we started back in September is finally complete. It came out better than we dared hope, and maybe we will start on another soon.
January 16th, 2018
Posted by Paul

Elia Bizzarri, a Hillsborough NC chair-maker, posted a video at his site of a Moroccan craftsman turning chess pieces on a bow lathe. The whole thing was fascinating but what really grabbed my attention was the loose ring he cut. I decided I wanted to try one on the lathe at Joe's basement. It was a lot of fun, and not nearly as hard as it looked.
I didn't plan to put a finish on it, since it really just amounted to a little piece that I made to satisfy my own curiosity, but Joe suggested I rub it down with wax. I took it home, worked over it with some 220 sandpaper and then applied a coat of S.C. Johnson Paste Wax. That made it a little darker and more golden in color, and brought out the grain. I may carry it around for a few days to show it off, and then it will go on the shelf.
January 14th, 2018
Posted by Paul

Joe has produced another gorgeous parquet box. All that is left is to add the hardware. His background in the building trades,where a sixteenth is usually close enough, gave him a head-start on cabinetmaking. The ability to do this kind of precision work he had to develop on his own.
January 8th, 2018
Posted by Paul

Lex grew out of his bassinet so Joe and I patched up a crib that was missing some fasteners. We scavenged some from another crib that was in about the same shape and drilled out some pieces to take hanger screws. We got it done in about an hour. Now Lex has plenty of room to be comfortable.
January 7th, 2018
Posted by Paul
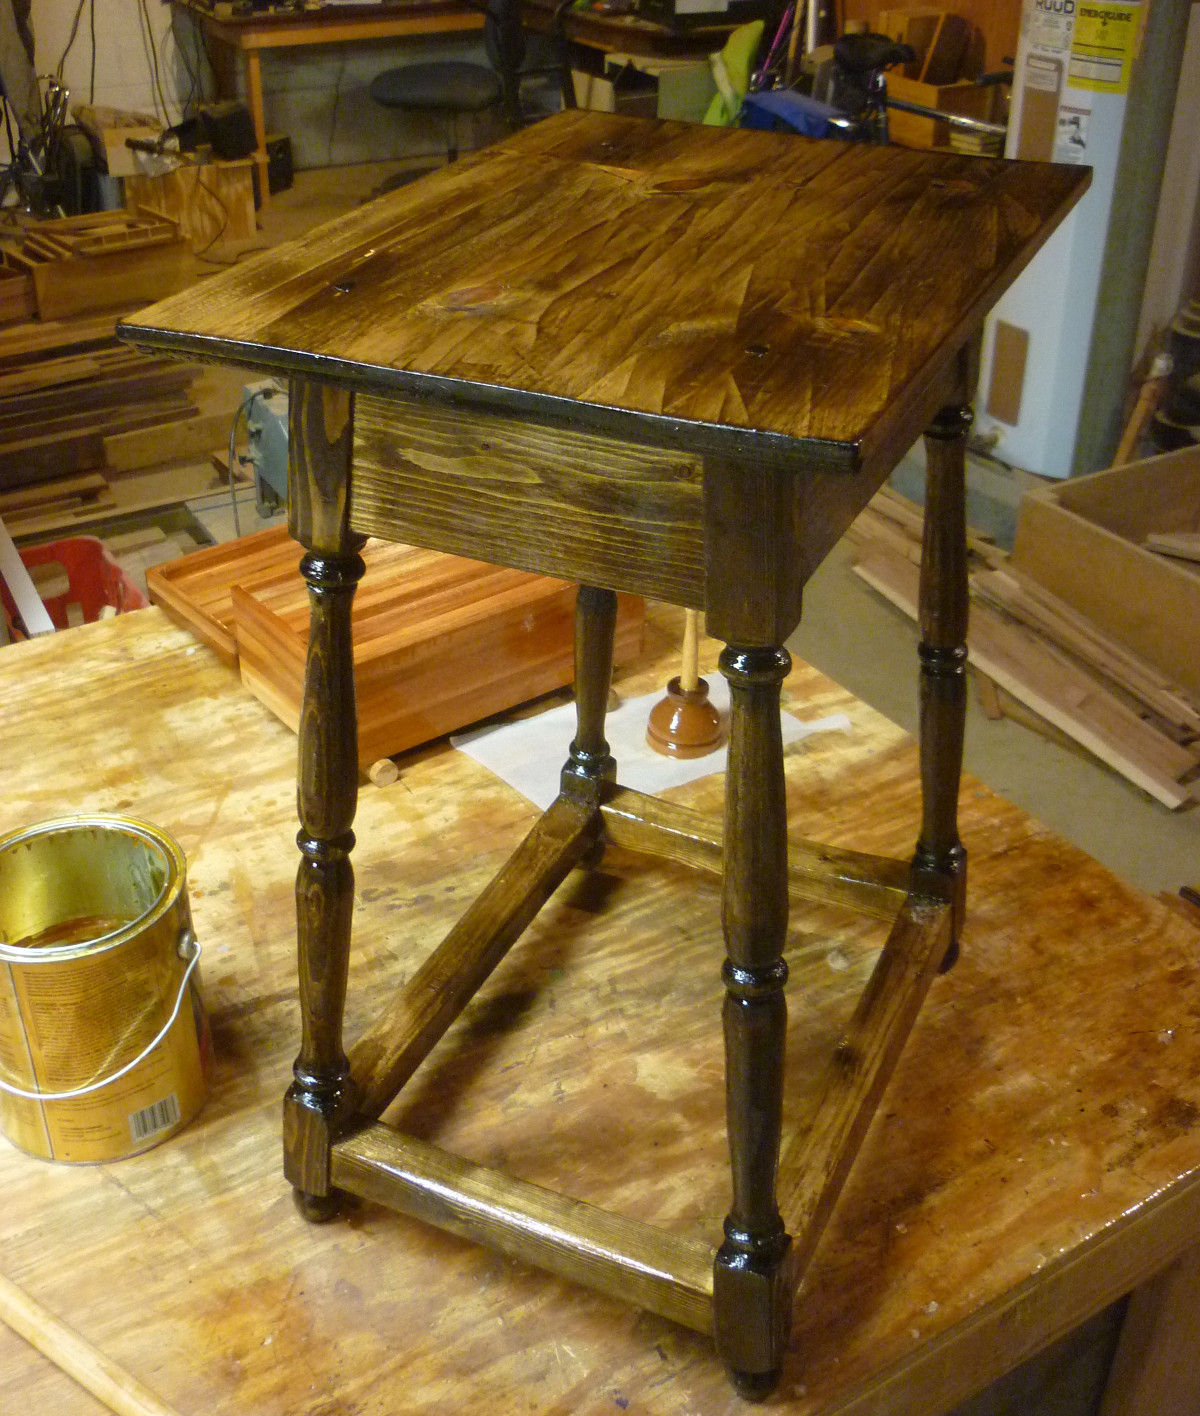
We stained the tavern table today and put on a first coat of poly.
A note on the stain. Joe made a gallon of it from walnut husks collected from a nearby tree. First he soaked the husks for several weeks in three gallons of water. Then he strained off the water and boiled it down to a gallon. I checked Amazon to see what a gallon of walnut stain is worth - $44.95.
January 7th, 2018
Posted by Paul

Faith has been a welcome visitor to the woodshop lately. Here she cleans up some glue squeeze-out after clamping her latest project.
January 1st, 2018
Posted by Paul

I'm going to send this poplar slide-top box and some drafting tools to my nephew Ryan.
December 31st, 2017
Posted by Paul

This little slide-top box in spalted maple came out well. It was Joe's idea to add the clip to the top. I think it adds considerably to the functionality.
December 31st, 2017
Posted by Paul

The tavern table is really close to being done. We have a little work to do with attaching the top to the base, and we need to finish rasping the feet down so they all sit level. Then it is just a matter of staining with Joe's homemade walnut formula, and putting on a couple coats of clear poly.
December 17th, 2017
Posted by Paul

I picked up this old Stanley 127 "Liberty Bell" from Ebay seller djchurn2012 who has a good selection of user tools at fair prices. The plane has been resoled at least once and converted to a scrub from its original "jack" configuration. The throat has been opened out and the blade radiused. The Liberty Bells were made in the late 1800s and early 1900s and the seller dated this one as 1891-1904. The board underneath it is quite likely just as old, as it is salvage from an old shed torn down in West Salem. There is some rot and some nail holes but plenty of good solid yellow pine too.
December 17th, 2017
Posted by Paul

Faith is real proud of the candleholder she turned on the lathe.
December 12th, 2017
Posted by Paul

Thor valiantly battled on a demo job but finally lost his head. When I left the shop Joe was preparing to give him a true Viking funeral, immolation in the fireplace.
December 11th, 2017
Posted by Paul

The slide-tops lined up, drying with a first coat of rub-on poly.
We glued up the base of the tavern table today, although the glue is the least of it. We figured out our technique on drawbored pins, and didn't even have to clamp the last stage. The trick is to mark the outside edge of the holes into the mortises on the tenons, then drill the tenons a hair to the inside edge of our mark. This gives just enough offset to pull the joint tight. That was Joe's idea. My contribution was figuring out the pins needed a taper on each side of the end, so they could cock one way into the tenon, then back the other way into the back of the mortise.
December 4th, 2017
Posted by Paul
A slide-top box in poplar for my nephew Ryan and a rattle for Lex. We also started assembly of the tavern table, drawboring the pins through the mortise and tenon joints, with mixed success. And we moved the lathe to a new spot along one wall, freeing up some floor space.
November 26th, 2017
Posted by Paul

All the lathe work for the tavern table is done. The legs need to be trimmed down to length and drilled for pins, and then we will be ready to glue up the base. After that, we have to make the top and then we will be ready to stain and finish.
November 23rd, 2017
Posted by Paul
Back in September we started experimenting to see if we could cut the joints needed to build a splayed leg table, and now in November we are closing in on finishing one. We've built a lot of boxes and done some repair work in the meantime, but almost every session we have set some time aside to work on the tavern table. We learned to build skewed, stopped mortise and tenons. Joe taught me how to operate the lathe. He also made up a batch of walnut stain from husks collected from a nearby tree.
Once this table is finished, I hope we can find time to build another one, out of maple, walnut, or some other hardwood. We made this one out of Douglas Fir, a very soft and inexpensive wood that would be easy to work and cheap to throw away if the whole project had ended up beyond our abilities. At this point, I'm pretty confident we can finish this job.
November 19th, 2017
Posted by Paul

After working on the turnings, we dry-fitted the tavern table to see how it was coming along.
November 19th, 2017
Posted by Paul

I rescued this chair from the trash and we cut a new seat and covered it today.
November 19th, 2017
Posted by Paul

Faith learned what a lathe is today and even got to run one. Joe gave her some instructions and showed her how to hold the chisel and then he stood back and let her turn a cylinder. I expect she is the only one in her fifth grade class to have run a lathe.
November 18th, 2017
Posted by Paul

Joe finished laminating the hoop for his fishing net. Next step is to drill out the holes for the net but that has to wait until he has the net in hand, to know just how many holes to drill.
November 18th, 2017
Posted by Paul
We made another slide-top box for me to carry down to my boat in Edenton. I will keep it in the cockpit when I am sailing, and it will hold a deck log, pens and pencils, a hand bearing compass and maybe a few other items I'd like to keep handy. It has three coats of Waterlok so far, and I will probably coat it with spar varnish and wax once I get it to the boat.
We did a repair on the tool tote that I keep on the boat after it shot out of its place in the forepeak and smashed onto the cabin sole in rough seas. One end broke but we scabbed over the break with a piece of dieboard and it is good as new.
November 3rd, 2017
Posted by Paul
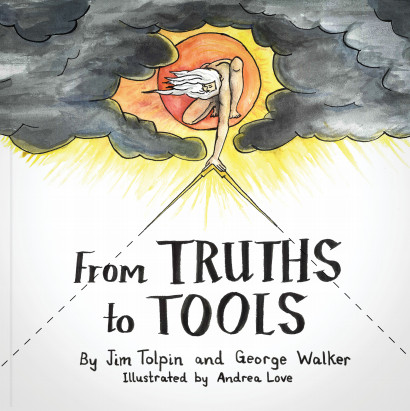
So, George Walker and Jim Tolpin have written another book on the geometry of woodworking. Since geometry and woodworking are two of my favorite subjects, I immediately navigated to the Lost Art Press website and bought a digital copy, which moments later was downloaded to my computer and opened in Master PDF Editor, my current favorite pdf reader. The first thing I noted was the cover design by illustrator Andrea Love, closely modeled on William Blake's work "The Ancient of Days". Inside I found the familiar Walker/Tolpin paradigm, large print set in a typeface resembling handwriting, describing fundamental concepts and practical applications, all copiously illustated with clear line drawings. This is an agreeable presentation that works as well in this book as it did in their prior volume, "By Hound and Eye".
I read these books secondly to learn new layout techniques and firstly to find little tidbits of practical geometry that amaze me. Early on I found a description of the graphic rule, a type of ruler designed to be used with a pair of dividers, in which the initial unit is subdivided into segments, superposed on an isosceles triangle, which divides the segments into fractional lengths. It is very similar in principle to using a ruler placed at an angle across a plank in order to divide its width into equal sections. The authors state that this form of rule is sometimes inscribed on boat plans, but since I am a sailor but not a boat builder, it is something I had never taken note of.
Later in the book I found a drawing and description of a transfer gauge, a simple gadget that allows for marking cut lengths on boards between fixed points. The illustration shows it in use determining where to cut a piece of baseboard molding to fit inside a door jam. It strikes me that this device would work well to lay out a splayed tenon shoulder like the ones we recently cut for the skirts and stringers on our tavern table. A variation of the transfer gauge can be used to transfer markings from the inside to the outside of a piece of wood.
The book is full of fascinating little techniques, like how to use a carpenter's square to figure out the circumference of a circle. A bit more complex is the technique described to make a "resultant angle square" for determining the rake and splay of a chair or table leg - another construction that would have been of value in laying out the tavern table.
Have you ever heard anyone say "I wouldn't touch that with a ten foot pole"? Well, a ten foot pole is a carpenter's tool designed for setting verticals. If you recall any of your high school geometry, you may remember a common right triangle with legs of 3, 4 and 5 units. A ten foot pole is double these dimensions, yielding a right triangle of 6, 8 and 10 feet. If a ten foot pole fits between a point on the ground 8 feet from the post we are setting, and touches the post 6 feet above the ground, the post is vertical in one dimension. Another ten foot pole set up the same way from a 90 degree side proves the post vertical in that dimension. A thirteen-knot cord will do the same thing. That's another old carpenter's layout tool you don't see every day. And a cord of diagonals will prove a layout square. On the other hand, a cone of silence - wait, that's not in this book.
The last part of the book takes us into the realm of antiquarian layout and survey tools, like cords of magnitude and angle, chorobates and cross staffs, which the authors point out can approximate angles without having to "go through the usual 20th century rigamarole of voodoo trig". Finally, Walker and Tolpin look at the specialized geometrical techniques used by foresters. And just for us gluttons, there are a couple of appendices with links to other works and a description of how Eratosthenes calculated the circumference of the earth. No mention of his sieve, though. This is a work of geometry, not number theory.
Walker and Tolpin have come up with another whacking good read for the geometrically inclined woodworker. If that describes you, I suggest you purchase a copy poste-haste. The digital ones get delivered quicker and take up less shelf space.
October 29th, 2017
Posted by Joe

Marcia bought this little table at a garage sale, missing the drawer, she wanted me to cut a piece of wood to go in the drawer slot to make it a shelf. I went ahead and built a drawer out of some drawer parts from scrapped furniture that I got last bulky item pick-up day. It didn't take me very long and Marcia just loves this piece of furniture now. She's not even going to paint it so that the drawer matches.
October 27th, 2017
Posted by Joe
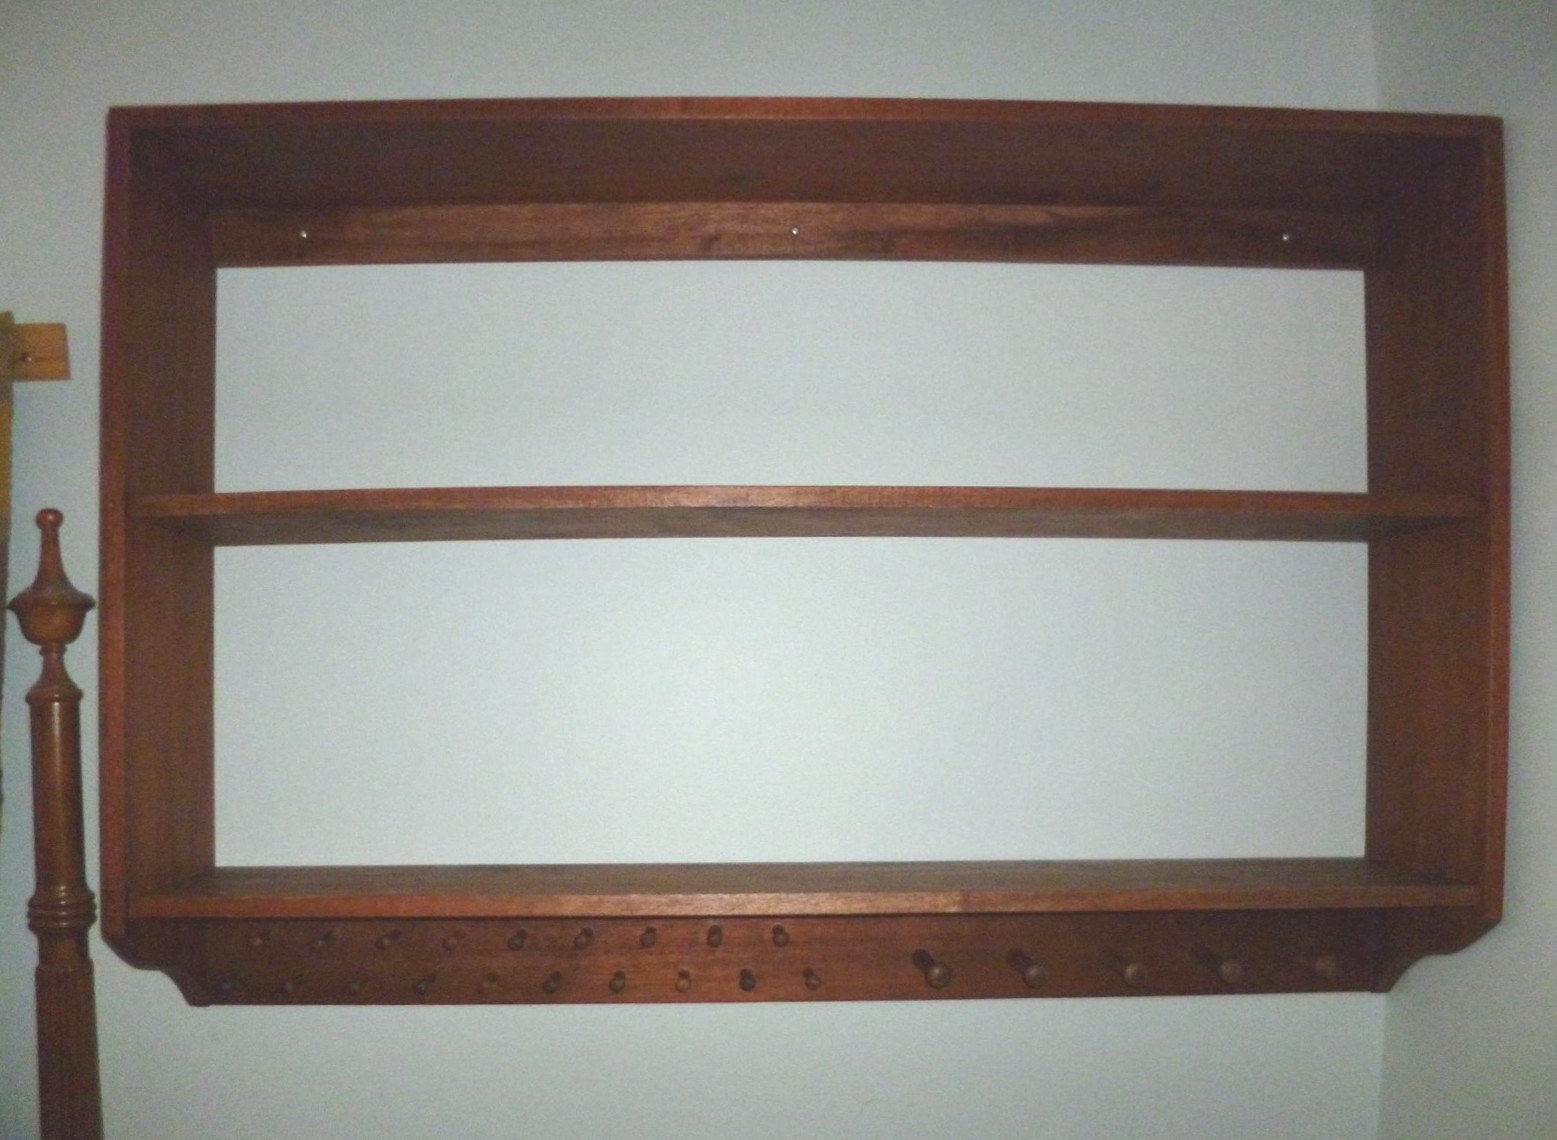
The Mahogany shelf is done and hung. I found out that this wood is mahogany by comparing to the wood I saw at the Georgetown Wooden Boat Show, I wasn't sure until then because I don't think I had ever seen mahogany finished natural. I got this wood from a guy clearing out his Grandfather's woodshop, thanks for that. The clamp extenders were used on this piece as it measures 39 inches in width and our largest clamps measure 36. Marcia is thrilled to have more display space; the pegs at the bottom are for jewelry and handbags. Shelves have begun to fill the house, before long, I may have to add walls to accommodate additional shelves.
October 14th, 2017
Posted by Paul

One more day of shop work before I leave for an extended road trip.
Joe had cut out the parts for a shelf that Marcia had requested, but the width was too great for our clamps to span. Even the new pipe clamps were too short. The solution took a bit of puzzling, but eventually we saw how we could build a jig to bridge one end of the project and give the clamps a place to hook about twelve inches shy of the end. Then we bridged the other end with a heavy board so the clamp pressure would be evenly distributed the whole height of the shelves. In effect, we made a box arrangement to surround the shelf, with hangers on the long edge to catch the ends of the clamps. I haven't seen the project out of the clamps, but it seems to have worked, and now we have a clamping system for oversized assemblies.
October 10th, 2017
Posted by Paul

All the joints are cut and fitted, and it's really starting to look like a tavern table.
Joe chucked a scrap up in the lathe, showed me how to turn the machine on, and handed me a chisel. Then he gave me a few pointers as I gradually turned the scrap into a cylinder. After a break to touch up the edges on the chisels, I worked on, and in half an hour had a right creditable vase shape carved out. With a bit more practice, I think I will be able to do my share of the turning. So far, no blood.
October 6th, 2017
Posted by Paul
The tavern table is coming along remarkably well so far. All the parts for the base are cut, as are the mortises and tenons for the apron. We dry fitted what we had done, but it is all still loose so we can take it down to cut mortises for the stretchers in the legs and then turn them on the lathe. The tenons on the stretchers are mostly cut. We will have to build a table top, but that is something we have done, and it should be easy.
I mentioned that the biggest job still remaining would be the turning. "The turning," Joe mused. "That could be the name of a horror movie." Lets hope not.
October 5th, 2017
Posted by Paul

These setup blocks are a new addition to the shop. We're just starting to get an idea of how to use them. So far, we have found that they work well for setting up the table saw. A block can go between the fence and the blade to rip a length to a set width. Or a block can be set next to the blade and the blade raised or lowered until it is precisely the right height. Here is where the finger can tell better than the eye. It is easier to feel that the blade and block are the same height than to see it.
Joe, with his years in the building trades, is pretty good at taking measurements with a rule, but the setup block are probably quicker and more accurate.The set of five individual blocks plus the 123 block can be combined to gauge everything from 1/16th to 4 11/16ths, by 16ths!
With the tenon-cutting jig we built for the table saw and the setup blocks to get just the right settings, we cut some very clean and accurate tenons for the tavern table we are building.
September 29th, 2017
Posted by Paul

Boxes are fine, we enjoy making them and everyone needs them. But now and then it's time to build a piece of furniture. I have long admired the colonial form known as a tavern table, but never seriously considered building one. They generally have splayed, not to mention turned, legs, so the mortises and tenons have to be cut at an angle, and there's lathe-work as well. Our record on mortise and tenons is sketchy, and Joe is just mastering the lathe that Graham gave him a year ago.
To see if there was any reason to even consider taking on a tavern table, we decided to try cutting a corner post and apron with angled blind mortise and stopped tenons, just to see if we could do it. If it worked out, we could think about moving forward.
Turned out not to be so bad. We completed the test in just a couple of hours, and ran into no real difficulties. Joe says turning the legs won't be too hard, either. So we will probably start building a tavern table in the near future, expecting it to take some time. To give ourselves the best chance, we plan to build it out of soft, straight-grained Douglas Fir. Then we will stain it down to look like the traditional tavern tables, which were commonly build out of walnut, mahogany or cherry. Many of them were painted, but we won't do that.
After searching the internet for hours, I found a plan in a 1929 issue of Popular Science for a tavern table which I will use as a model for the plan I draw up. These tables are small, so I can probably draw it up full size.
September 27th, 2017
Posted by Paul
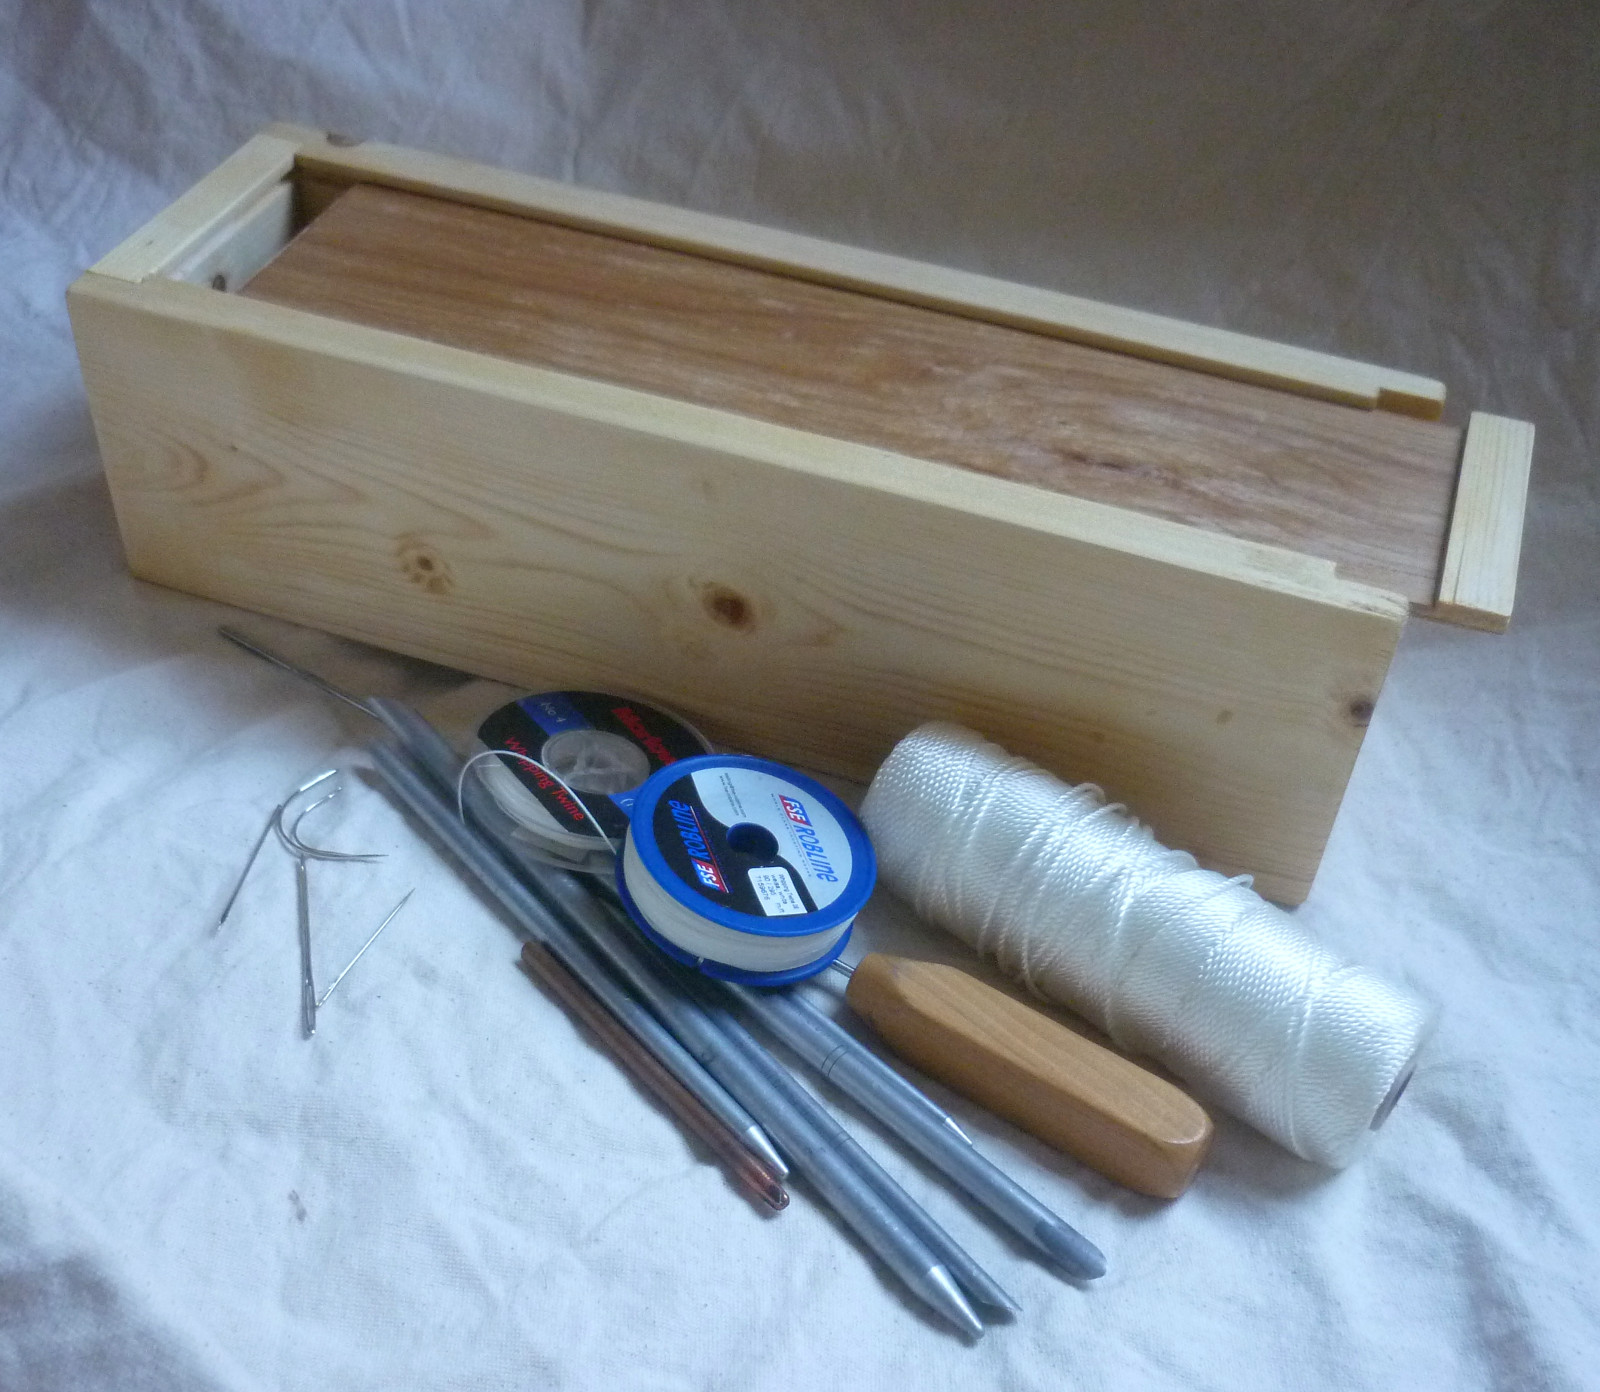
We're on a sliding top box binge, and the latest is this 5x5x16 inch one for holding my rope-working supplies - fids, needles and whipping twine. This box will fit on a shelf over one of the settees on my boat.
September 26th, 2017
Posted by Paul

Four years ago when we started the shop we built several small tool totes for young friends just starting out living on their own. This one went to Marie and Levi, and it still makes good storage for their small collection of household tools. I think it has aged beautifully.
September 22nd, 2017
Posted by Paul

Neighbors put an old chair out at the dumpster. I retrieved it and took it to the shop. A couple of stretchers were loose but the chair was in fairly solid shape, so we reglued the stretchers, sanded off the flaking finish and gave it a coat of green milk paint. Then we brushed on polyurethane. The neighbors are older ladies living on a fixed income and my plan is to give the repaired chair back to them, if they want it.
Also getting poly were a small cypress box my mother asked us to build, a Leyland cypress utility box, a slide-top box and a pine step-stool.
September 10th, 2017
Posted by Paul

I need some storage boxes so I planned one that could be made out of dimensioned lumber with a minimum of saw resets. It would be 10x16 inches to be stackable with my other 10x16 and 16x20 boxes. A six foot 1x5 would produce a box with a a good scrap left over to be used as a side or two ends of another box. The top and bottom would be of die board.
I bought two boards at Home Depot and took them to the shop. We set up the table saw to cut dadoes on either edge of the boards to inlet the bottoms and tops. Then we cut two 16 inch and two 9 1/2 inch lengths for the sides and the ends out of each board. Next we cut rabbets in the sides to let the ends fit in between them. We cut down one end of each box to allow the top to slide out. Then we cut out the tops and bottoms from the die board, attached a batten to each top as a pull, and then glued up one of the boxes. The other will have to wait for another time as we don't have enough clamps to glue two at once. I took the finished one home and the other we will keep at the shop as a model. The whole project took a couple of hours but the next ones should go quicker.
September 7th, 2017
Posted by Paul

Sometimes the old Langdon miter box is the best tool for the job. We needed to cut miters in some stock that was slightly too large to fit in the power arm saw. With a stop clamped to the fence and the stock clamped against the stop, we made eight perfect cuts to produce sides for a small box.
September 3rd, 2017
Posted by Paul

We built another step stool out of an old pine plank we found in the shop. Neither of us has any idea where it came from, maybe it was there when Marcia bought the house. It was the hardest piece of pine we have ever worked with, hard to cut, hard to plane, hard to chisel. We forgot to saw the top to length and after we cut the dadoes it was too late, so this one ended up three inches longer than standard. In my view, the extra length makes it more like a low bench than a step stool, but still perfectly functional for either use. We are getting quick at building these and had it in the clamps in just a couple of hours. All that remains is to jigsaw a carrying hole in the top and put on finish.
September 2nd, 2017
Posted by Paul

I rubbed on three more coats of satin Minwax Wipe-On Poly, lightly sanding with 220 between each coat. Then I sanded with 1000 and gave a last coat, making a total of five. After waiting 21 hours for the poly to set up, I applied a coat of wax. All that remains is to get some levelers to make it stand right on my living room floor.
It was a lot of fun to do this project. Next up, a pine step-stool, then maybe some boxes, wooden bar clamps... Time to do some searching through old woodworking magazines for another good project.
(Yes, I changed the picture. I decided I liked this one better.)
August 31st, 2017
Posted by Paul
We rubbed a first coat of finish on the atlas stand and I took it home. I will put a few more coats on and then wax.
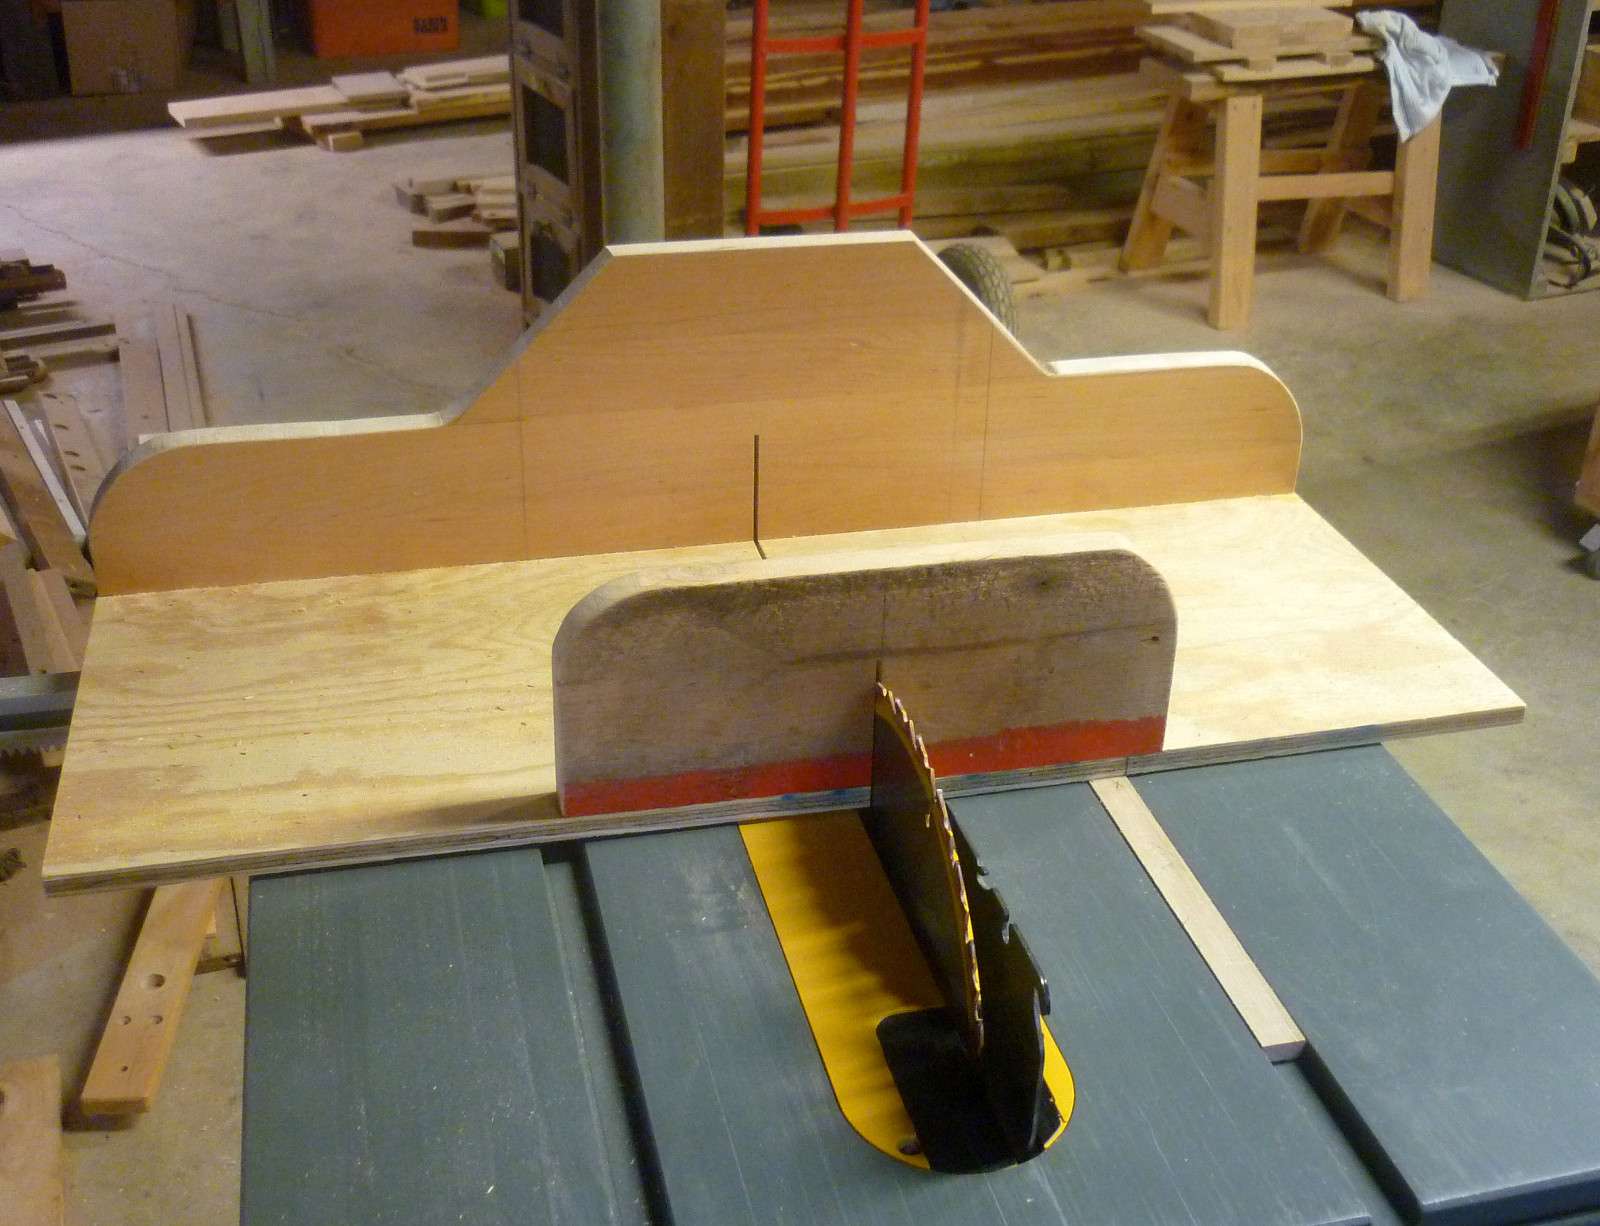
We built a crosscut sled for the table saw from a plan in the July 2011 Fine Woodworking. This should make crosscut work safer and more accurate. It went together easily using mostly scraps we had in the shop. The fence is a nice piece of maple but we have plenty of it and know where to get more.
August 27th, 2017
Posted by Paul
The altas stand is completed and next time we will start rubbing on finish.
Poking around the wood stack we found a length of wide, thick old pine that will make a good step stool. There's enough wood to make another of the oversize ones, suited for the equally oversized modern American.
August 23rd, 2017
Posted by Paul

Joe works in the shop a good deal more than I do, and here are a couple of his recent projects - a box and a crate. Most of these things he donates to auctions for the local burn survivors group, known as Victims to Victors, and another local organization, the Firefighters' Burned Children Fund. Joe's work has been very popular and the Sellers' benches generally bring around $100 apiece for the organizations. Even the smaller boxes and crates can bring $20-$50 each. People have a real liking for this kind of craftmanship, especially when things are priced at a level that the average person can attain.
We continue to build things for young people starting out their independent lives, and if there is something we want for ourselves, we make it. We have both been fortunate to live in modern-day America, where it is easy to make a living, so we have never had to look at woodworking as a means to earn money. That means it has remained a pleasant hobby. Everything we build is given away, either to individuals or to non-profit organizations, or used in our own homes.
August 20th, 2017
Posted by Paul

We got far enough along with the atlas table today that we were able to dry-fit the parts that were cut and get an idea of how it was going to look. Still to come is a trestle cross-piece that will be mortised through the uprights, and brackets from the top to the uprights for adjusting the angle of the top. This is going to be a really nice piece, once it is finished, I think. I just need to figure out where in my small apartment to put it.
August 16th, 2017
Posted by Paul

The atlas table is coming along. We glued the top into the frame today.
August 16th, 2017
Posted by Paul
Small utility boxes are a real help for keeping things organized on the boat. I can always use more. They would come in handy around the house as well.
We have built things out of wood we purchased, wood we were given, wood we salvaged from old furniture and buildings. This utility box is built from wood we harvested. A neighbor had a large leyland cypress tree cut and stacked the rounds on the curb. I loaded the truck with all it would carry and moved them to the basement, where we split them out and stacked them to dry. That was in April of 2015, and we used some of the now well-seasoned wood in this box. It's good-looking, very light and easy to work, and should be strong enough for small boxes. If I see more you can be sure I will take it.
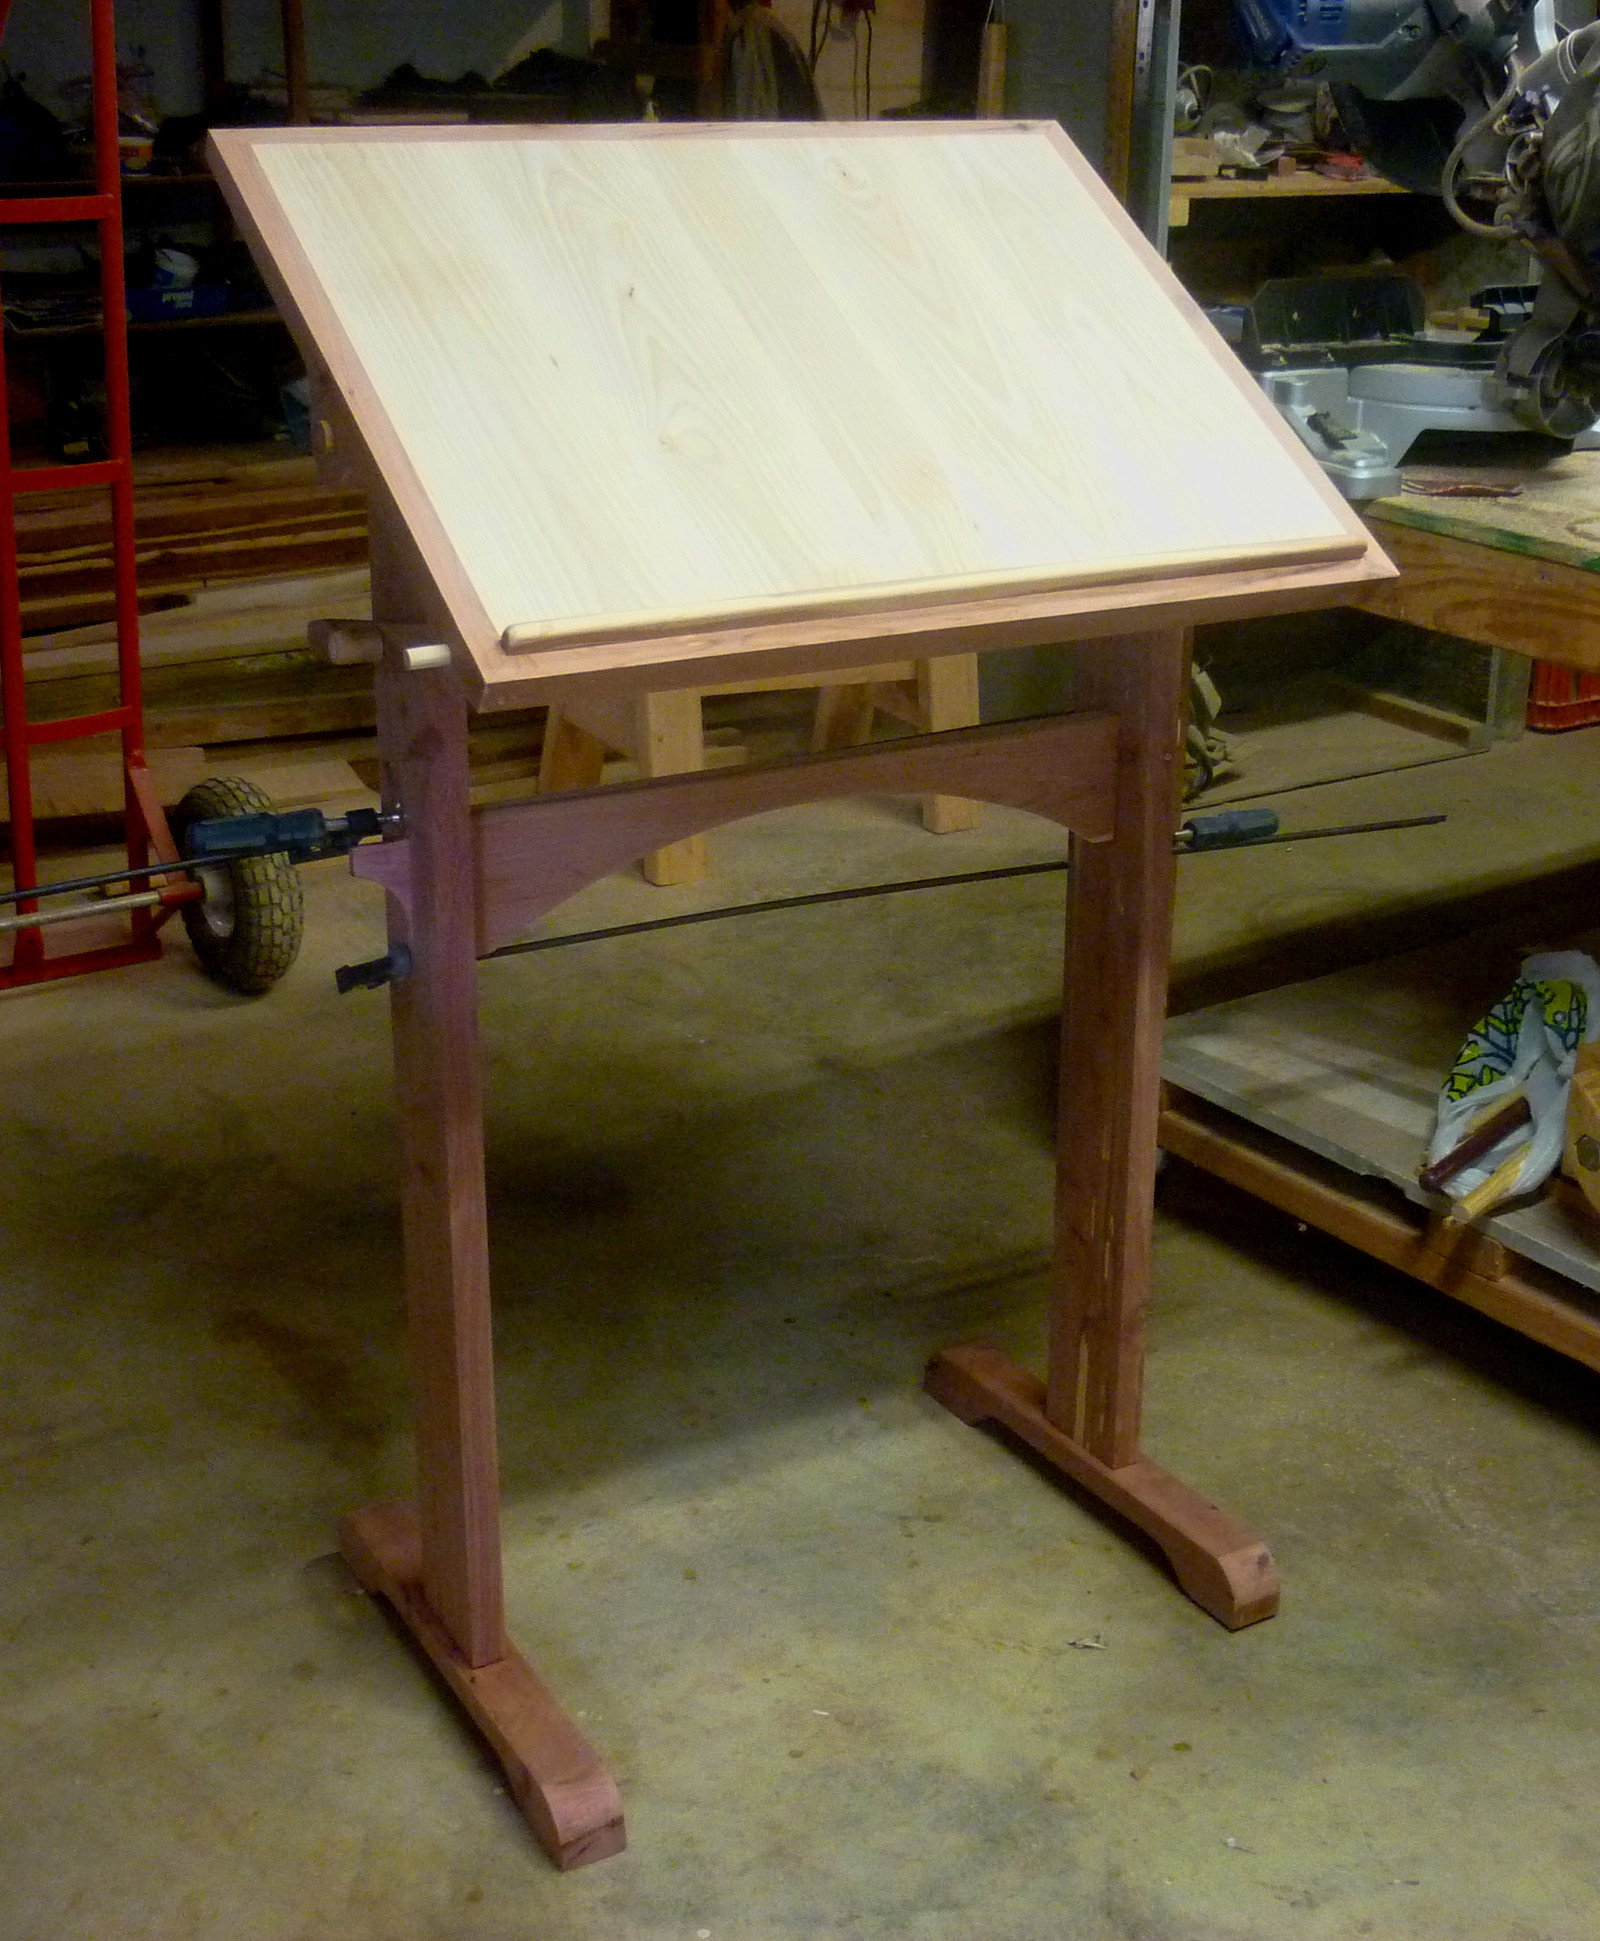
August 14th, 2017
Posted by Paul

I had long wanted to build a stand-up table for viewing my atlases, and we finally started it recently. The top will pivot so it can be set at various angles. Yesterday we glued up the framework for the top. Next we will insert the ash top, which should contrast nicely with the cedar frame.
August 3rd, 2017
Posted by Paul

Both step stools are finished. We decided to keep the big one around the shop for now and give the standard-sized one to Dee. We put third coats of finish on them and I rubbed Dee's down with wax. She picked it up on her way to work and was very pleased.
The old heart pine was fairly easy to work and we have our eyes open for more.
July 31st, 2017
Posted by Paul

Old heart pine glows under a second coat of poly.
July 26th, 2017
Posted by Paul

The latest step stools got first coats of poly today. Just as we expected, the grain and color are spectacular. This wood is old heart pine, not easy to find. It isn't so full of knots as the second-growth wood available at the lumber yard.
July 23th, 2017
Posted by Paul

Losing count on how many of these small step stools we have built. The original plan was laid out to build two from a 6 foot 1x12 shelving board. Then we built one from leftover oak, and lately two more from a plank of heart pine. So there's five. Could be more that I have forgotten.
July 16th, 2017
Posted by Paul

So, this is what we did with half the plank that Dee gave us. It's a bigger version of the step stools that we built a while back out of 1x12 shelving board. The step stools were designed for reaching high shelves but this one, with its wider tread, is suitable for heavier work that might require a lift. We will keep it in the shop for the time being for times when we need to get up over a piece of work.
This old heart pine should really look good once we get a couple coats of finish on it. And once we get done with this one, there is enough wood left to do another. That will have to wait, as I will probably be out of town for a week or ten days.
July 14th, 2017
Posted by Paul

Dee's table is delivered and back in its place in her home. She will take care of painting the leg extensions and the scrapes from working on and moving the table. Dee is a fantastic cook and I'm sure that many great meals will be served on this table, and that her guests will appreciate being able to sit up close.
Some years ago Dee's neighbor gave her a plank of heart pine from an ancient farmhouse that was being torn down. She kept it, thinking some day she would have a coffee table made from it, but that plan went by the wayside. Today she gave it to Joe and I, to use however we liked in the woodshop. The plank was 15 inches wide and 7 feet long, and we took it straight to the shop and started a project, which will be featured in my next post.
July 11th, 2017
Posted by Paul

My friend Dee has a beautiful little house out in the country, with an antique farm table in her dining area. The frame is a little low to comfortably sit up close, so she asked me to extend the legs by about 3 inches. We cut tenons on the end of each leg, then built up mortised ends to fit over the tenons. We got them all cut and glued the first day, and next time we will put pins in to get extra strength, and start shaping the extensions to match the taper on the original legs.
July 6th, 2017
Posted by Paul
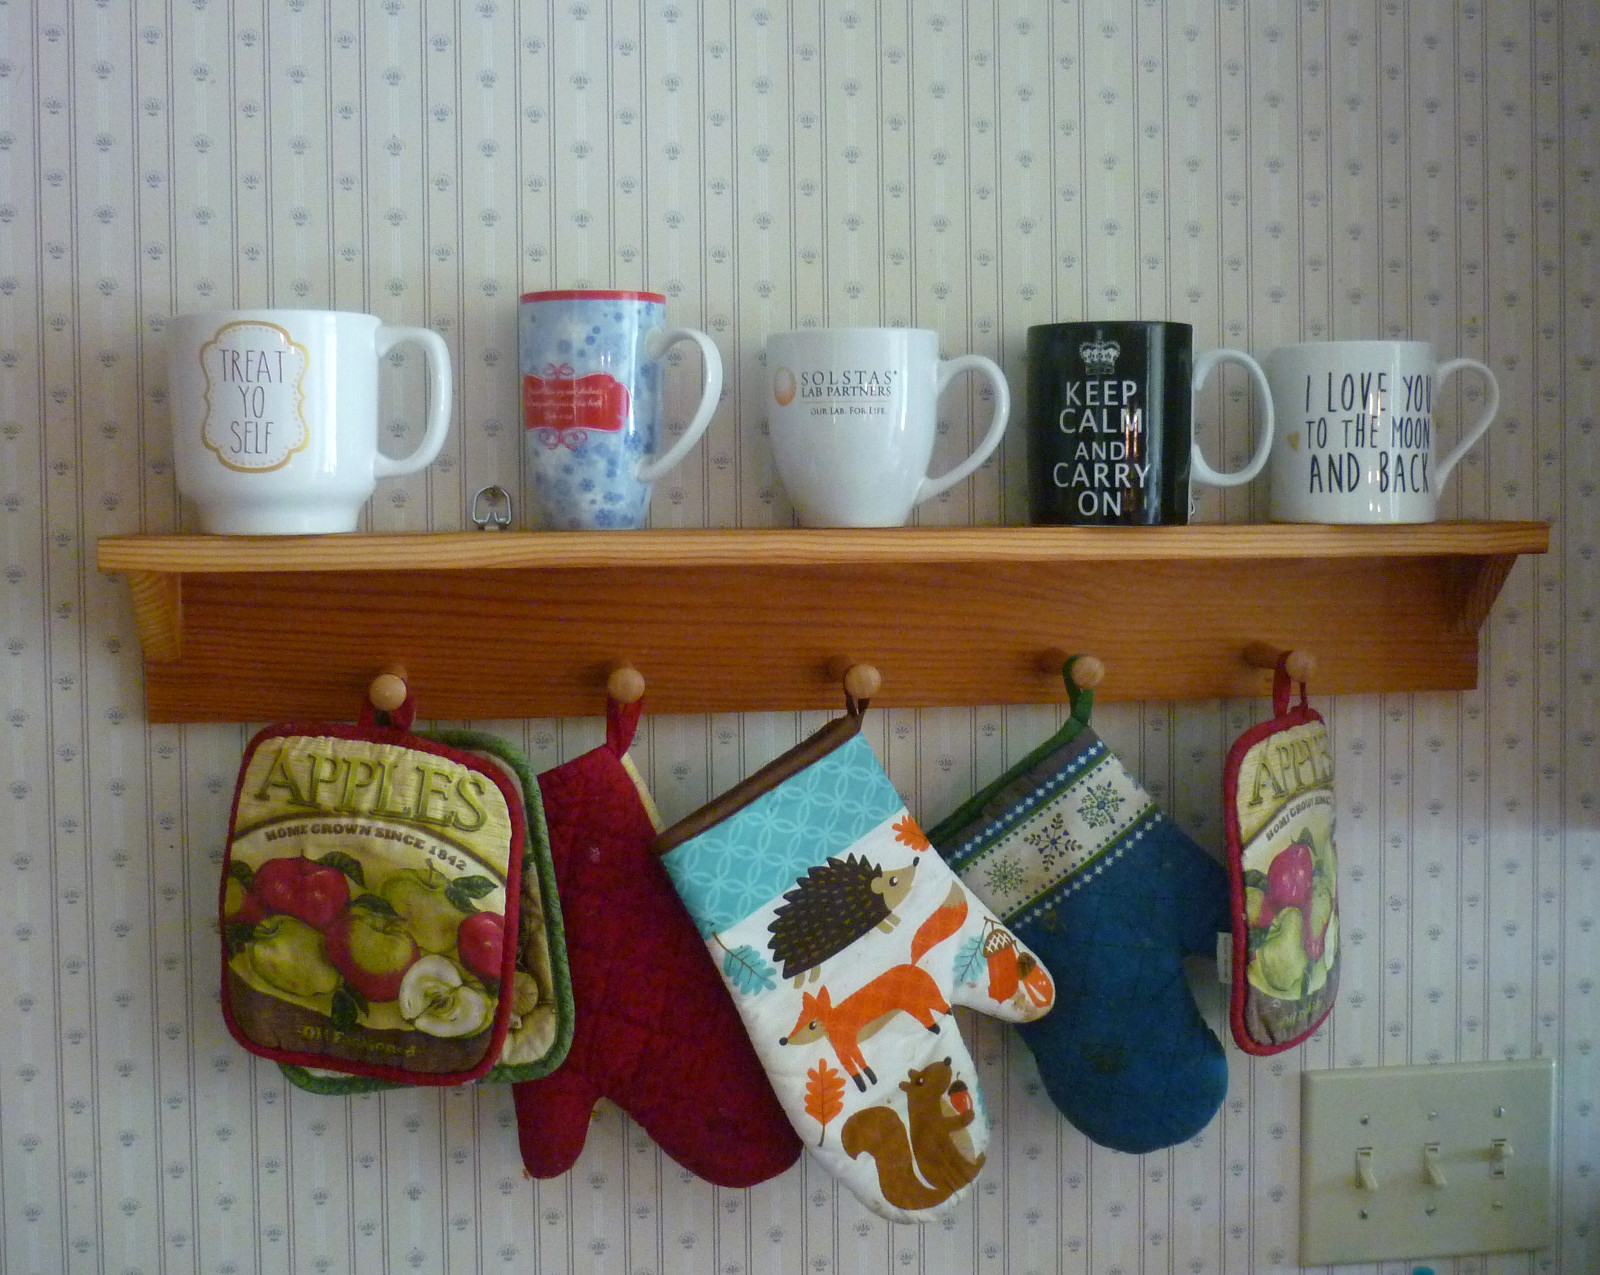
This coat rack that Joe built hung at the door to Marie and Levi's old house, but they have a closet for coats now, so it has been repurposed as a coffee cup and oven mitt rack in the kitchen.
July 1st, 2017
Posted by Paul
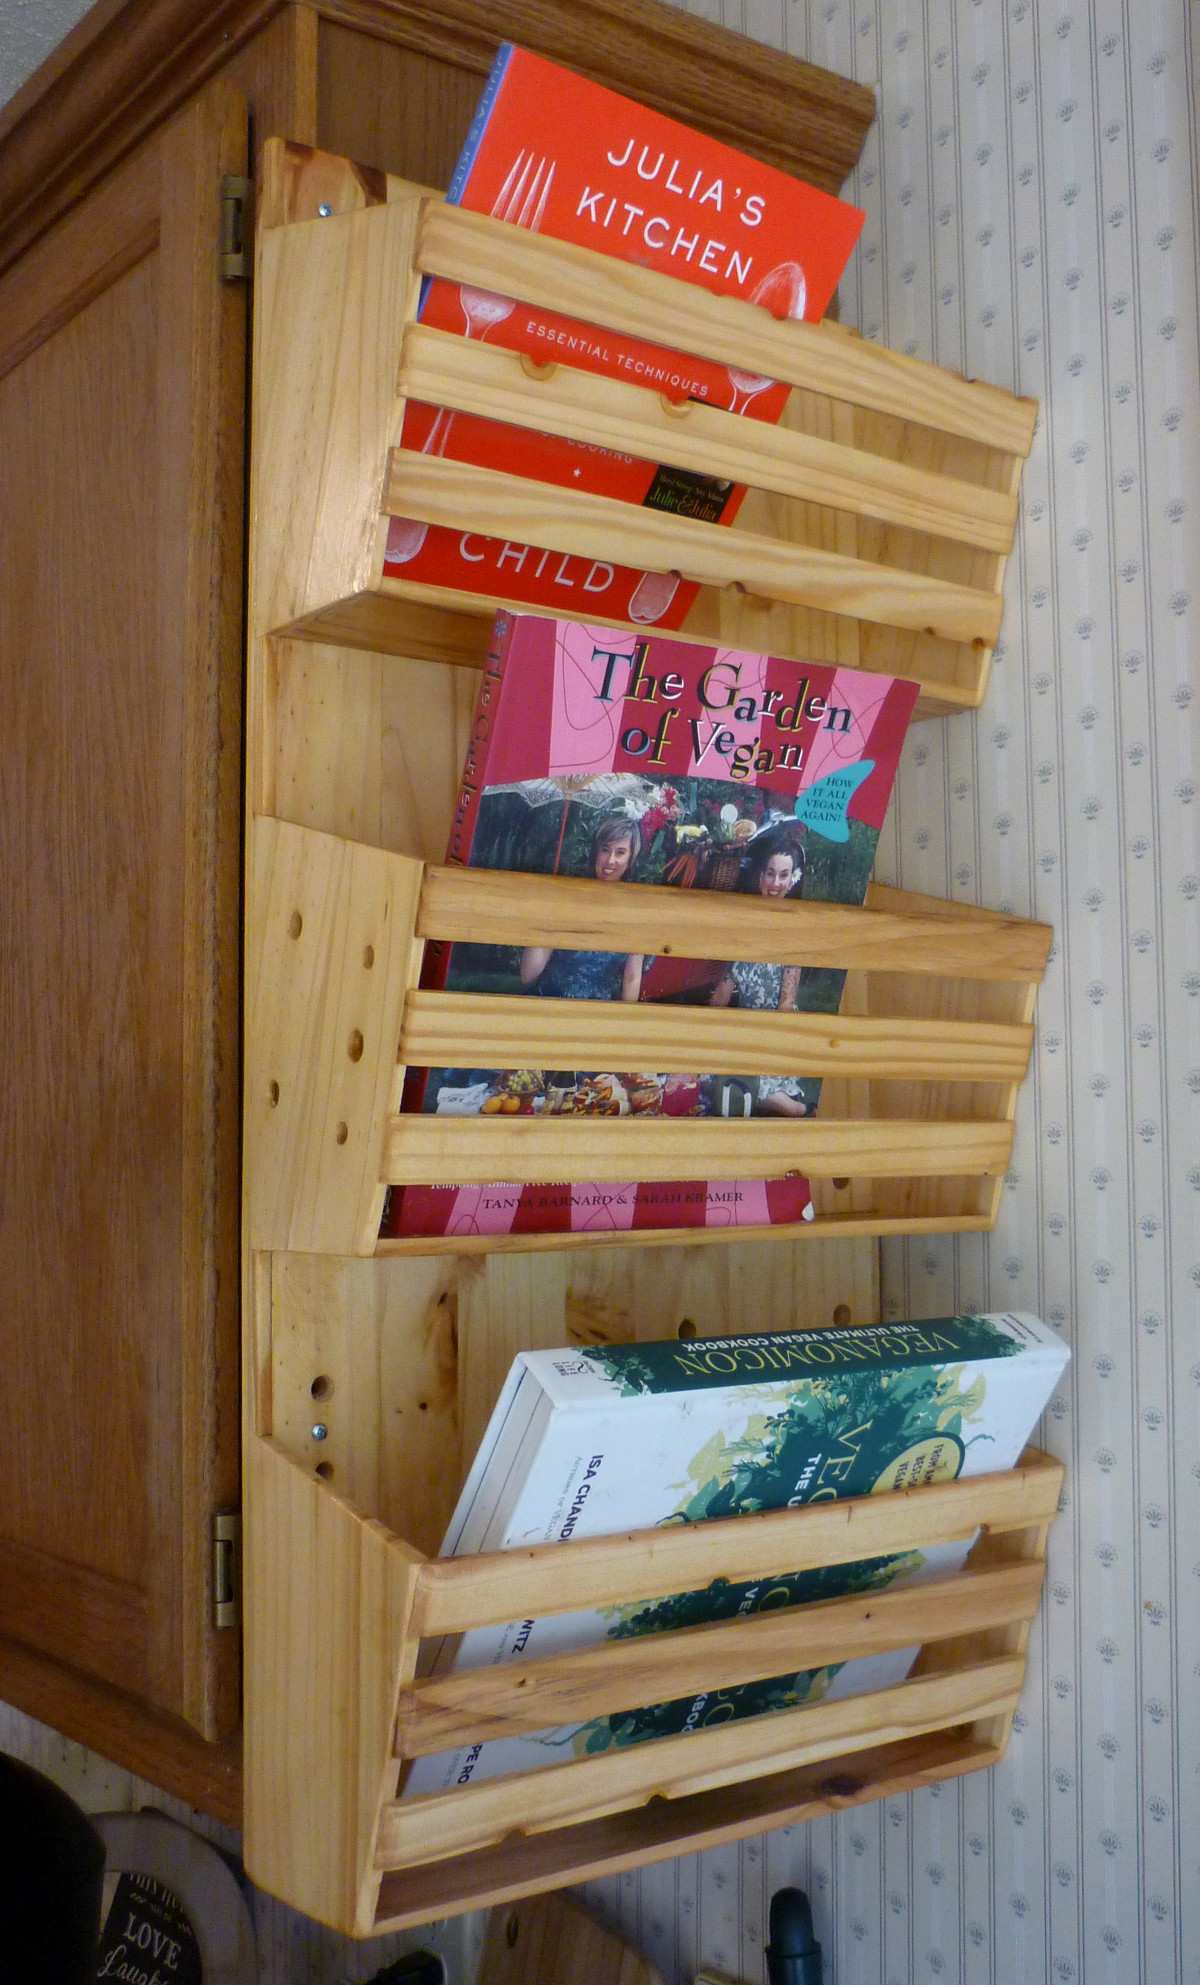
Marie likes her cookbook rack and has started filling it up. I overestimated the size of her cabinet and drew the rack so large that it ended up just barely fitting the space available - but fit it does; there is no interference with either the cabinet door or the door to the garage.
June 30th, 2017
Posted by Paul

Nothing out of the ordinary about this glue-up, just a standard clamp job making four narrow boards into one wide one. The wood, on the other hand, is something different. It is Leyland Cypress, harvest wood from a tree that was cut down in my Ardmore neighborhood. I picked up some of the rounds and brought them to the shop, where we split them down, ricked them and let them dry, and then milled them into useable lumber.
June 28th, 2017
Posted by Paul

Marie asked for a rack to hang in her kitchen for her small collection of cookbooks. We came up with this design similar to a magazine rack and built it out of salvage wood from a frame of some sort. The holes where pins held the frame together are clearly visible. We didn't do anything to disguise or hide them. We are coming to the view that salvage wood can show its honorable scars with pride.
This is the piece that was so bound up in clamps a few days ago. At this stage it has a coat of Waterlox as a sealer and it will probably get a coat or two of poly before it is done.
For something so simple, it has a lot of parts - 29 in all. With the resawing to get thin stock, odd angles on the sides, rabbets and dadoes, complicated glue-up, and all the parts, it was a bit of a challenge, but it went together with no problems.
June 22nd, 2017
Posted by Paul

With a few minutes left over at the end of the day, we made this oaken mallet to go in my toolbox at home.
June 22nd, 2017
Posted by Paul

Well, I'd say we have this one pretty well tied down. You can't even tell what it is, from all the clamps and the 25 pound weight. We call this "Son of Clampzilla".
June 18th, 2017
Posted by Paul

While I was gone to the coast, Joe started work on this exquisite inlaid cedar box. It is close to being done. He just needs to cut off the top (he assures me there is no weight trapped inside), add hardware and finish. I told him as nice as the box is he should find some really good hardware for it. A rubbed finish would be worth the effort. He tells me making the inlay was not that hard, and he may make another box to this pattern.
May 24th, 2017
Posted by Paul
I brought my board home and rubbed it down with cooking oil. Afterward, I decided that it should be tested. It works!
May 24th, 2017
Posted by Paul

When I got to the shop today, Joe was in the process of making a cutting board from a piece of leftover cherry, too small to use for another project and too nice to burn. I suggested we come up with something better than a simple butt joint for the breadboard ends, so we decided to tongue and groove them onto the central section. Since we don't have the proper match planes we cut the joints on the table saw. The board came out well enough that we decided to make another very small one for me to keep on the boat. We made mine from hard maple with walnut breadboards.
May 22nd, 2017
Posted by Paul

I mentioned a maple benchtop and machinist's vise in an earlier post, and here they are, installed in the forecabin of my sailboat Terry Ann.
May 21st, 2017
Posted by Paul
While I was at the marina, Joe built several more items, including these two boxes. The one in the back is poplar, showing the wide color variations the wood is known for, and the one in front is good solid oak.
May 3rd, 2017
Posted by Paul

There is still a lot of white space on the walls of the Smith's new house, and this corkboard, our third, fills some of it.
May 2nd, 2017
Posted by Paul

Since the earliest days of the woodshop, one goal has been to make decent, solid, useful furniture for young people who might otherwise have to buy pressboard junk from the big box store. This crate is something Katie asked for. At her age, she can expect to move every year of two, and the crate will be a safe container for valuables that she might not trust to a cardboard box. In between moves, it will serve as a bookcase. This is Joe's work, though I helped with the glue-up.
On the workbench is an inch-thick hard maple block that will serve as a workbench on my boat. The big Babco machinist's vise will be bolted to it, and the whole assembly will be secured atop a small bureau in the forward cabin of my boat.
April 30th, 2017
Posted by Paul
Here is the second corkboard. There is a minor construction change that Joe and I agree makes it look better than the first - the corners of the frame, trim and shelf are rounded. I like the color of the wood, which we think is Douglas Fir. This one will go to Marcia. The first one, which we consider as the prototype, will stay in the shop. My hope is that we will make several of these, in various woods. I think they would sell easily at the Firemen's fundraiser, and I also think that friends who see one will want one.
April 29th, 2017
Posted by Paul

Joe made a little crate out of cherry for a friend in the burn survivors' group. He took it to the last firemans' sale to deliver it, and somebody saw it and wanted to buy it. Deanna graciously allowed it to be placed in the sale to benefit the burned children's fund. Joe made another one for her and this time I hope he will deliver it at one of the group's meetings. The cherry comes from a bedframe salvaged from along the road. I haven't had much chance to work with it, but Joe tells me it is very easy to shape and sand. Add to that it's beautiful grain and color, and it is no wonder that it has long been one of the premier American woods for furniture. At $4.90 a board foot, we probably won't be buying any, but we'll pick it up off the side of the road every chance we get.
April 28th, 2017
Posted by Paul

We don't actually sell anything but we still call it payday when we have a lot of work to finish at once. Here are nine items getting first or second coats of polyurethane. Most of this is Joe's work since I have been out of town for most of the month.
April 28th, 2017
Posted by Paul
Joe built several things while I was away at the coast, including this box. He used a common technique for building boxes, glueing up all the sides, including the top and bottom, into a cube and then sawing all the way around to cut off the lid. During the glueing stage, he put a five pound dumbbell in the box, something we often do to keep the weight of the clamps from flipping the box off the bench. When time came to glue on the top, he forgot the dumbbell and entombed it inside the cube like some poor cat out of an Edgar Allen Poe story. Fortunately, he was able to saw the lid off with the blade set just a hair over the thickness of the box walls and retrieve the dumbbell with no damage done.
April 6th, 2017
Posted by Paul

We're close to finishing the cork board, which hopefully will be the prototype for several to follow. All it needs is a couple more coats of finish and then for the cork and backing to be applied. What made this project easy is that most of it is made from 1 1/4 by 9/16 inch pieces of varying lengths. We can mill out long sticks on the table saw, cut stepped rabbets for the cork and backer, and then cut individual pieces to length. The tray and trim piece at the top are different dimensions, but still out of 9/16 stock. Cutting these pieces to wrap around the frame is the only part of the job that takes any hand work or close fitting.
The best cork I could find was only 3/32nd inch thick, so we laminated two layers to get it up to 3/16. Not having glued cork before, we did some tests with yellow glue and contact cement. Each worked fine, so we decided to use the quicker and less noxious yellow glue.
April 4th, 2017
Posted by Paul

We finished up a couple of projects today, putting final coats of finish on a shoe rack for Marie and a tool tote that I will take down to the boat. Last time I was at the boatyard I found my tools getting scattered all over the place, and maybe having a tote will help me keep them together. We have built at least ten of these totes, and this one went together fast and easy.
We started a new project, a cork board. I have high hopes for this to be something we might like to make as a regular production run. For the most part it is machine work with just one small step requiring hand work.
It's the city's bulky item pickup in Joe's neighborhood, and he drove around with Marcia scouring trash piles for good items. They found several decent pieces of furniture that can be restored or parted out. The basement is packed full of small dimensioned wood that will make good boxes, crates and racks. We still have plenty of cedar, West Salem yellow pine, hickory and poplar. In fact, I don't think we have ever had so much wood on hand.
April 3rd, 2017
Posted by Paul

Joe is very active with the local burn survivors' group. One thing they do is participate in auctions and sales to raise money for the Firefighters' Burned Children Fund. Joe has built and donated many items that have raised hundreds of dollars for the organization. Marcia crochets items for the sales, and they have been big sellers too. In appreciation, the Firefighters gave them medallions. Joe mentioned that I helped out on some of the builds and they sent one for me as well.
April 2nd, 2017
Posted by Paul

Yes, another Sellers Bench, in cherry. Joe did about 90 percent of this one and tells me that cherry is very easily worked. The source for all this cherry Joe has been using lately is a salvaged bedframe that somebody turned up. That's good because cherry at Wall Lumber is running $4.90 a board foot.
In addition to glueing up the Sellers Bench, we built a tool tote for me to take down to the boat, started glueing a shoe rack similar to the one we built Marie, and coated several items with polyurethane.
April 2nd, 2017
Posted by Joe

I made this cherry crate for a friend and took it, full of fudge, to the Fire Fighters' Burned Children's Fund spring sale. A shopper saw it and wanted it and paid $50 for it, so I am building another for my friend. I am so pleased that these crates have become so popular. They aren't too difficult to make, so I think I'll take one to each event and maybe won't bring any back home.
April 1st, 2017
Posted by Paul

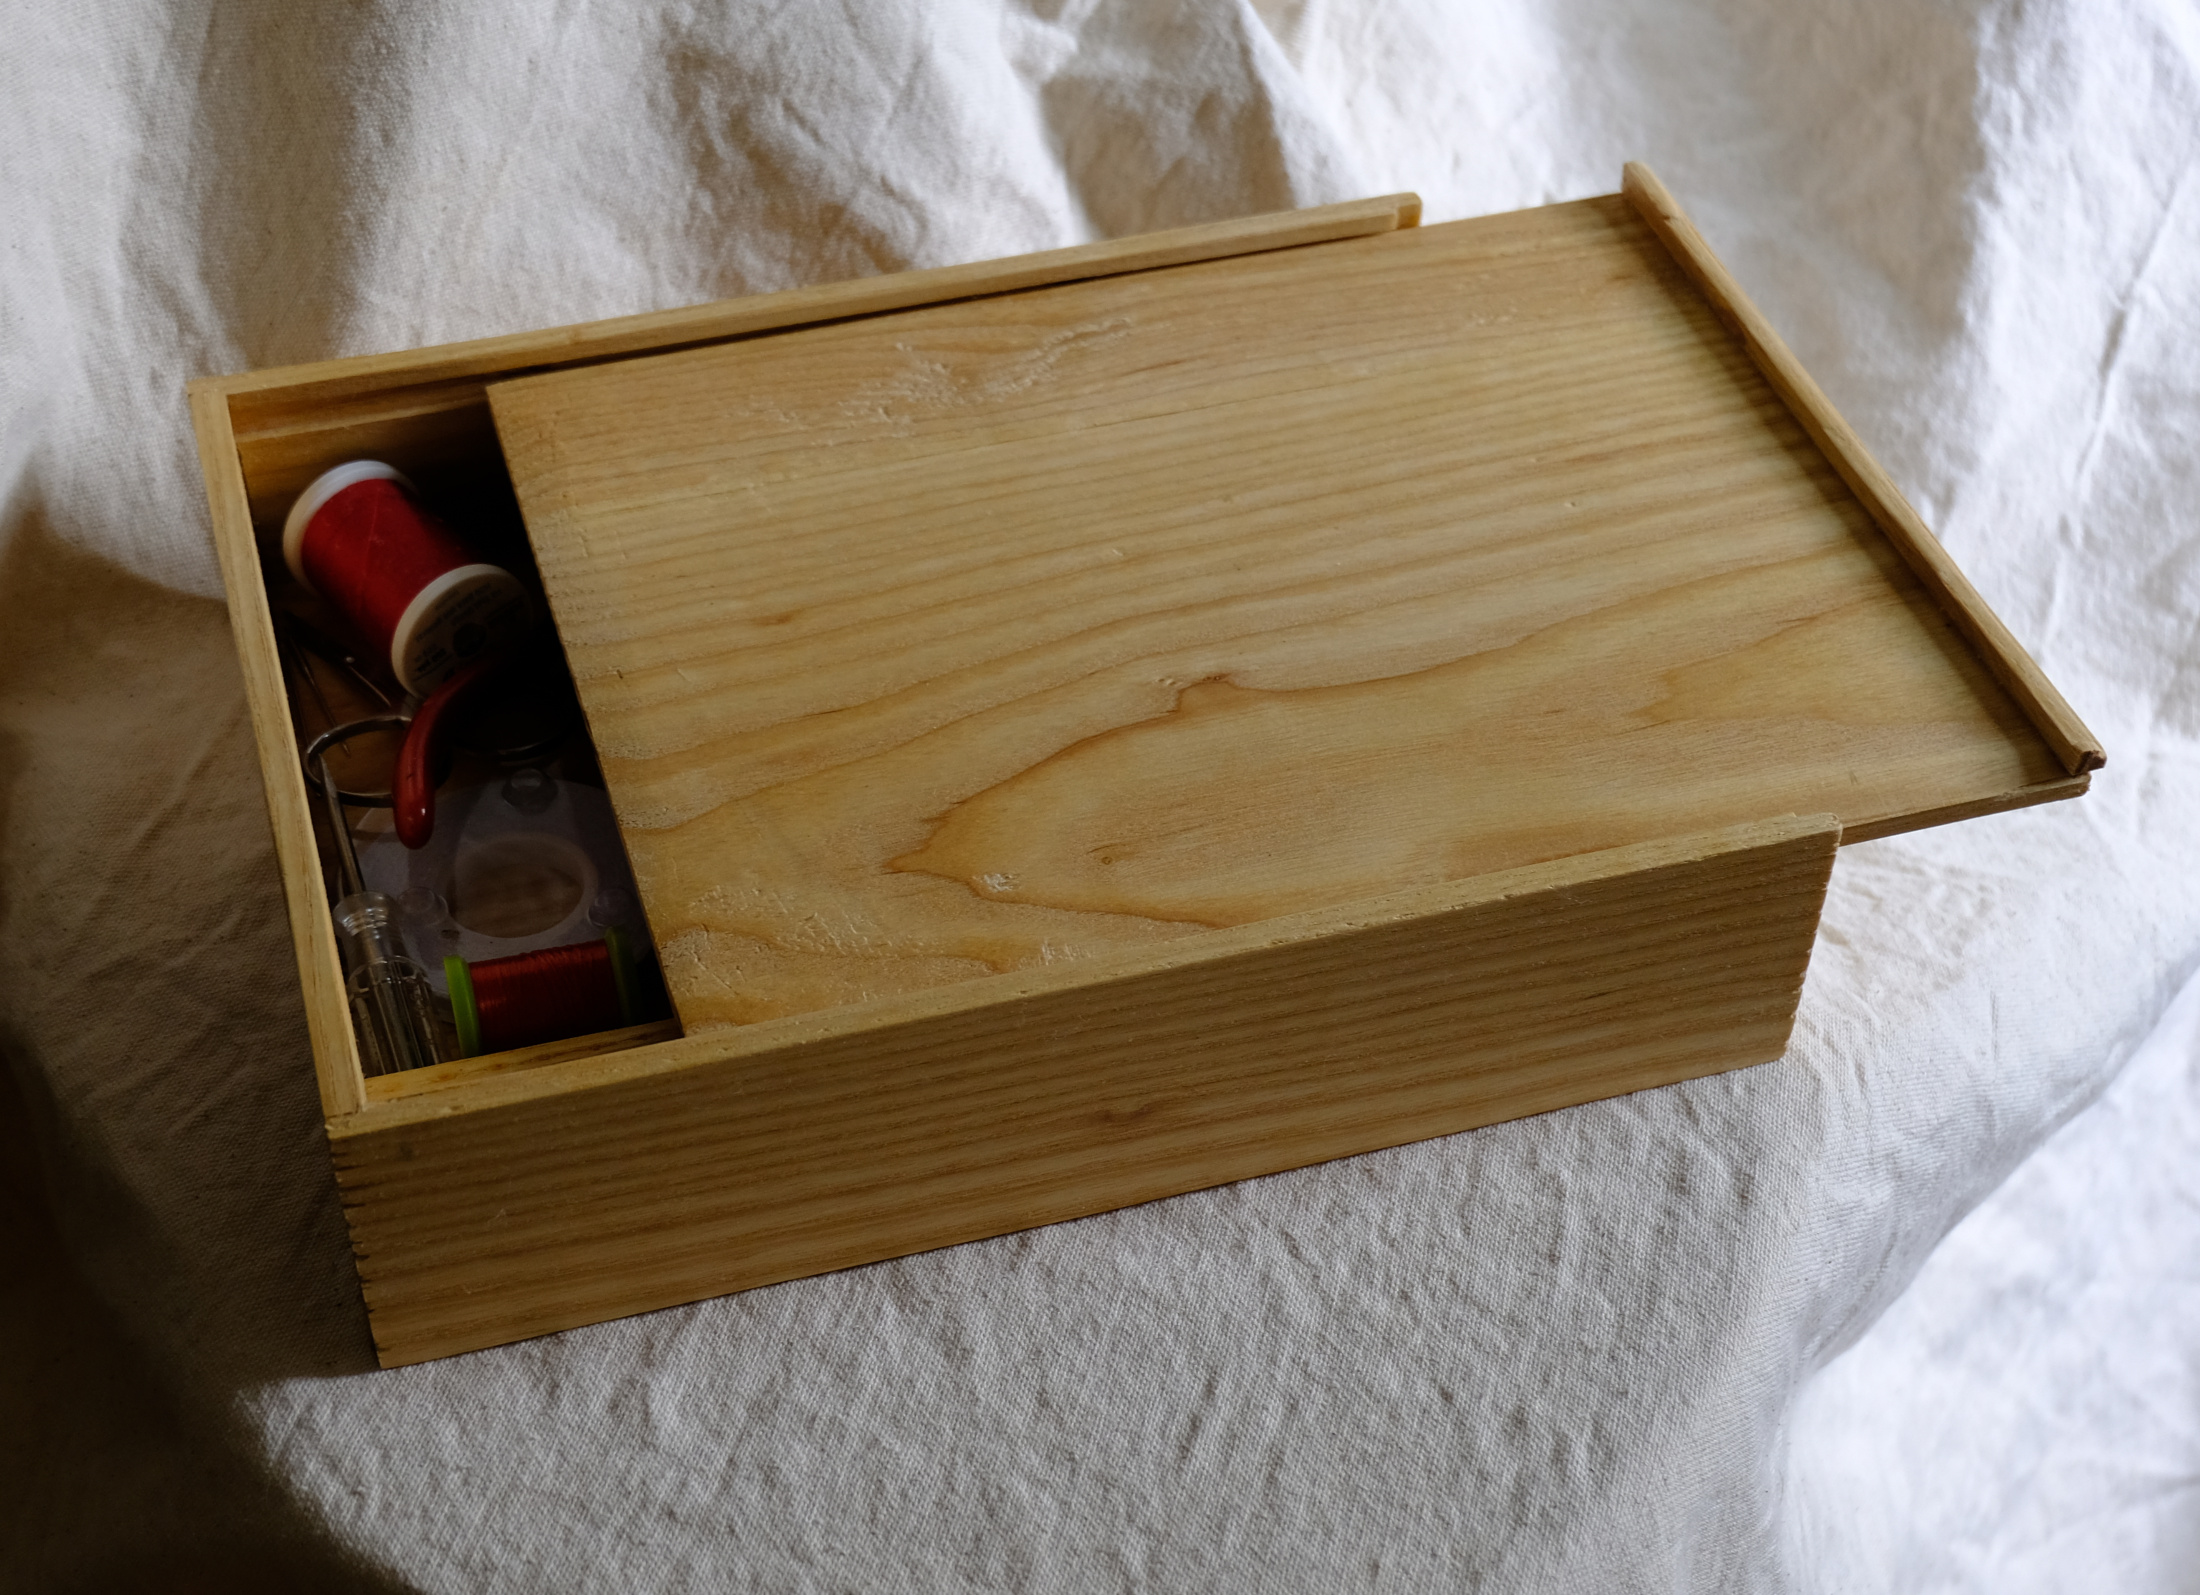
One of the reasons I like making things for Marie is she has a specific need to fill when she asks for something. Nothing gets pushed to the back of a closet and forgotten. Here is her little tray to keep her herbal teas organized, that we made last October.
March 31st, 2017
Posted by Paul

Our first big project, finished three years ago to the day, was this cedar-topped table for Marie and Levi. It has served them well in three houses now and shows hardly a scratch in the polyurethane topcoat. No wobbles either.
March 17th, 2017
Posted by Paul

The big pile of parts has been assembled and all that remains to do is to sand and finish. I got the general design from the July/August 1995 issue of Fine Woodworking magazine. Felix Marti, the author of the article, made use of lots of identical parts - four identical legs, four shelves, several feet of molding that just had to be chopped to various lengths - to make for a quick and simple project. We dispensed with the formica shelf covering and used pegs through inserts rather than screws, but followed the directions in the article for the most part. The router jig for making dadoes that Felix designed served us well and was easier than cutting them on the table saw.
March 15th, 2017
Posted by Paul

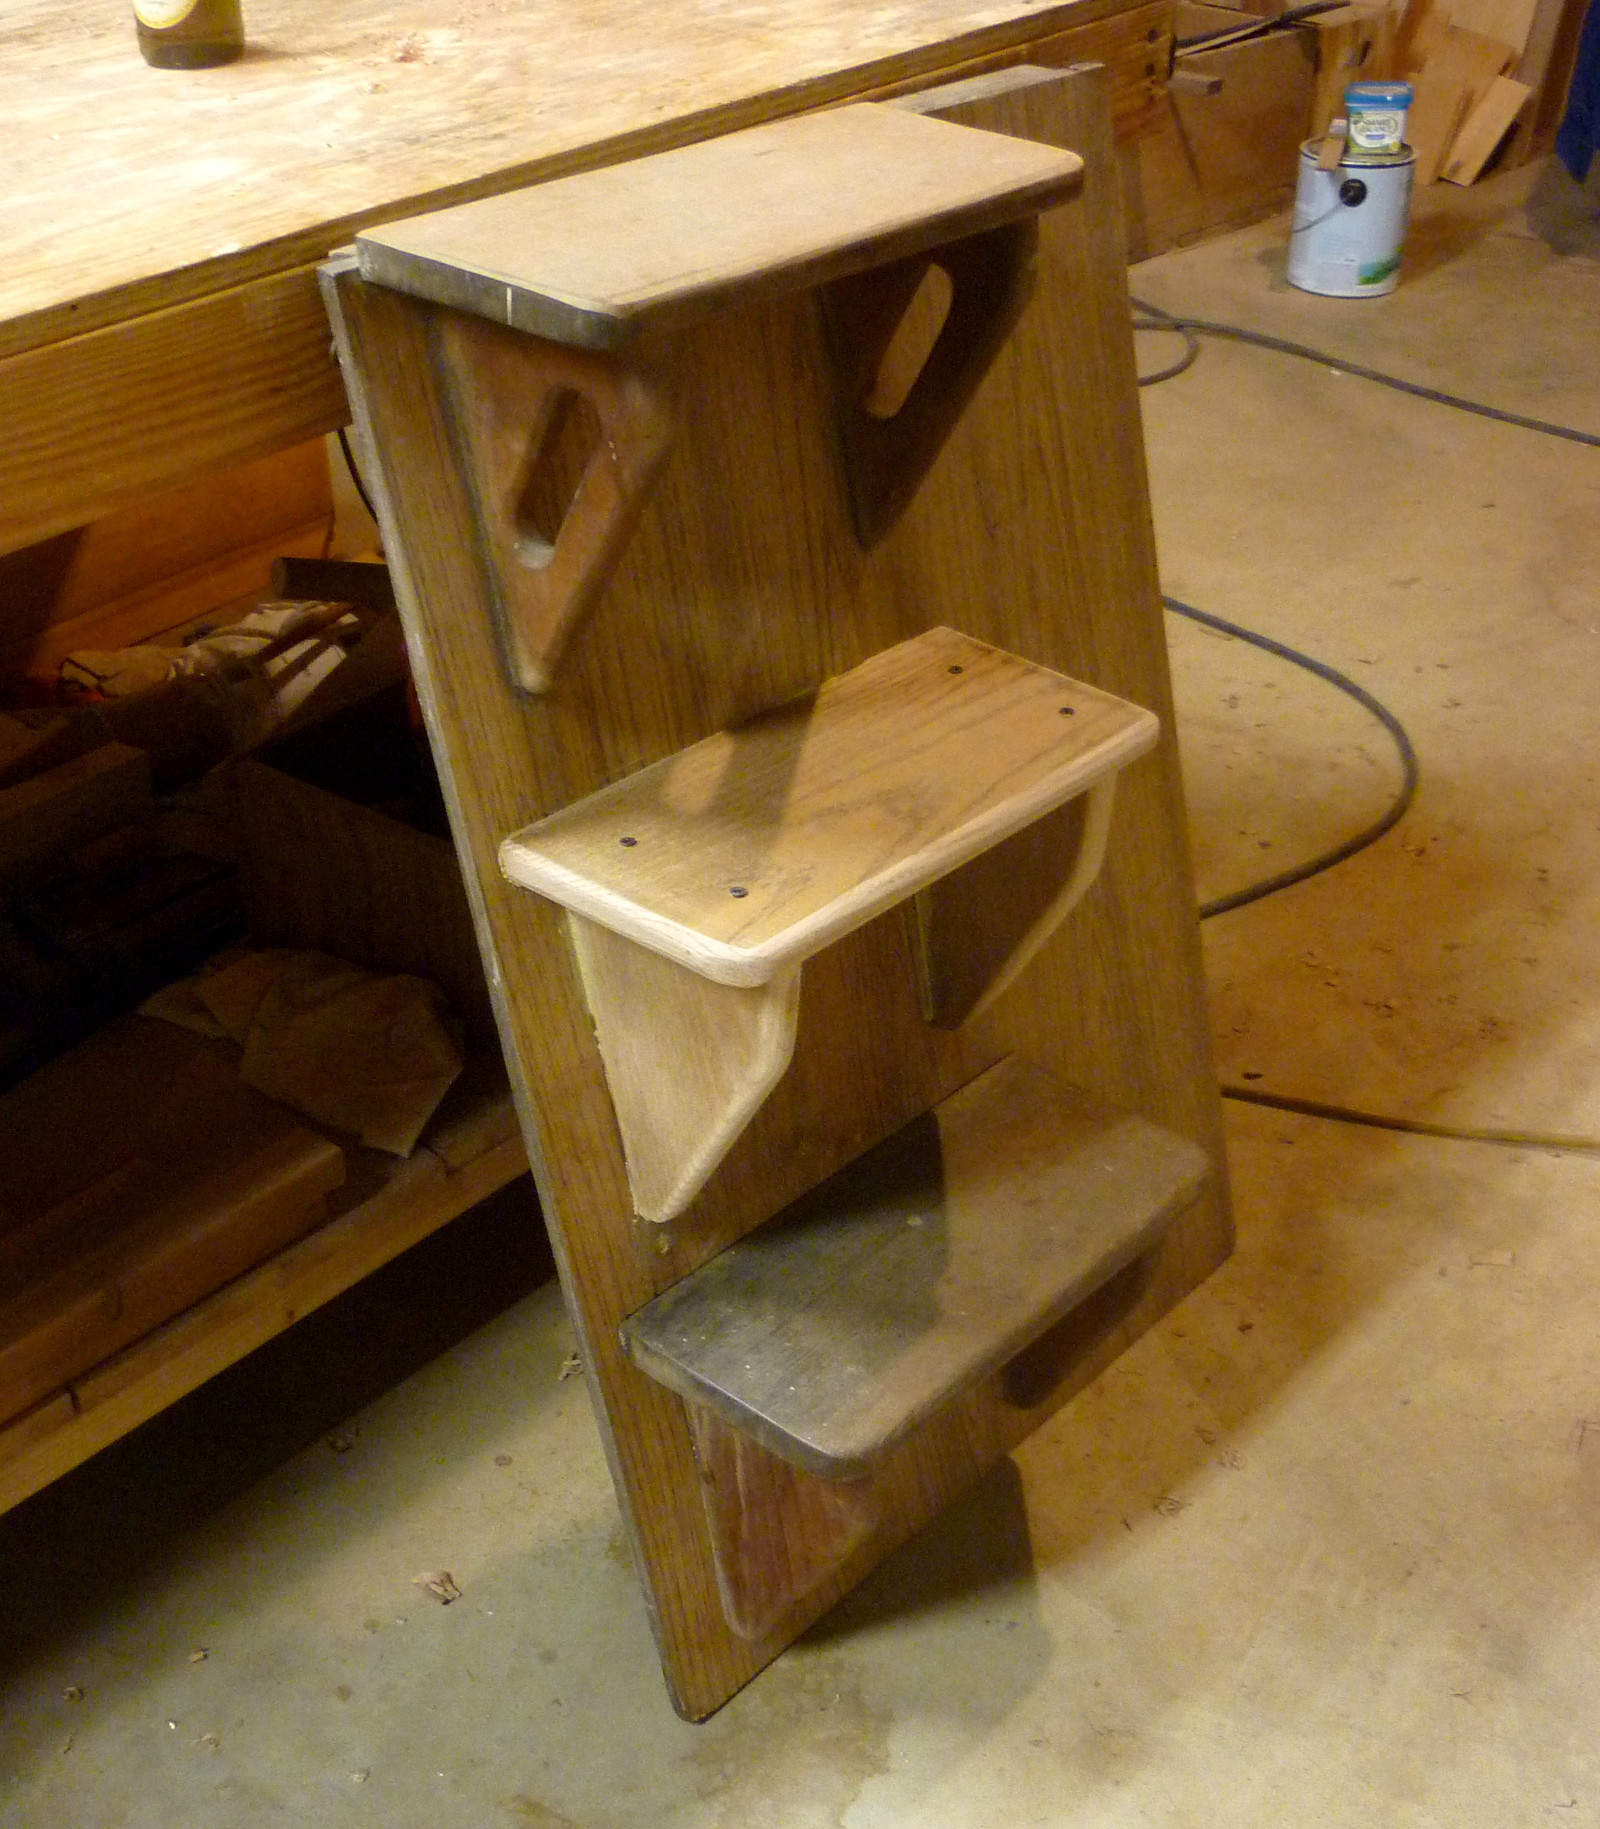
Big pile of parts for a shoe rack we are making for Marie. The four plywood shelves have holes in the corners for inserts that will accept dowels pinned through the legs. Trim pieces will cover the edges of the shelves. This project will rival Lars' rocker for most pieces, though it is much less complicated to build. We have materials available to make a second smaller one once this one is complete.
March 13th, 2017
Posted by Paul
We built this jig for plowing dadoes with the router.
March 9th, 2017
Posted by Paul

Last time I was in town we built this little utility box to hold bolts, nuts and screws. I took it to my boat and it has been very convenient. I need a few more.
March 1st, 2017
Posted by Paul

We built a couple of these step stools a while back, dimensioned to use 3 linear feet of 1x12 apiece. This one is slightly smaller, dimensioned to use a small piece of oak left over from another project. Using mostly machine tools, we built this one in not much more than an hour one afternoon.
February 16th, 2017
Posted by Paul

The teak first aid box got hardware today, and then a final, rubbed-on coat of poly.
February 15th, 2017
Posted by Paul

The companionway steps we modified a few weeks ago are now installed in the boat. They will make it a lot easier and safer getting in and out of the cabin.
Most of what we have done lately has been related to the boat. We have stripped and started refinishing the main boom, built a mast spreader to replace one that had rotted, and started work on a trim piece for the companionway cover.
January 22nd, 2017
Posted by Paul

Joe built this small Japanese toolbox out of teak. We still have a bit of it left from the old garden furniture that Graham gave Joe a while back. If I ever find a source for salvaged teak, I will take all I can get. It is easy to work, strong, impervious to rot; the only drawback is that it doesn't adhere well with regular yellow glue, so we have had to learn to use epoxy.
Joe commented on how he looked back over the site and was amazed at how much production we had completed since we started the shop in September of 2013. Considering that this is only a hobby for either of us, and we can only give it a few hours a week, I have to agree.
January 6th, 2017
Posted by Paul
A great day in the shop. First, the pleasure of seeing my dear friends Marcia and Joe, after a long absence. Second, starting and completing a project that will make my recently-acquired boat safer and more comfortable.
For the most part, my Alberg 35 Terry Ann is well-designed and easy to get around. But the entrance through the companionway and down the ladder to the cabin sole leaves a lot to be desired. As built, the first step down from the cockpit, through the companionway to the top of the motor casing, was 20 inches deep, then there were two steps down from there, each 16 inches. That first 20 inches is yet to be resolved, but today we rebuilt the motor cover to add a step so now there are three steps, each just under 11 inches. This was a priority since I slipped off a step a few days ago and took a painful fall. The project involved unbolting the bottom step and moving it down, then building a new one out of oak to go between the top and bottom. With Joe and I each working on different parts, we managed to complete this job in one afternoon.
I am going to paint the whole assembly white for visibility and add non-skid material to the top of the steps. For the drop from the companionway to the top of the motor case I will probably install steel brackets with a wooden step.
Comments?
Email us at woodshopatjoesbasement
@gmail.com
This is the page for posts from 1/6/17 through 11/12/18. Newer Posts -
Older posts -
Copyright © 2018-2023 Paul M. Clayton